跳转到主内容

当前版本的文档还未经巡查,您可以查看最新的已查核版本

你所需要的

  1. , 屏幕: 步骤 1 中的图像 1,2 , 屏幕: 步骤 1 中的图像 2,2
    • 使用指甲在手机底部的凹槽中撬起并移除后壳。

    • 在拆解工作开始前请确保手机完全关机。

  2. : 步骤 2 中的图像 1,2 : 步骤 2 中的图像 2,2
    • 使用热风枪或者iOpener作为加热工具。 这个指南将指导如何使用iOpener。

    • 均匀地将热量传导到到触摸屏的边缘以松开粘合剂。 一旦屏幕边缘摸起来温暖,请继续执行步骤3。

    • 切勿使用热风枪或者iOpener 持续加热一个点过长时间,这样可能会损坏手机。

    • 在重组时,使用iOpener或者热风枪来让粘合剂重新与新屏幕贴合。加热屏幕边缘位置,对屏幕施加压力,指导屏幕完全贴合。

  3. : 步骤 3 中的图像 1,3 : 步骤 3 中的图像 2,3 : 步骤 3 中的图像 3,3
    • 粘合剂松动后,使用塑料打开工具或者塑料撬片撬起屏幕一角。 吸盘也能帮上忙.。

    • 使用塑料撬片固定一角,继续在屏幕四周进行这个操作,如果有必要的话请加热屏幕。

    • 避免在屏幕边缘撬动时损坏LCD屏幕排线插头。 它位于手机的左边缘,音量控制按键 的正对面。

    • 在重组时,新的粘合剂可能要贴合在旧的粘合剂之上来保证屏幕的贴合。

  4. : 步骤 4 中的图像 1,3 : 步骤 4 中的图像 2,3 : 步骤 4 中的图像 3,3
    • 使用塑料打开工具将显示屏排线ZIF连接器上的锁解锁。

    • 从主板的插座中拉出显示排线。

  5. , 主板: 步骤 5 中的图像 1,1
    • 移除主板侧面上的10颗2.4mm T4螺丝。

    • 移除4颗主板顶部和底部上的4.5mm T4 螺丝

  6. : 步骤 6 中的图像 1,1
    • 如果粘合剂残留物在主板上,请使用Jimmy切割主板和手机背面之间的粘合剂。

    • 小心地从右侧边缘处提起主板。

    • 避免拉动电池线,主板在左下方与电池相连。

  7. : 步骤 7 中的图像 1,1
    • 使用塑料打开工具来断开电池和主板连接的排线。

  8. 这个步骤还没有翻译 帮忙翻译一下

    : 步骤 8 中的图像 1,1
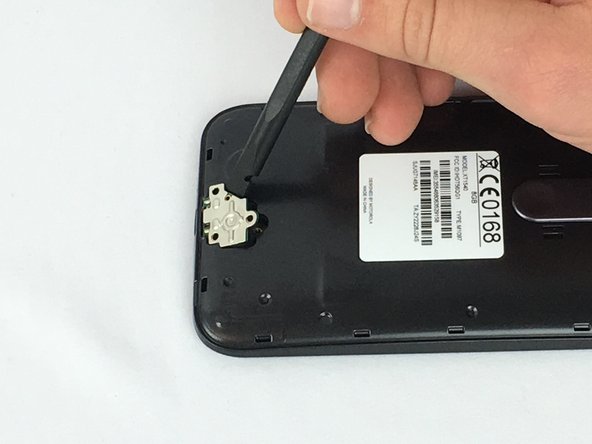
    • Remove the three 3.0 mm T4 screws from the charging port cover.

    • Remove the charging port cover.

  9. 这个步骤还没有翻译 帮忙翻译一下

    : 步骤 9 中的图像 1,1
    • If the charging port is secured with adhesive, use a heat gun around the charging port for ten seconds to loosen the adhesive.

    • Do not heat the area for too long. Excess heat can damage the phone.

  10. 这个步骤还没有翻译 帮忙翻译一下

    : 步骤 10 中的图像 1,2 : 步骤 10 中的图像 2,2
    • Use a spudger to push out the charging port from the inside of the case and pry it off from the outside of the case.

终点

16等其他人完成本指南。

James Copeland

于02/10/16注册

4,022 声望

创作了5篇指南

团队

USF Tampa, Team 1-3, Nance Spring 2016 USF Tampa, Team 1-3, Nance Spring 2016 的会员

USFT-NANCE-S16S1G3

4 名成员

创作了21篇指南

21条评论

Is all this necessary? There is a youtube teardown that states the usb port should be replaceable from just the 3 screws, so no glue gun, no screen removal etc. So just step 9.

So is this repair accurate?

Brendan L - 回复

Step 10 tells you to push out the charging port from inside the case, which would require first removing the screen. Maybe it's possible to just remove the charging port from outside the case like in the video, but it may require a lot of force and pushing it out from inside is just easier.

Ahnaf Siddiqui -

I mean I replace my charging port every 6 months now and I the only thing I do is unscrew the charging port area and get a tiny flathead bit after applying heat and pull off the metal plate. After that, I insert the flathead into the bottom of the charging port from where it plugs and push it outwards.

nikomarquez2013 -

No, it’s not I did sucesfullz replaced microusb port in mz G3 simplz bz removing screws, pulling port from the outside with ?a?little? more force, replacing it and screwing back. 5 minutes, nothing but T4 torx screwdriver.

MarcinEs -

strange issue

my phone doesnt charge..

it always show charging symbol.

now im charging by switching off phone then connecting charger, after it shows charging then i will turn on phone..

it will charge slowly.and it will discontinue if charging cord is moved...

tried using different chargers,cords but still same issue.

cant able to decide wheiter it is a charging port problem or battery or software..

any suggestions???

please mail me...

hamedliar@gmail.com

hamed khan - 回复

添加评论

浏览统计数据:

过去 24 小时: 2

过去 7 天: 24

过去 30 天: 81

总计 49,392