跳转到主内容

Microsoft Surface Pro 5 Power, Volume Button, and Left Speaker Assembly Replacement

已存档的指南
本指南只作为历史记录保留。请使用指南的最新版本来进行维修。

你所需要的

  1. Microsoft Surface Pro 5 Power, Volume Button, and Left Speaker Assembly Replacement, Disconnect the display board: 步骤 1 中的图像 1,3 Microsoft Surface Pro 5 Power, Volume Button, and Left Speaker Assembly Replacement, Disconnect the display board: 步骤 1 中的图像 2,3 Microsoft Surface Pro 5 Power, Volume Button, and Left Speaker Assembly Replacement, Disconnect the display board: 步骤 1 中的图像 3,3
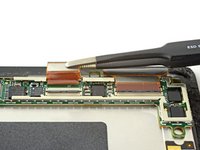
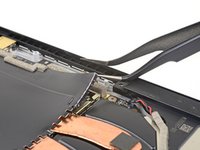
    • Use a spudger to flip up the small locking flaps on the display cable ZIF connectors.

  2. Microsoft Surface Pro 5 Power, Volume Button, and Left Speaker Assembly Replacement: 步骤 2 中的图像 1,3 Microsoft Surface Pro 5 Power, Volume Button, and Left Speaker Assembly Replacement: 步骤 2 中的图像 2,3 Microsoft Surface Pro 5 Power, Volume Button, and Left Speaker Assembly Replacement: 步骤 2 中的图像 3,3
    • Use tweezers to slide the display cables straight out of their sockets on the display board.

  3. Microsoft Surface Pro 5 Power, Volume Button, and Left Speaker Assembly Replacement, Remove the display board: 步骤 3 中的图像 1,3 Microsoft Surface Pro 5 Power, Volume Button, and Left Speaker Assembly Replacement, Remove the display board: 步骤 3 中的图像 2,3 Microsoft Surface Pro 5 Power, Volume Button, and Left Speaker Assembly Replacement, Remove the display board: 步骤 3 中的图像 3,3
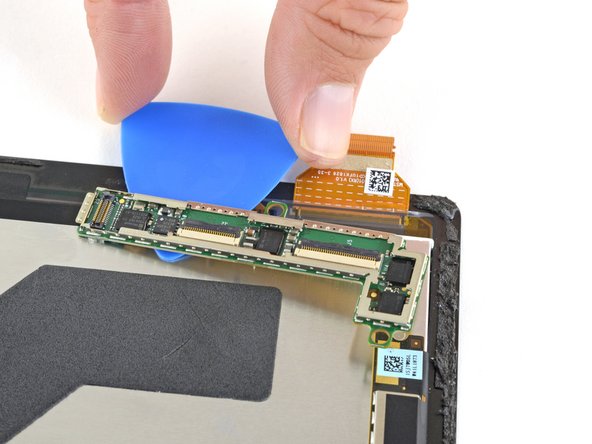
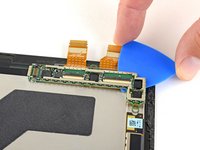
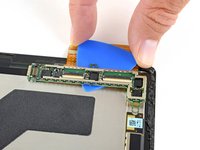
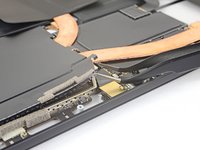
    • Slide an opening pick under the display board to separate the adhesive holding it onto the back of the screen.

  4. Microsoft Surface Pro 5 Power, Volume Button, and Left Speaker Assembly Replacement: 步骤 4 中的图像 1,1
    在这个步骤中使用的工具:
    Tesa 61395 Tape
    $5.99
    购买
    • Remove the display board.

    • During reassembly, use a strong double-sided tape or a precut adhesive card to secure the display board. Clean off the old adhesive before applying new adhesive.

    • To ensure correct positioning, plug in both display connectors before adhering the board to the display.

  5. Microsoft Surface Pro 5 Power, Volume Button, and Left Speaker Assembly Replacement: 步骤 5 中的图像 1,1
    • Only the screen remains.

  6. Microsoft Surface Pro 5 Power, Volume Button, and Left Speaker Assembly Replacement, Remove the heat sink shield: 步骤 6 中的图像 1,2 Microsoft Surface Pro 5 Power, Volume Button, and Left Speaker Assembly Replacement, Remove the heat sink shield: 步骤 6 中的图像 2,2
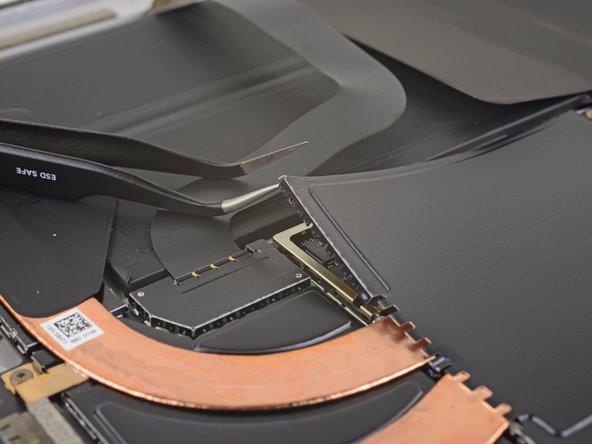
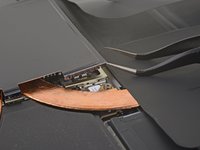
    • Insert one point of a pair of pointed tweezers into a gap in the corner of the EMI shield covering the heat sink.

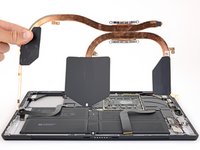
    • Use the tweezers to pry the EMI shield away from the motherboard as much as you can without bending it. Do not remove it yet.
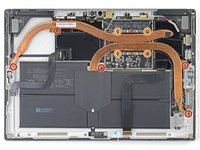
    • Try not to deform the shield too much—you will need to reinstall it during reassembly.

    • Take care not to puncture the battery with the tweezers while working on this shield.

  7. Microsoft Surface Pro 5 Power, Volume Button, and Left Speaker Assembly Replacement: 步骤 7 中的图像 1,3 Microsoft Surface Pro 5 Power, Volume Button, and Left Speaker Assembly Replacement: 步骤 7 中的图像 2,3 Microsoft Surface Pro 5 Power, Volume Button, and Left Speaker Assembly Replacement: 步骤 7 中的图像 3,3
    • Repeat the last step for each corner of the EMI shield covering the heat sink.

  8. Microsoft Surface Pro 5 Power, Volume Button, and Left Speaker Assembly Replacement: 步骤 8 中的图像 1,1
    • Remove the heat sink shield.

  9. Microsoft Surface Pro 5 Power, Volume Button, and Left Speaker Assembly Replacement, Remove the heat sink: 步骤 9 中的图像 1,2 Microsoft Surface Pro 5 Power, Volume Button, and Left Speaker Assembly Replacement, Remove the heat sink: 步骤 9 中的图像 2,2
    • Remove the ten Torx screws securing the heat sink:

    • Five 2.6 mm-long T3 screws

    • Four 3.3 mm-long T5 screws
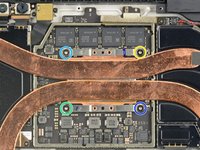
    • During reassembly, tighten the heat sink screws in the following criss-cross pattern, one turn at a time, until they're tight:

    • Screw 1

    • Screw 2

    • Screw 3

    • Screw 4

  10. Microsoft Surface Pro 5 Power, Volume Button, and Left Speaker Assembly Replacement: 步骤 10 中的图像 1,3 Microsoft Surface Pro 5 Power, Volume Button, and Left Speaker Assembly Replacement: 步骤 10 中的图像 2,3 Microsoft Surface Pro 5 Power, Volume Button, and Left Speaker Assembly Replacement: 步骤 10 中的图像 3,3
  11. Microsoft Surface Pro 5 Power, Volume Button, and Left Speaker Assembly Replacement, Camera Tie Bar: 步骤 11 中的图像 1,1
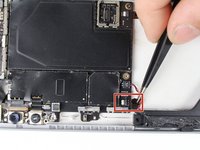
    • Remove the Torx T5 x 6mm screw connecting the black tie bar to the power button/volume control/speaker assembly.

  12. Microsoft Surface Pro 5 Power, Volume Button, and Left Speaker Assembly Replacement: 步骤 12 中的图像 1,1
    • Remove the remaining three Torx T5 x 4.5mm screws holding down the camera tie bar.

  13. Microsoft Surface Pro 5 Power, Volume Button, and Left Speaker Assembly Replacement: 步骤 13 中的图像 1,1
    • Disconnect the small ribbon cable connecting the camera tie bar to the motherboard by pulling up with tweezers.

  14. Microsoft Surface Pro 5 Power, Volume Button, and Left Speaker Assembly Replacement: 步骤 14 中的图像 1,1
    • Lift the camera tie bar off of the device.

  15. Microsoft Surface Pro 5 Power, Volume Button, and Left Speaker Assembly Replacement, Power Button, Volume Buttons, and Left Speaker Assembly: 步骤 15 中的图像 1,1
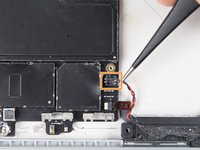
    • Use a Torx T5 to remove the two 4.5mm silver screws on the power button/volume control/speaker assembly.

  16. Microsoft Surface Pro 5 Power, Volume Button, and Left Speaker Assembly Replacement: 步骤 16 中的图像 1,2 Microsoft Surface Pro 5 Power, Volume Button, and Left Speaker Assembly Replacement: 步骤 16 中的图像 2,2
    • Disconnect the small ribbon attaching the assembly to the motherboard by lifting up with tweezers.

    • Disconnect the black and red cable connector by lifting up with tweezers.

  17. Microsoft Surface Pro 5 Power, Volume Button, and Left Speaker Assembly Replacement: 步骤 17 中的图像 1,1
    • Pull the assembly to the left with hands and lift up to remove.

结论

To reassemble your device, follow these instructions in reverse order.

另外一个人完成了本指南。

Kaden Foster

于10/02/17注册

885 声望

创作了3篇指南

团队

Cal Poly, Team S15-G3, Livingston Fall 2017 Cal Poly, Team S15-G3, Livingston Fall 2017 的会员

CPSU-LIVINGSTON-F17S15G3

3 名成员

创作了17篇指南

一条评论

Hi,

Where can I purchase the power button assembly in the UK?

junaidpatel - 回复

添加评论

浏览统计数据:

过去 24 小时: 0

过去 7 天: 1

过去 30 天: 5

总计 2,781