跳转到主内容

当前版本的文档还未经巡查,您可以查看最新的已查核版本

已存档的指南
本指南只作为历史记录保留。请使用指南的最新版本来进行维修。

你所需要的

  1. , 后盖: 步骤 1 中的图像 1,1
    • 将固定 MacBook Pro 后盖的 P5 五角螺丝拆掉:

    • 8颗 3.0mm 螺丝

    • 2颗 2.3mm 螺丝

  2. : 步骤 2 中的图像 1,1
    • 从后盖盖和主机壳夹扣处抬起,从 MacBook Pro上取下后盖。

    • 将取下的后盖放到一边。

  3. , 电池连接器: 步骤 3 中的图像 1,1
    • 揭开盖住电池接口的警告标签。

  4. : 步骤 4 中的图像 1,2 : 步骤 4 中的图像 2,2
    • 使用撬棒平头的那端,轻轻地将电池接口直接从逻辑板上的插座中撬出。

    • 弯曲电池电缆,确保电池接口不会意外接触逻辑板。

  5. , AirPort/相机线缆: 步骤 5 中的图像 1,1
    • 使用撬棒尖端来将三条AirPort天线线缆从 AirPort 板上的插座中径直翘起。

    • 此线缆的连接插口很脆弱。请注意分离位置是在连接器上方链接部分而不是在底插或线缆处。

    • 重新插回时可以在小心的对准插口位置后利用撬棒较宽的平面部分水平发力下按。

  6. : 步骤 6 中的图像 1,1
    • 使用撬棒的尖端来推动相机线缆位于逻辑板插座上的链接头。

    • 照片中的插头有六个接口,但有些型号是有十二个接口。这两种型号拔出插头的过程是相同的。

    • 如果相机排线的插头很难从主板上拔出,请将风扇上的橡胶盖向后折叠使相机排线露出。在轻拉排线的同时使用撬棒将插头轻轻推出插座

    • 请确保推动方向与主板相平行,先推动一侧,然后让链接头从插座中“走”出来。如果强行将其撬起则会有损坏部件的可能。

  7. : 步骤 7 中的图像 1,3 : 步骤 7 中的图像 2,3 : 步骤 7 中的图像 3,3
    • 在右侧散热风扇橡胶垫下方插入撬棒扁平的一端。

    • 在下方滑动,来分离粘合剂。

    • 抬起翻开,你就可以靠近下方的线缆了。

  8. : 步骤 8 中的图像 1,3 : 步骤 8 中的图像 2,3 : 步骤 8 中的图像 3,3
    • 使用手指来将 AirPort和摄像头线缆从风扇上剥离。

    • 线缆粘附于风扇上,所以请小心剥离以免损伤。

    • 小心地将电缆从塑料电缆导轨上卸下。

  9. , I/O 板线缆: 步骤 9 中的图像 1,3 , I/O 板线缆: 步骤 9 中的图像 2,3 , I/O 板线缆: 步骤 9 中的图像 3,3
    • 如果 I/O 板电缆的连接器在衬垫中有槽口,你需要松开槽口下方的锁定杆以移除电缆。 如果是这种情况,请在拉杆解锁之前不要撬起接口。

    • 使用撬棒扁平的一端,将 I/O 板连接器从主板上的插座中直接撬出。

    • 在重新组装设备的时候,首先连接这一端,因为它不会弯曲。

    • 以类似的方式,从 I/O 板上的插槽中卸下 I/O 板排线。

    • 从 MacBook Pro 上拔下 I/O 板电缆。

  10. , Airport卡: 步骤 10 中的图像 1,1
    • 移除一颗将AirPort卡与主板相固定的2.9mm T5 梅花螺丝(有些时候可能是T6)。

  11. : 步骤 11 中的图像 1,2 : 步骤 11 中的图像 2,2
    • 抓住 AirPort 卡的两侧,将其向上以小角度略微提起(5-10˚),以分离粘附在主板上的轻质粘合剂。

    • 将 AirPort 卡平行于主板上的接口拉出以将其卸下。

  12. : 步骤 12 中的图像 1,2 : 步骤 12 中的图像 2,2
    • 使用撬棒的尖端来将右风扇的排线ZIF插座解锁。

    • 请确保您在撬动插座铰链而不是插座本身。

    • 从电缆顶部开始,在右侧风扇电缆下面滑动塑料打开工具,将其从逻辑板上取出。

    • 取出电缆时要小心谨慎,因为它牢固地固定在逻辑板上。

  13. : 步骤 13 中的图像 1,1
    • 拧下固定右侧风扇到主板的三颗螺丝如下:

    • 一颗 4.4mm T5 梅花 螺丝

    • 一颗 3.9mm T5 宽头梅花 螺丝

    • 一颗 5.0mm T5 梅花螺丝 带有一个2mm套管。

  14. : 步骤 14 中的图像 1,1
    • 从MacBook Pro中提起移走右风扇。

    • 装回风扇时,比较简单的方法是先连接风扇电缆,而不是先安装三个风扇螺钉。

  15. , 左侧风扇: 步骤 15 中的图像 1,1
    • 使用撬棒的扁平一端来翘起左侧风扇上的橡胶导热槽。

  16. : 步骤 16 中的图像 1,1
    • 移除下列三颗将左风扇固定在逻辑板上的螺丝。

    • 一颗 4.4mm T5 梅花螺丝,包含一个2mm套管。

    • 一颗 5.0mm T5 梅花螺丝, 包含一个2mm套管。

    • 一颗 3.9mm T5 宽头梅花螺丝。

    • 重新安装风扇及其螺丝钉时,在将全部螺丝钉安装之前,请不要将螺丝钉完全拧紧。这样在将螺帽套到螺丝钉上时,风扇可以略微移动以更好的固定螺帽。

  17. : 步骤 17 中的图像 1,3 : 步骤 17 中的图像 2,3 : 步骤 17 中的图像 3,3
    • 使用撬棒尖端来将风扇排线从ZIF插座上解锁下来。

    • 请确保您在撬动铰链部分而不是插座本身。

    • 从线缆顶部开始,在线缆底部滑入一个塑料打开工具来将线缆从逻辑板上卸下。

    • 卸下电缆时要小心谨慎,因为它牢固地固定在逻辑板上。 如有必要,请使用iOpener或吹风机加热电缆,以便软化粘合剂并使其更易于清除。

    • 从设备上取出左风扇。

    • 装回风扇时,较为简单的方法是先连接风扇电缆,而不是先安装三个风扇螺钉。

  18. , SSD 固态硬盘: 步骤 18 中的图像 1,1
    • 拧下把SSD固态硬盘固定到主板的 3.1 mm T5 Torx 螺丝。

  19. : 步骤 19 中的图像 1,2 : 步骤 19 中的图像 2,2
    • 轻轻提起最右边 SSD 固态硬盘,把它从主板的槽里直接滑出来。

  20. , I/O 板: 步骤 20 中的图像 1,2 , I/O 板: 步骤 20 中的图像 2,2
    • 使用撬棒尖端将I / O板数据电缆锁向上翻,并将其向计算机的电池侧旋转。

    • 使用撬棒的扁平端将I / O板数据电缆从逻辑板上的插槽中滑出。

    • 请勿抬起I / O板数据电缆,因为其插口非常脆弱。 将电缆平行于逻辑板的表面拉动。

  21. : 步骤 21 中的图像 1,3 : 步骤 21 中的图像 2,3 : 步骤 21 中的图像 3,3
    • 移除两颗固定I/O板的3.1mm T5 梅花螺丝。

    • 在某些型号上,还可以从散热器上卸下银色的 3.5 毫米 T5 Torx 螺丝,这有助于卸下 I/O 板。

    • 小心地提起I/O板,并将其从底壳中移除。

  22. , 逻辑板组件: 步骤 22 中的图像 1,2 , 逻辑板组件: 步骤 22 中的图像 2,2
    • 使用挑线器的扁平端向上撬起左侧扬声器连接器,并将其从逻辑板上的插座中撬出。

    • 使用挑线器的尖端将右扬声器连接器向上撬出逻辑板上的插座。

    • 一定要撬动电缆链接头,而不是在插座本身。 插入插座撬动可能导致插座与逻辑板分离。

  23. : 步骤 23 中的图像 1,3 : 步骤 23 中的图像 2,3 : 步骤 23 中的图像 3,3
    • 剥开覆盖键盘带状电缆连接器顶部的胶带。

    • 使用挑线器的扁平端将键盘带状电缆ZIF插座上的固定挡板翻起来。

    • 确保你在铰链固定盖上撬动,而不是插座本身。

    • 使用挑线器的扁平端将键盘带状电缆从插座中推出。

  24. : 步骤 24 中的图像 1,1
    • 使用挑线器的扁平端将触控板带状电缆连接器从其插座上撬出。

  25. : 步骤 25 中的图像 1,1
    • 使用挑线器的扁平端从逻辑板上的插座上撬起键盘背光连接器。

  26. : 步骤 26 中的图像 1,1
    • 使用挑线器的尖端或指甲翻转麦克风带状电缆ZIF插座上的固定盖。

    • 确保你在铰链固定盖上撬动,而不是插座本身。

    • 将麦克风带状电缆从插座中拔出。

  27. : 步骤 27 中的图像 1,2 : 步骤 27 中的图像 2,2
    • 使用挑线器的顶端将显示数据电缆锁定向上翻转并将其朝计算机的电源插口DC-In侧旋转。

    • 将显示数据线直接从逻辑板上的插座中拔出。

    • 请勿抬起显示器数据线,因为其插口非常脆弱。 将电缆平行于逻辑板的表面拉。

  28. : 步骤 28 中的图像 1,1
    • 使用挑线器的平端小心地撬起MagSafe 2接口附近凸起螺丝头上的橡胶螺帽。

    • 此螺丝的位置可能因型号而异。

  29. : 步骤 29 中的图像 1,1
    • 卸下将逻辑板固定到上壳上的以下六个螺丝:

    • 一个3.1毫米T5 梅花螺丝

    • 一个2.5毫米T5 梅花螺丝

    • 一个5.5毫米银色凸头T5梅花螺丝

    • 两个5.7毫米T5梅花螺丝

    • 一个3.8毫米银色T5 梅花螺丝

  30. : 步骤 30 中的图像 1,2 : 步骤 30 中的图像 2,2
    • 从靠近电池的一侧抬起,将主板向MacBook Pro的顶部旋转。

    • 你可能需要将主板向左滑动几毫米,以便沿着电路板右边缘的端口获得间隙。

    • 使用挑线器的扁平端,小心地将MagSafe 2连接器从主板底部的插座中拔出。

    • 分离MagSafe 2链接会比较困难。如果你只是想暂时的将主板的位置挪一下例如换电池,你可以看看这篇指南 remove the two 2.5 mm T5 Torx screws securing the MagSafe DC-In board, 然后将主板和MagSafe一起卸下。

  31. : 步骤 31 中的图像 1,3 : 步骤 31 中的图像 2,3 : 步骤 31 中的图像 3,3
    • 从MacBook Pro中取出主板组件。

    • 重新安装主板时,请确保所有电缆都可见并且未被卡在主板下。

    • 从顶部顺时针方向:电池,右扬声器,键盘背光灯,AirPort /相机,显示器,麦克风,左扬声器,键盘和触控板。

  32. , 扬声器: 步骤 32 中的图像 1,2 , 扬声器: 步骤 32 中的图像 2,2
    • 移除下列3颗将左侧扬声器与顶壳相固定的螺丝。

    • 1颗 5.6mm T5 梅花螺丝

    • 1颗 6.9mm T5 梅花螺丝

    • 1颗 2.6mm T5 梅花螺丝

    • 将扬声器从顶壳中取出,将其放在一旁。

    • 扬声器用一些轻质粘合剂固定在外壳上。

  33. : 步骤 33 中的图像 1,2 : 步骤 33 中的图像 2,2
    • 移除下列将右侧扬声器固定在顶壳上的三颗螺丝。

    • 1颗 5.6mm T5 梅花螺丝

    • 1颗 6.9mm T5 梅花螺丝

    • 1颗 2.6mm T5 梅花螺丝

    • 从MacBook Pro中移出右扬声器。

    • 扬声器用一些轻质粘合剂固定在外壳上。

  34. 这个步骤还没有翻译 帮忙翻译一下

    : 步骤 34 中的图像 1,1
    • Remove the two 3.2 mm T5 Torx screws securing the battery board.

  35. 这个步骤还没有翻译 帮忙翻译一下

    : 步骤 35 中的图像 1,1
    • The liquid adhesive remover provided in your kit can affect the antireflective coating on your MacBook Pro's display.

    • To protect your display, place a sheet of aluminum foil between the display and keyboard and leave it there while you work.

  36. 这个步骤还没有翻译 帮忙翻译一下

    : 步骤 36 中的图像 1,2 : 步骤 36 中的图像 2,2
    • With the front edge of the MacBook Pro facing you, lift the right side and prop it up at a slight angle, using a sturdy foam block or book.

    • In the following steps, you'll apply liquid adhesive remover to the right (outer) edge of the battery. Keeping this side of the MacBook Pro elevated will help the adhesive remover flow underneath the battery.

  37. 这个步骤还没有翻译 帮忙翻译一下

    : 步骤 37 中的图像 1,2 : 步骤 37 中的图像 2,2
    • Now that your MacBook Pro is fully prepped, it's time to prep yourself.

    • iFixit adhesive remover contains acetone, a mild skin and eye irritant.

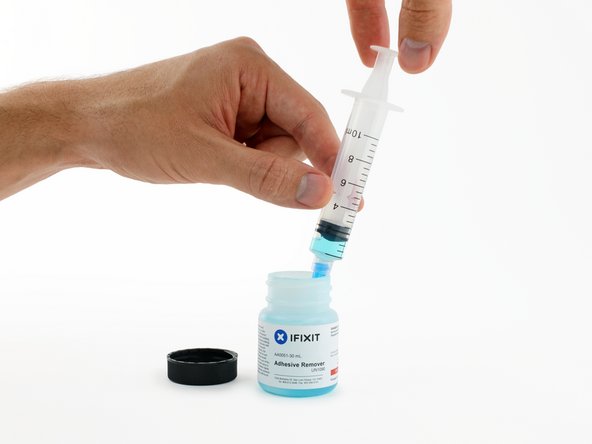
    • Wear eye protection when handling and applying the adhesive remover. (Eye protection is included in your kit.)

    • Do not wear contact lenses without eye protection.

    • Protective gloves are also included in your kit. If you are concerned about possible skin irritation, put your gloves on now.

  38. 这个步骤还没有翻译 帮忙翻译一下

    : 步骤 38 中的图像 1,2 : 步骤 38 中的图像 2,2
    • Open your container of adhesive remover.

    • Fill the syringe included in your kit with a small amount (approximately 1-2 milliliters) of adhesive remover.

    • It's best to fill the syringe with no more than about 1-2 milliliters of adhesive remover at a time, so as to avoid accidentally applying too much.

    • Refill your syringe as needed throughout the rest of this procedure.

  39. 这个步骤还没有翻译 帮忙翻译一下

    : 步骤 39 中的图像 1,2 : 步骤 39 中的图像 2,2
    • Apply a small amount of adhesive remover (approximately 1 ml) evenly along the elevated edge of the outer right battery cell.

    • Wait 2-3 minutes for the liquid adhesive remover to penetrate underneath the battery cell before you proceed to the next step.

  40. 这个步骤还没有翻译 帮忙翻译一下

    : 步骤 40 中的图像 1,3 : 步骤 40 中的图像 2,3 : 步骤 40 中的图像 3,3
    在这个步骤中使用的工具:
    Plastic Cards
    $2.99
    购买
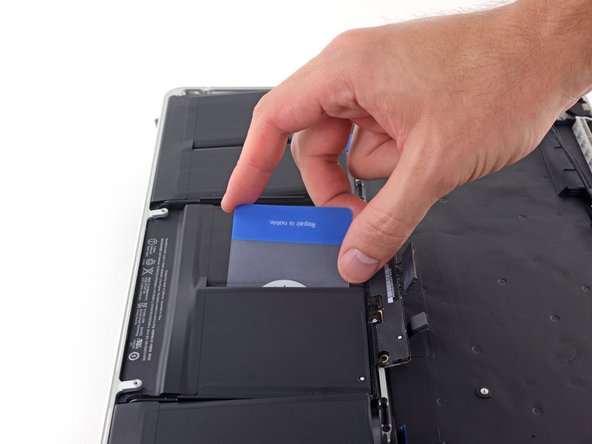
    • Slide one corner of a plastic card under the outer edge of the battery cell.

    • It may help to gently twist the card to open up a slight gap between the battery cell and the MacBook Pro's case.

    • Slide the card farther underneath the battery cell to separate it from the adhesive securing it to the MacBook Pro's upper case.

  41. 这个步骤还没有翻译 帮忙翻译一下

    : 步骤 41 中的图像 1,2 : 步骤 41 中的图像 2,2
    • Lift the battery cell to separate it from the MacBook Pro's upper case, but don't try to remove it.

    • Leave the plastic card underneath the battery cell to prevent it from re-adhering as you proceed to the next step.

  42. 这个步骤还没有翻译 帮忙翻译一下

    : 步骤 42 中的图像 1,3 : 步骤 42 中的图像 2,3 : 步骤 42 中的图像 3,3
    • Apply a small amount of adhesive remover (approximately 1 ml) evenly along the elevated edge of the next battery cell.

    • Wait 2-3 minutes for the liquid adhesive remover to penetrate underneath the battery cell before you proceed to the next step.

  43. 这个步骤还没有翻译 帮忙翻译一下

    : 步骤 43 中的图像 1,3 : 步骤 43 中的图像 2,3 : 步骤 43 中的图像 3,3
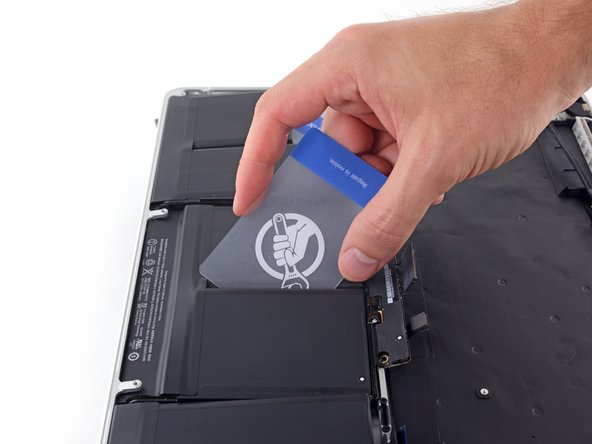
    • Slide one corner of your plastic card underneath the second battery cell.

    • Push the card underneath the second battery cell, and slide it side to side to separate the adhesive underneath.

    • Leave the plastic card underneath both battery cells (or flip them over) to prevent them from re-adhering as you proceed to the next step.

  44. 这个步骤还没有翻译 帮忙翻译一下

    : 步骤 44 中的图像 1,3 : 步骤 44 中的图像 2,3 : 步骤 44 中的图像 3,3
    • It's time to switch sides. Remove your book or foam block and place it under the opposite side of your MacBook Pro.

    • Repeat the procedure from the prior steps to separate the two battery cells on this side:

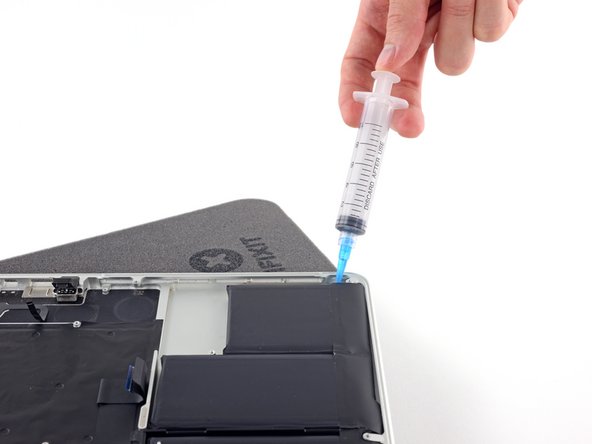
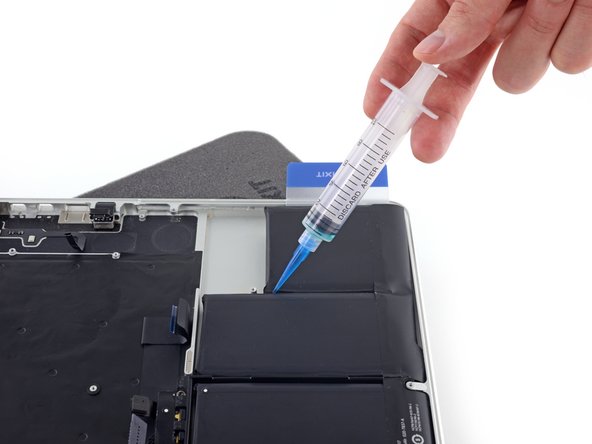
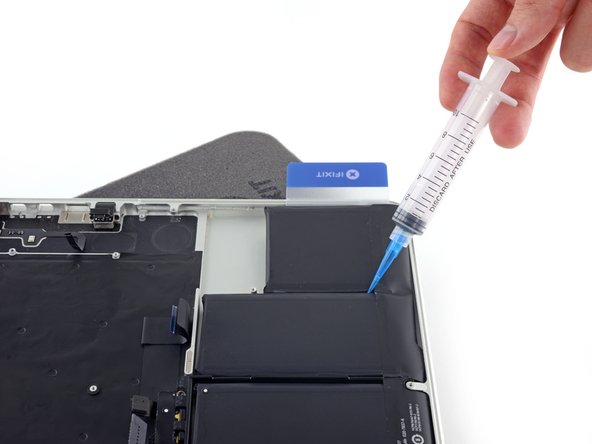
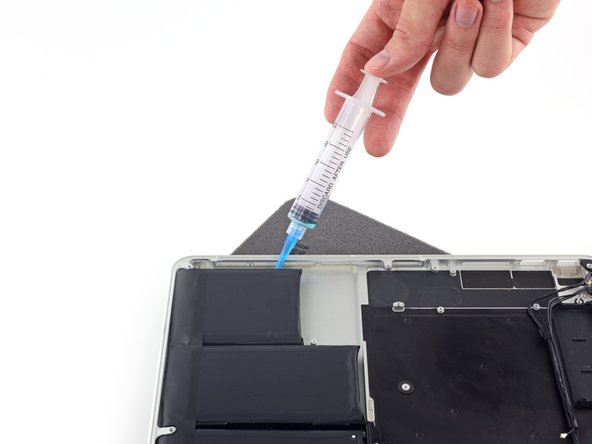
    • Apply your adhesive remover to the elevated edge of the outer battery cell, and wait 2-3 minutes for it to penetrate.

    • Work one corner of a plastic card underneath the battery cell, and slide the card fully underneath the battery cell to separate it.

    • Do the same for the adjacent cell.

    • Leave your plastic card in place or flip the battery cells over to prevent them from re-adhering during the following steps.

  45. 这个步骤还没有翻译 帮忙翻译一下

    : 步骤 45 中的图像 1,2 : 步骤 45 中的图像 2,2
    • With the left edge of your MacBook Pro still propped up, apply a small amount (about 1 ml) of adhesive remover down the center line between the two middle battery cells.

    • Wait 2-3 minutes for the adhesive remover to penetrate before you continue.

  46. 这个步骤还没有翻译 帮忙翻译一下

    : 步骤 46 中的图像 1,3 : 步骤 46 中的图像 2,3 : 步骤 46 中的图像 3,3
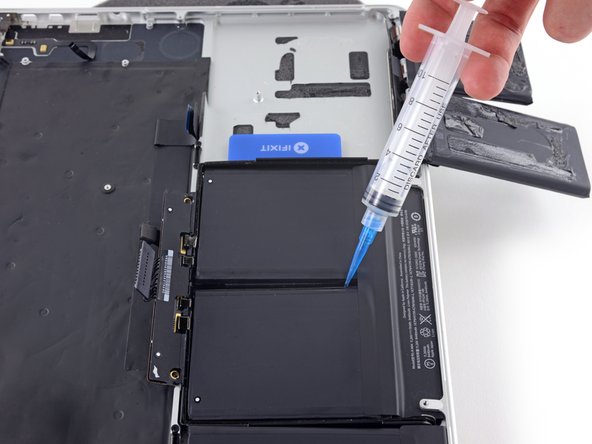
    • Slide one corner of a plastic card between the middle two cells, and under the elevated edge of the center-right battery cell.

    • Slide the card farther underneath the battery cell to slice through the adhesive securing it in place.

    • Don't try to fully separate this battery cell yet. Leave your plastic card in place to prevent it from re-adhering.

  47. 这个步骤还没有翻译 帮忙翻译一下

    : 步骤 47 中的图像 1,3 : 步骤 47 中的图像 2,3 : 步骤 47 中的图像 3,3
    • Flip the two de-adhered right-hand battery cells over the front edge of the MacBook Pro, if you haven’t already. This will allow access to the outside edge of the center cell.

  48. 这个步骤还没有翻译 帮忙翻译一下

    : 步骤 48 中的图像 1,2 : 步骤 48 中的图像 2,2
    • Push one corner of a plastic card below the plastic battery frame and underneath the remaining adhered edge of the lower center cell.

    • Do not pry along the edge nearest the battery connector, or you risk damaging the keyboard ribbon cable.

    • Slide your card all the way under the battery cell, and leave it to prevent the battery cell from re-adhering.

  49. 这个步骤还没有翻译 帮忙翻译一下

    : 步骤 49 中的图像 1,2 : 步骤 49 中的图像 2,2
    • Remove the first plastic card that you inserted under the center-right battery cell.

  50. 这个步骤还没有翻译 帮忙翻译一下

    : 步骤 50 中的图像 1,2 : 步骤 50 中的图像 2,2
    • Remove your book or foam block.

    • With the front edge of the MacBook Pro facing you, lift the right side and prop it up once again.

  51. 这个步骤还没有翻译 帮忙翻译一下

    : 步骤 51 中的图像 1,2 : 步骤 51 中的图像 2,2
    • Apply a small amount (about 1 ml) of adhesive remover between the two center battery cells, so that it flows underneath the remaining battery cell.

    • Wait 2-3 minutes for the adhesive remover to penetrate before you continue.

  52. 这个步骤还没有翻译 帮忙翻译一下

    : 步骤 52 中的图像 1,3 : 步骤 52 中的图像 2,3 : 步骤 52 中的图像 3,3
    • Slide one corner of a plastic card under the elevated edge of the final battery cell.

    • Push the card farther underneath the battery cell to slice through the adhesive securing it in place.

    • Don't try to fully separate this battery cell yet. Leave your plastic card in place to prevent it from re-adhering.

  53. 这个步骤还没有翻译 帮忙翻译一下

    : 步骤 53 中的图像 1,1
    • Repeat the process you used on the center-right battery cell to finish separating the adhesive on the center-left cell:

    • Lift and flip the two outer battery cells to clear access to the remaining adhered edge of the center-left battery cell.

    • Slide your card all the way underneath the battery cell, and leave it to prevent the battery cell from re-adhering.

    • Remove the first card that you inserted under this battery cell in the previous step.

  54. 这个步骤还没有翻译 帮忙翻译一下

    : 步骤 54 中的图像 1,2 : 步骤 54 中的图像 2,2
    • With one plastic card underneath each of the two center battery cells, twist and lift both cards to fully separate the battery cells, together with the plastic frame and battery board, from the MacBook Pro.

  55. 这个步骤还没有翻译 帮忙翻译一下

    : 步骤 55 中的图像 1,2 : 步骤 55 中的图像 2,2
    • Lift and remove the battery.

    • Before installing your new battery, remove all the old adhesive from the MacBook Pro's case.

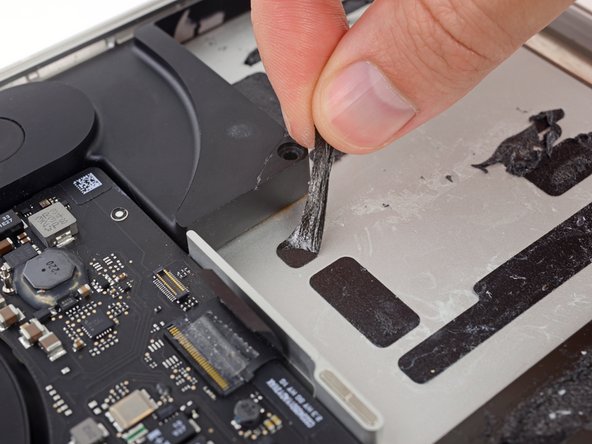
    • With a little luck, you can slowly pull out each strip of adhesive with your fingers.

    • Otherwise, soak each strip of adhesive with a bit of adhesive remover for 2-3 minutes, and then scrape it out with a plastic tool. This can take quite a bit of work, so be patient.

    • Mop up any remaining adhesive remover and give your MacBook Pro a few minutes to air dry.

    • The replacement battery included in your iFixit kit comes with adhesive pre-installed. Test the battery's fit and alignment carefully before peeling off the film covering the adhesive, and then press each cell firmly into place. If any additional films/liners are present that weren't on your original battery, remove them now.

    • Calibrate your battery before using it: allow it to drain overnight, then charge it to 100% and drain it again until your MacBook Pro shuts down automatically. Charge it again and use it normally.

    • If you notice any unusual behavior or problems after installing your new battery, you may need to reset your MacBook Pro's SMC.

终点

3等其他人完成本指南。

Jeff Suovanen

于08/06/13注册

428,530 声望

创作了259篇指南

团队

iFixit iFixit 的会员

Staff

135 名成员

创作了17,198篇指南

0条评论

添加评论

浏览统计数据:

过去 24 小时: 4

过去 7 天: 11

过去 30 天: 25

总计 1,394