跳转到主内容

MacBook Pro (13英寸, 带有Retina显示屏, 2015早期) 显示组件更换

你所需要的

  1. MacBook Pro (13英寸, 带有Retina显示屏, 2015早期) 显示组件更换, 背板: 步骤 1 中的图像 1,1
    在这个步骤中使用的工具:
    Magnetic Project Mat
    $19.95
    购买
    • 拆下以下10个固定在上壳体上的螺丝

    • 两个 2.3毫米 的梅花五角螺丝

    • 八个 3.0毫米 的梅花五角螺丝

    • 在本次维修中,要对每个螺丝做好记录以便准确装回,避免对设备造成伤害。

  2. MacBook Pro (13英寸, 带有Retina显示屏, 2015早期) 显示组件更换: 步骤 2 中的图像 1,1
    • 把你的手指放在上下壳体中间

    • 轻轻地把上下壳体拉开

  3. MacBook Pro (13英寸, 带有Retina显示屏, 2015早期) 显示组件更换: 步骤 3 中的图像 1,2 MacBook Pro (13英寸, 带有Retina显示屏, 2015早期) 显示组件更换: 步骤 3 中的图像 2,2
    • 上下壳体中间有两个塑料卡扣相连

    • 在组装期间,温柔地从中间推下机壳,重新扣上这两个塑料卡扣。

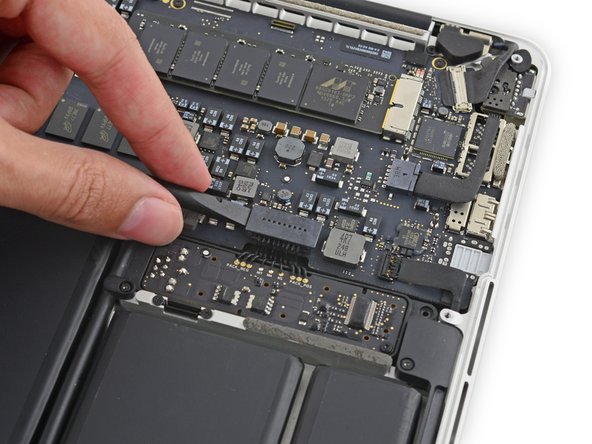
  4. MacBook Pro (13英寸, 带有Retina显示屏, 2015早期) 显示组件更换, 电池连接器: 步骤 4 中的图像 1,1
    • 如有必要,可拆卸粘在电池接触板上的塑料盖。

  5. MacBook Pro (13英寸, 带有Retina显示屏, 2015早期) 显示组件更换: 步骤 5 中的图像 1,2 MacBook Pro (13英寸, 带有Retina显示屏, 2015早期) 显示组件更换: 步骤 5 中的图像 2,2
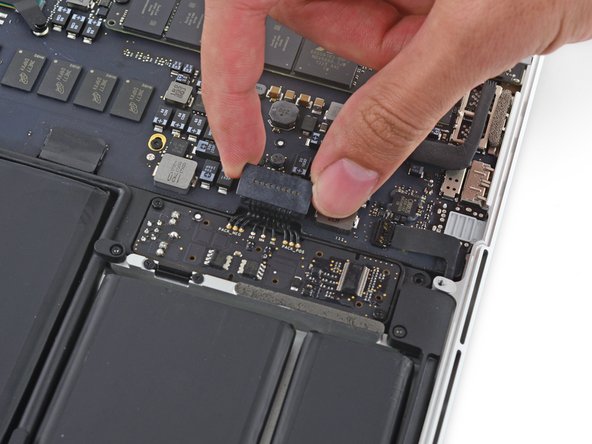
    • 用撬棒的平端,将电池连接器从主板插座上直着往上撬起。

    • 确保您只抬起了连接器本身,而不是插座,否则您可能会对主板造成永久性的损坏。

  6. MacBook Pro (13英寸, 带有Retina显示屏, 2015早期) 显示组件更换: 步骤 6 中的图像 1,1
    • 在维修过程中,将电池连接器弯曲,以防止意外接触其插座。

  7. MacBook Pro (13英寸, 带有Retina显示屏, 2015早期) 显示组件更换, 显示屏组件: 步骤 7 中的图像 1,3 MacBook Pro (13英寸, 带有Retina显示屏, 2015早期) 显示组件更换, 显示屏组件: 步骤 7 中的图像 2,3 MacBook Pro (13英寸, 带有Retina显示屏, 2015早期) 显示组件更换, 显示屏组件: 步骤 7 中的图像 3,3
    • 小心地从散热器边缘位置移走橡胶垫。

    • 风扇橡胶垫密封着散热器,并安装在风扇管道插槽中。 在重新组装时,请确保将卡舌安装到风扇导管中的凹口中。

  8. MacBook Pro (13英寸, 带有Retina显示屏, 2015早期) 显示组件更换: 步骤 8 中的图像 1,3 MacBook Pro (13英寸, 带有Retina显示屏, 2015早期) 显示组件更换: 步骤 8 中的图像 2,3 MacBook Pro (13英寸, 带有Retina显示屏, 2015早期) 显示组件更换: 步骤 8 中的图像 3,3
    • 从AIirPort板上使用撬棒的尖端来从天线线缆连接头附近下方撬起。

    • 三条黑色的线缆长度是不同的,在重组时请注意。

    • 将最长的电缆连接到中心插座。

    • 短的电缆连接在螺丝旁边。

    • 剩下的那个电缆没有护套,并连接在最后一个空插座上,位于风扇旁边。

  9. MacBook Pro (13英寸, 带有Retina显示屏, 2015早期) 显示组件更换: 步骤 9 中的图像 1,2 MacBook Pro (13英寸, 带有Retina显示屏, 2015早期) 显示组件更换: 步骤 9 中的图像 2,2
    • 使用撬棒的尖端来从iSight摄像头连接头位置两边的任意一边推动来将其从插座上断开。

  10. MacBook Pro (13英寸, 带有Retina显示屏, 2015早期) 显示组件更换: 步骤 10 中的图像 1,2 MacBook Pro (13英寸, 带有Retina显示屏, 2015早期) 显示组件更换: 步骤 10 中的图像 2,2
    • 将iSight相机电缆从风扇外壳上取下。

  11. MacBook Pro (13英寸, 带有Retina显示屏, 2015早期) 显示组件更换: 步骤 11 中的图像 1,3 MacBook Pro (13英寸, 带有Retina显示屏, 2015早期) 显示组件更换: 步骤 11 中的图像 2,3 MacBook Pro (13英寸, 带有Retina显示屏, 2015早期) 显示组件更换: 步骤 11 中的图像 3,3
    • 抓住黑色塑料把手将其向后拉,来将显示连接线缆从逻辑板上的插座中断开。

    • 在重组时,请确保将显示连接头把手完全粘贴好。

  12. MacBook Pro (13英寸, 带有Retina显示屏, 2015早期) 显示组件更换: 步骤 12 中的图像 1,3 MacBook Pro (13英寸, 带有Retina显示屏, 2015早期) 显示组件更换: 步骤 12 中的图像 2,3 MacBook Pro (13英寸, 带有Retina显示屏, 2015早期) 显示组件更换: 步骤 12 中的图像 3,3
    • 从左右显示屏铰链上拆下橡胶铰链盖。

  13. MacBook Pro (13英寸, 带有Retina显示屏, 2015早期) 显示组件更换: 步骤 13 中的图像 1,2 MacBook Pro (13英寸, 带有Retina显示屏, 2015早期) 显示组件更换: 步骤 13 中的图像 2,2
    • 卸下固定Macbook两侧铝合金支架的两个4.2 mm T5 梅花螺丝。

  14. MacBook Pro (13英寸, 带有Retina显示屏, 2015早期) 显示组件更换: 步骤 14 中的图像 1,3 MacBook Pro (13英寸, 带有Retina显示屏, 2015早期) 显示组件更换: 步骤 14 中的图像 2,3 MacBook Pro (13英寸, 带有Retina显示屏, 2015早期) 显示组件更换: 步骤 14 中的图像 3,3
    • 使用镊子将铝制铰链支架从左右显示屏铰链上提起。

    • 在重新组装时,支架的垂直部分应与Macbook中心的铝制导轨对齐。

  15. MacBook Pro (13英寸, 带有Retina显示屏, 2015早期) 显示组件更换: 步骤 15 中的图像 1,2 MacBook Pro (13英寸, 带有Retina显示屏, 2015早期) 显示组件更换: 步骤 15 中的图像 2,2
    • 拆下四个在外部将显示屏固定在上盖的5.3 mm T8 梅花螺丝(每侧两个)。

    • 一些型号有可能使用T9梅花螺丝而不是T8。

  16. MacBook Pro (13英寸, 带有Retina显示屏, 2015早期) 显示组件更换: 步骤 16 中的图像 1,2 MacBook Pro (13英寸, 带有Retina显示屏, 2015早期) 显示组件更换: 步骤 16 中的图像 2,2
    • 将MacBook Pro如图放置在桌面上,并打开大于90度,

    • 左手扶着显示屏,使用右手来拆卸显示屏边框顶部上剩下的T8梅花螺丝。

    • 确保显示屏和顶壳是平衡稳固的,不会掉落,掉落可能会损坏组件。

    • 移除剩下的将顶壳与显示屏固定的T8梅花螺丝。

  17. MacBook Pro (13英寸, 带有Retina显示屏, 2015早期) 显示组件更换: 步骤 17 中的图像 1,3 MacBook Pro (13英寸, 带有Retina显示屏, 2015早期) 显示组件更换: 步骤 17 中的图像 2,3 MacBook Pro (13英寸, 带有Retina显示屏, 2015早期) 显示组件更换: 步骤 17 中的图像 3,3
    • 用右手抓住顶壳,轻轻地顺时针旋转,朝向显示屏顶部,因此显示屏支架可以与顶壳分离。

    • 将显示屏稍微的提起来远离顶壳。

    • 将显示器从上部外壳拉出,注意可能被挂住的支架或者线缆。。

结论

要重新组装您的设备,请按照本指南的相反顺序进行操作。

222等其他人完成本指南。

由衷感谢以下译者:

en zh

100%

Leon赵国鑫正在帮助我们修复这个世界! 您也想加入吗?
开始翻译 ›

团队

iFixit iFixit 的会员

Staff

135 名成员

创作了16,817篇指南

60条评论

Just did this for my wife. Awesome! Thank you!

Josh Way - 回复

Just complete this over lunch and it was cake - no pun. Follow the instructions and you'll be back to new in about 30 minutes. The toughest part is getting all those little screws out, so be patient and just know it's worth the squeeze. Take care, AZ

Advisor King - 回复

Is display assembly for Late 2013/Mid 2014 compatible with this model?

Payton James - 回复

Hi, I have same question, and I think its not fully compatible, I tried to put 2014 display on 2015 and its have issue with backlight at startup, for example if you press "ALT" at startup to chose startup disk, screen remains all the time dark only with flash light you can see its working and if you chose disk and only after some 5 seconds backlight will turn on, if I put old original broken display but with working backlight it will turn on backlight straight with the "chime" and yes with new 2014 display its not lighting up straight after chime only after some 5 seconds or so, but after that works fine.

artc -

Hi, last night i was watching a movie in my MBP E2015, and out of nothing, gave me "the gift" of a black screen... i tried everything i found in forums, reset SMC PRAM/NRAM, safe mode, force reboot, well, you name it, i tried it with no luck... i opened the MB and re-connected the display cable to what see if something happens, and nothing... i can only see the contents of the screen when using HDMI on a tv (i also can see stuff in the screen when pointing a flashlight in the dark screen, that makes me think its fixable) should i start thinking of replacing the whole display? any suggestion would be appreciated, thanks!

DanielD

Daniel Dugarte - 回复

添加评论

浏览统计数据:

过去 24 小时: 35

过去 7 天: 249

过去 30 天: 986

总计 227,929