跳转到主内容

当前版本的文档还未经巡查,您可以查看最新的已查核版本

你所需要的

  1. , 卸下固定下壳的螺丝: 步骤 1 中的图像 1,1
    • 在开始此过程之前,你应该禁用 Mac 的自动启动功能。当你打开盖子时,自动启动会打开你的 Mac,并且可能会在拆卸过程中意外触发。使用本指南禁用自动启动。

    • 如果你的 MacBook 运行的是 Big Sur v11.1 或更高版本,则禁用自动启动可能不起作用。你可以正常进行,但请确保在你进入后立即断开电池连接。

    • 在开始之前,请完全关闭 MacBook Air 的电源并拔下插头。合上显示屏并将整个笔记本电脑倒置。

    • 使用 P5 螺丝刀卸下以下螺丝:

    • 两颗 7.9 毫米螺丝

    • 两颗 7.1 毫米螺丝

    • 六颗 2.6 毫米螺丝

    • 在整个维修过程中,请跟踪每个螺丝并确保它准确地回到原来的位置,以避免损坏你的 MacBook。

  2. , 移除底壳: 步骤 2 中的图像 1,3 , 移除底壳: 步骤 2 中的图像 2,3 , 移除底壳: 步骤 2 中的图像 3,3
    • 将手指夹在显示屏和下壳之间,然后向上拉以将底壳从 Air 中弹出。

    • 取下底壳。

    • 要重新安装小写字母:

    • 将其固定到位并用力按压以接合下方的两个隐藏夹子。你应该感觉到并听到它们卡入到位。

  3. , 断开电池: 步骤 3 中的图像 1,1
    • 剥开覆盖电池接口的胶带,足以露出下面的接口。

  4. : 步骤 4 中的图像 1,2 : 步骤 4 中的图像 2,2
    • 使用撬棒将平行于主板的电池接口从主板上的插槽中滑出。

  5. 这个步骤还没有翻译 帮忙翻译一下

    : 步骤 5 中的图像 1,2 : 步骤 5 中的图像 2,2
    • Slide the pointed end of a spudger underneath the speaker cable and pry straight up to disconnect it.

  6. 这个步骤还没有翻译 帮忙翻译一下

    : 步骤 6 中的图像 1,2 : 步骤 6 中的图像 2,2
    • Use a T4 Torx driver to remove the three 1.4 mm screws securing the audio board connector cover.

    • Remove the audio board connector cover.

  7. 这个步骤还没有翻译 帮忙翻译一下

    : 步骤 7 中的图像 1,2 : 步骤 7 中的图像 2,2
    • Use the flat end of a spudger to pry the audio board connector straight up to disconnect it from the board.

    • To re-attach press connectors like this one, carefully align and press down on one side until it clicks into place, then repeat on the other side. Do not press down on the middle. If the connector is misaligned, the pins can bend, causing permanent damage.

  8. 这个步骤还没有翻译 帮忙翻译一下

    : 步骤 8 中的图像 1,3 : 步骤 8 中的图像 2,3 : 步骤 8 中的图像 3,3
    • Use the flat end of a spudger to pry the Touch ID cable straight up to disconnect it from the audio board.

    • Continue to slide the spudger underneath the Touch ID cable to release it from the audio board.

    • The Touch ID cable is secured to the audio board with some light adhesive.

  9. 这个步骤还没有翻译 帮忙翻译一下

    : 步骤 9 中的图像 1,1
    • Use a T4 Torx driver to remove the three screws securing the audio board:

    • Two 4.3 mm screws

    • One 2.4 mm screw

  10. 这个步骤还没有翻译 帮忙翻译一下

    : 步骤 10 中的图像 1,1
    • Remove the audio board.

  11. 这个步骤还没有翻译 帮忙翻译一下

    : 步骤 11 中的图像 1,1
    • Use a pair of tweezers to peel back the black tape covering the fan cable connector.

  12. 这个步骤还没有翻译 帮忙翻译一下

    : 步骤 12 中的图像 1,3 : 步骤 12 中的图像 2,3 : 步骤 12 中的图像 3,3
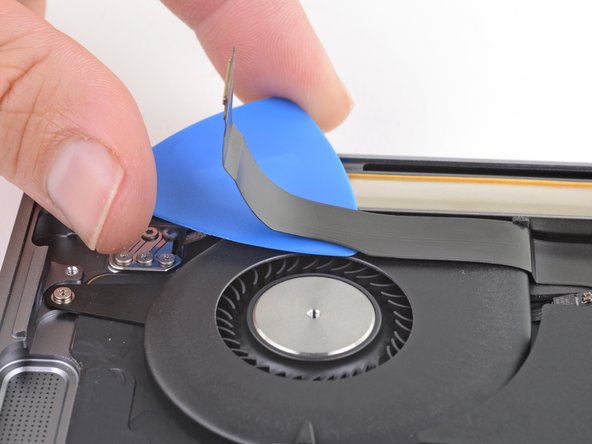
    • Use the pointed end of a spudger to lift up the small locking flap on the fan cable's ZIF connector.

    • Slide the fan cable out of its connector.

    • If possible, grip the cable by the tape, not by the cable itself.

  13. 这个步骤还没有翻译 帮忙翻译一下

    : 步骤 13 中的图像 1,3 : 步骤 13 中的图像 2,3 : 步骤 13 中的图像 3,3
    • Slide an opening pick underneath the audio board cable to separate it from the fan.

    • The cable is secured with some light adhesive.

    • If the adhesive is stubborn, do not force the pick. Lightly heat the cable using an iOpener or a hair dryer to soften the adhesive.

  14. 这个步骤还没有翻译 帮忙翻译一下

    : 步骤 14 中的图像 1,1
    • Use a T4 Torx driver to remove the three 2.7 mm screws securing the fan.

  15. 这个步骤还没有翻译 帮忙翻译一下

    : 步骤 15 中的图像 1,1
    • Lift the fan out of the case to remove it.

终点

2等其他人完成本指南。

Carsten Frauenheim

于03/10/20注册

113,871 声望

创作了338篇指南

团队

iFixit iFixit 的会员

Staff

135 名成员

创作了17,146篇指南

一条评论

Thank you very much. This helped me a lot when my fan started making buzzing noise an$ had the change it.

francis Bahenduzi - 回复

添加评论

浏览统计数据:

过去 24 小时: 10

过去 7 天: 78

过去 30 天: 363

总计 8,111