跳转到主内容

MacBook Air 13" Early 2017 Heat Sink Replacement

你所需要的

  1. MacBook Air 13" Early 2017 Heat Sink Replacement, Lower Case: 步骤 1 中的图像 1,1
    在这个步骤中使用的工具:
    P5 Pentalobe Screwdriver Retina MacBook Pro and Air
    $5.99
    购买
    • Before proceeding, power down your MacBook. Close the display and lay it on a soft surface, top-side down.

    • Use a P5 Pentalobe driver to remove ten screws securing the lower case, of the following lengths:

    • Two 9 mm screws

    • Eight 2.6 mm screws

  2. MacBook Air 13" Early 2017 Heat Sink Replacement: 步骤 2 中的图像 1,1
    • Wedge your fingers between the display and the lower case and pull upward to pop the lower case off the Air.

    • Remove the lower case and set it aside.

  3. MacBook Air 13" Early 2017 Heat Sink Replacement, Battery Connector: 步骤 3 中的图像 1,2 MacBook Air 13" Early 2017 Heat Sink Replacement, Battery Connector: 步骤 3 中的图像 2,2
    • To ensure that everything is de-energized and won't turn on while you're working, it is recommended that you disconnect the battery.

    • Grab the clear plastic pull tab attached to the battery connector and pull it parallel to the board toward the front edge of the Air.

    • Do not lift upward on the connector as you disconnect it or you risk damage to the connector socket.

  4. MacBook Air 13" Early 2017 Heat Sink Replacement, I/O Board Cable: 步骤 4 中的图像 1,1
    • Use the flat end of a spudger to pry the I/O board cable connector up out of its socket on the I/O board.

  5. MacBook Air 13" Early 2017 Heat Sink Replacement: 步骤 5 中的图像 1,1
    • Carefully peel the I/O board cable from the adhesive securing it to the top of the fan.

    • During reassembly, make sure this cable is in the correct orientation. It will fit if reversed, but the laptop will not boot.

  6. MacBook Air 13" Early 2017 Heat Sink Replacement: 步骤 6 中的图像 1,2 MacBook Air 13" Early 2017 Heat Sink Replacement: 步骤 6 中的图像 2,2
    • The following connector has an especially deep socket. Use care when disconnecting it.

    • While gently pulling the I/O board cable upward near its connection to the logic board, use the flat end of a spudger to pry up on alternating sides of the connector to help "walk" it out of its socket.

    • Remove the I/O board cable.

  7. MacBook Air 13" Early 2017 Heat Sink Replacement, Fan: 步骤 7 中的图像 1,1
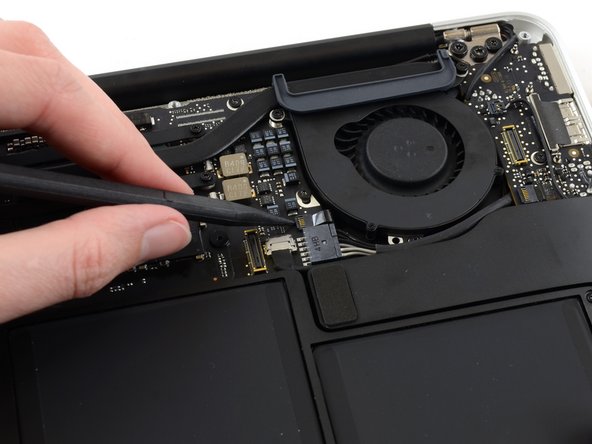
    • Use the tip of a spudger to carefully flip up the retaining flap on the fan cable ZIF socket.

    • Be sure you are prying up on the hinged retaining flap, not the socket itself.

  8. MacBook Air 13" Early 2017 Heat Sink Replacement: 步骤 8 中的图像 1,1
    • Peel the rubber gasket off the adhesive on the top of the fan.

  9. MacBook Air 13" Early 2017 Heat Sink Replacement: 步骤 9 中的图像 1,1
    • Remove the following three screws securing the fan to the upper case:

    • One 5.2 mm T5 Torx screw

    • One 3.3 mm T5 Torx screw

    • One 4.4 mm T5 Torx screw with a short head

  10. MacBook Air 13" Early 2017 Heat Sink Replacement: 步骤 10 中的图像 1,2 MacBook Air 13" Early 2017 Heat Sink Replacement: 步骤 10 中的图像 2,2
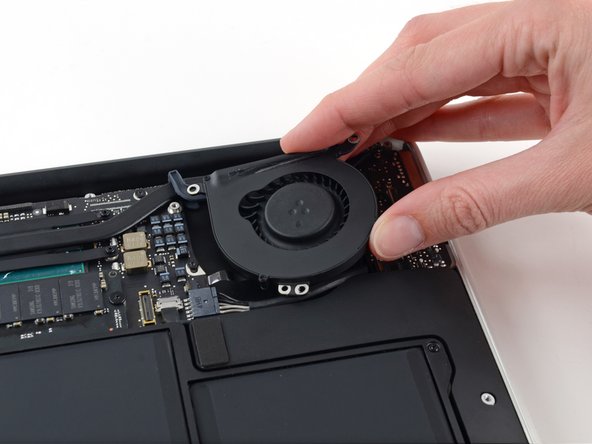
    • Lift the fan from the I/O board side and pull it free from the upper case.

    • Removing the fan will also disconnect the fan ribbon cable. Be careful not to snag it.

  11. MacBook Air 13" Early 2017 Heat Sink Replacement, I/O Board: 步骤 11 中的图像 1,1
    • Disconnect the I/O board by pulling its power cable away from its socket on the logic board.

    • Pull the cable parallel to the face of the logic board toward the right edge of the Air.

  12. MacBook Air 13" Early 2017 Heat Sink Replacement: 步骤 12 中的图像 1,2 MacBook Air 13" Early 2017 Heat Sink Replacement: 步骤 12 中的图像 2,2
    • Use the flat end of a spudger to pry the left speaker cable connector up and out of its socket on the I/O board.

    • Pry up from beneath the wires.

  13. MacBook Air 13" Early 2017 Heat Sink Replacement: 步骤 13 中的图像 1,2 MacBook Air 13" Early 2017 Heat Sink Replacement: 步骤 13 中的图像 2,2
    • Use the tip of a spudger to carefully flip up the retaining flap on the microphone ribbon cable ZIF socket.

    • Make sure you are flipping up the retaining flap, not the socket itself.

  14. MacBook Air 13" Early 2017 Heat Sink Replacement: 步骤 14 中的图像 1,1
    • Remove the single 4.1 mm T5 Torx screw securing the I/O board to the upper case.

  15. MacBook Air 13" Early 2017 Heat Sink Replacement: 步骤 15 中的图像 1,2 MacBook Air 13" Early 2017 Heat Sink Replacement: 步骤 15 中的图像 2,2
    • Gently de-route the camera cable from its notch on the I/O board and push it out of the way with the tip of a spudger.

  16. MacBook Air 13" Early 2017 Heat Sink Replacement: 步骤 16 中的图像 1,1
    • Lift the I/O board from the logic board side and pull it free from the upper case.

    • Removing the I/O board will also disconnect the microphone ribbon cable. Be careful not to snag it.

  17. MacBook Air 13" Early 2017 Heat Sink Replacement, Heat Sink: 步骤 17 中的图像 1,1
    • Remove the two 4.9 mm T8 Torx screws securing the antenna cable retainer on the left display hinge to the upper case.

  18. MacBook Air 13" Early 2017 Heat Sink Replacement: 步骤 18 中的图像 1,1
    • Push the antenna cable retainer out of the way and remove the single 3 mm T5 Torx screw securing the end of the heat sink to the upper case.

  19. MacBook Air 13" Early 2017 Heat Sink Replacement: 步骤 19 中的图像 1,1
    • Remove the four 2.5 mm T5 Torx screws securing the heat sink to the logic board.

  20. MacBook Air 13" Early 2017 Heat Sink Replacement: 步骤 20 中的图像 1,2 MacBook Air 13" Early 2017 Heat Sink Replacement: 步骤 20 中的图像 2,2
    • If the heat sink seems to be stuck to the logic board after removing all five screws, use a spudger to carefully separate the heat sink from the faces of the CPU and GPU.

    • Remove the heat sink from the logic board.

    • When reinstalling the heat sink, be sure to apply a new layer of thermal paste. If you have never applied thermal paste before, we have a guide that makes it easy.

  21. MacBook Air 13" Early 2017 Heat Sink Replacement: 步骤 21 中的图像 1,2 MacBook Air 13" Early 2017 Heat Sink Replacement: 步骤 21 中的图像 2,2
    • When reassembling your device, attach the gasket to the heat sink as shown.

    • The tail of the gasket should fit into the notch in the heat sink, it should not end up underneath the heat sink tab that will rest on the logic board.

    • Be sure the small post molded into the rubber gasket mates with the hole cut into the upper right corner of the logic board.

结论

To reassemble your device, follow these instructions in reverse order.

Take your e-waste to an R2 or e-Stewards certified recycler.

Repair didn’t go as planned? Try some basic troubleshooting, or ask our Answers community for help.

6等其他人完成本指南。

Adam O'Camb

于04/11/15注册

195,355 声望

创作了416篇指南

3条评论

Well imho a lil bit overkill from step 11 - you can easily unscrew with thin screwdriver the lonely heatsink screw near the rubber component

Krzysztof P - 回复

is the tr8 torx screw a neccessity and if so what step

boop. - 回复

is a tr8 torx security screwdriver a necessity? if so what step?

boop. - 回复

添加评论

浏览统计数据:

过去 24 小时: 19

过去 7 天: 86

过去 30 天: 333

总计 11,610