跳转到主内容

Lenovo ThinkPad T16 Gen 3 Webcam and Microphone Module Replacement

你所需要的

  1. Lenovo ThinkPad T16 Gen 3 Webcam and Microphone Module Replacement, Prepare your laptop for disassembly: 步骤 1 中的图像 1,2 Lenovo ThinkPad T16 Gen 3 Webcam and Microphone Module Replacement, Prepare your laptop for disassembly: 步骤 1 中的图像 2,2
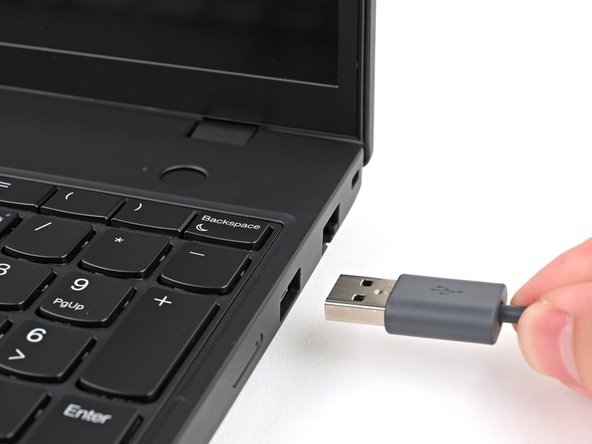
    • Completely shut down your laptop (don't just put it in sleep mode) and disconnect all cables.

  2. Lenovo ThinkPad T16 Gen 3 Webcam and Microphone Module Replacement, Screen Bezel: 步骤 2 中的图像 1,2 Lenovo ThinkPad T16 Gen 3 Webcam and Microphone Module Replacement, Screen Bezel: 步骤 2 中的图像 2,2
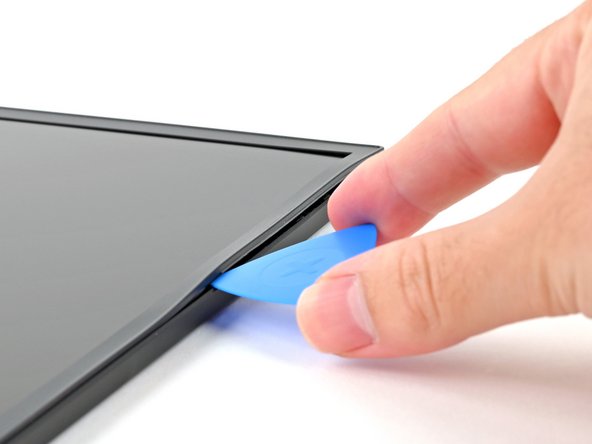
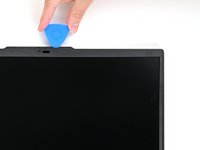
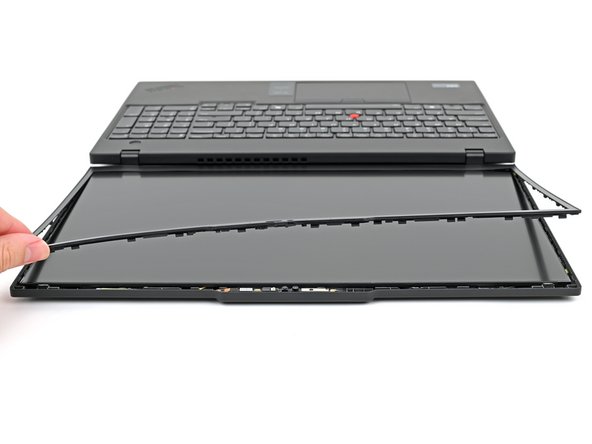
    • Insert the tip of an opening pick at a downward angle between the bezel and screen assembly, near the top right corner.

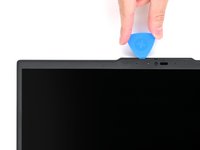
    • Lower the pick so it's flat with the screen and the tip is under the screen bezel.

  3. Lenovo ThinkPad T16 Gen 3 Webcam and Microphone Module Replacement: 步骤 3 中的图像 1,3 Lenovo ThinkPad T16 Gen 3 Webcam and Microphone Module Replacement: 步骤 3 中的图像 2,3 Lenovo ThinkPad T16 Gen 3 Webcam and Microphone Module Replacement: 步骤 3 中的图像 3,3
    • Don't insert your pick further than the tip, as you might damage the display.

    • If your bezel doesn't have clips, this guide can still be helpful, but it is recommended to take extra caution since the adhesive-only bezels are extremely fragile and designed to be consumed, not reused.

    • Slide your opening pick down the right edge to unfasten the bezel clips.

  4. Lenovo ThinkPad T16 Gen 3 Webcam and Microphone Module Replacement: 步骤 4 中的图像 1,3 Lenovo ThinkPad T16 Gen 3 Webcam and Microphone Module Replacement: 步骤 4 中的图像 2,3 Lenovo ThinkPad T16 Gen 3 Webcam and Microphone Module Replacement: 步骤 4 中的图像 3,3
    • Re-insert your opening pick near the top right corner.

    • Slide your opening pick around the top right corner to unfasten the frame clips, stopping before you hit the webcam.

    • Remove the opening pick.

  5. Lenovo ThinkPad T16 Gen 3 Webcam and Microphone Module Replacement: 步骤 5 中的图像 1,3 Lenovo ThinkPad T16 Gen 3 Webcam and Microphone Module Replacement: 步骤 5 中的图像 2,3 Lenovo ThinkPad T16 Gen 3 Webcam and Microphone Module Replacement: 步骤 5 中的图像 3,3
    • Re-insert your pick to the left of the webcam and slide it towards the top left corner and down the left edge to unfasten the remaining clips.

  6. Lenovo ThinkPad T16 Gen 3 Webcam and Microphone Module Replacement, Lift the bezel: 步骤 6 中的图像 1,3 Lenovo ThinkPad T16 Gen 3 Webcam and Microphone Module Replacement, Lift the bezel: 步骤 6 中的图像 2,3 Lenovo ThinkPad T16 Gen 3 Webcam and Microphone Module Replacement, Lift the bezel: 步骤 6 中的图像 3,3
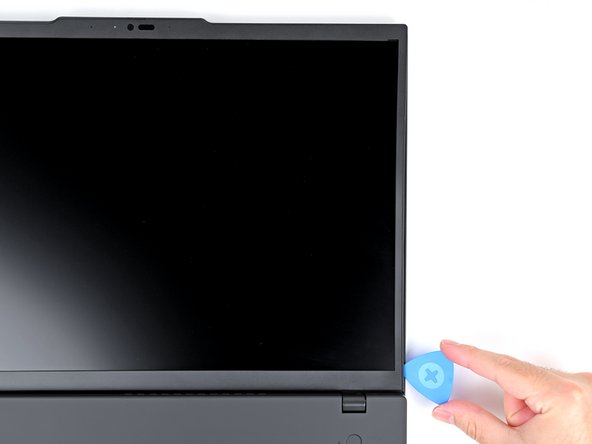
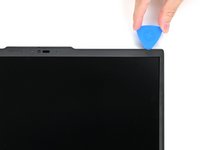
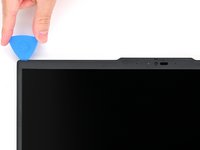
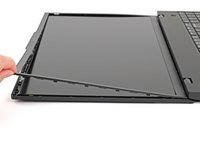
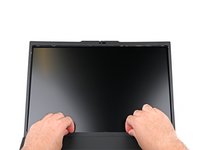
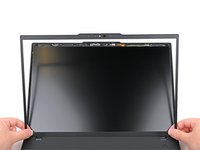
    • Gently lift the bezel on the right, top, and left sides to ensure all the clips are fully unfastened.

  7. Lenovo ThinkPad T16 Gen 3 Webcam and Microphone Module Replacement: 步骤 7 中的图像 1,3 Lenovo ThinkPad T16 Gen 3 Webcam and Microphone Module Replacement: 步骤 7 中的图像 2,3 Lenovo ThinkPad T16 Gen 3 Webcam and Microphone Module Replacement: 步骤 7 中的图像 3,3
    • The bottom edge of the bezel is held in place with strong adhesive and clips.

    • Ensure you're separating the bottom edge of the bezel from the protective film and not the protective film from the screen. If the film starts to peel up, gently press it back into place before you continue peeling up the bezel.

    • Use your fingers to slowly peel the bottom edge of the bezel from the protective film on the display.

    • If you're having a hard time separating the adhesive, use your opening pick to slice through the adhesive, being very careful not to cut the film. If it is still difficult, use an iOpener or hair dryer to lightly heat the bottom edge of the bezel.

  8. Lenovo ThinkPad T16 Gen 3 Webcam and Microphone Module Replacement, Remove the bezel: 步骤 8 中的图像 1,2 Lenovo ThinkPad T16 Gen 3 Webcam and Microphone Module Replacement, Remove the bezel: 步骤 8 中的图像 2,2
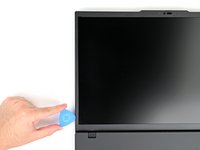
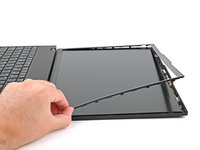
    • Once the adhesive is completely separated, lift the bottom edge of the bezel straight up to unfasten its clips.

  9. Lenovo ThinkPad T16 Gen 3 Webcam and Microphone Module Replacement: 步骤 9 中的图像 1,1
    在这个步骤中使用的工具:
    Tesa 61395 Tape
    $2.99
    • Remove the bezel.

    • To re-install this bezel or install a new one, you'll need replacement adhesive. If your replacement does not include adhesive, use thin, double-sided tape. Use the 5mm strips for the bottom, and the 1mm strips around the top and sides. Remove all residue from the original adhesive before replacing.

  10. Lenovo ThinkPad T16 Gen 3 Webcam and Microphone Module Replacement, Pry up the camera module: 步骤 10 中的图像 1,2 Lenovo ThinkPad T16 Gen 3 Webcam and Microphone Module Replacement, Pry up the camera module: 步骤 10 中的图像 2,2
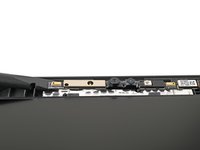
    • Insert a flat end of a spudger or a clean fingernail underneath the left side of the camera module.

    • Pry the module up enough to hold it with your fingers.

  11. Lenovo ThinkPad T16 Gen 3 Webcam and Microphone Module Replacement, Remove the tape: 步骤 11 中的图像 1,3 Lenovo ThinkPad T16 Gen 3 Webcam and Microphone Module Replacement, Remove the tape: 步骤 11 中的图像 2,3 Lenovo ThinkPad T16 Gen 3 Webcam and Microphone Module Replacement, Remove the tape: 步骤 11 中的图像 3,3
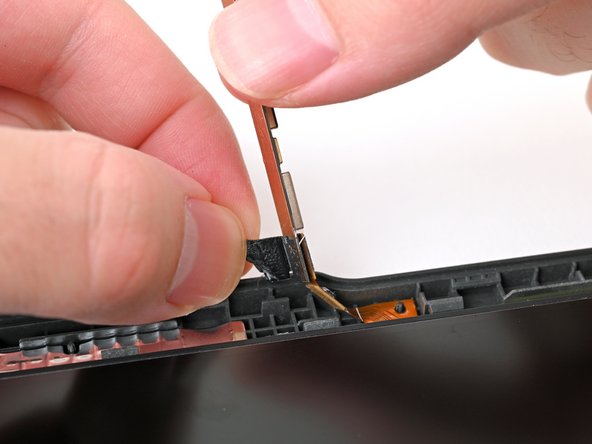
    • Use your fingernail or the point of a spudger to peel up the edge of the black tape holding the camera connector in place.

    • Completely unravel the tape.

    • Insert your fingernail or the flat end of a spudger beneath the camera module press connector and lift up to disconnect it from the board.

    • During reassembly, connect the press connector first, then replace the tape.

  12. Lenovo ThinkPad T16 Gen 3 Webcam and Microphone Module Replacement, Remove the camera module: 步骤 12 中的图像 1,1
    在这个步骤中使用的工具:
    Electrical Tape in 6 Assorted Colors
    $9.99
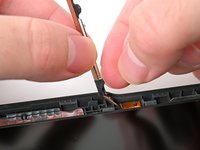
    • Remove the camera module from the laptop.

    • If the tape gets damaged during removal, it can be replaced with a piece of 5 mm‑wide standard electrical tape.

结论

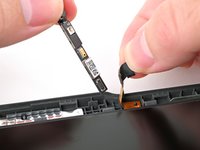
Compare your new replacement part to the original part—you may need to transfer remaining components or remove adhesive backings from the new part before you install it.

To reassemble your device, follow these instructions in reverse order.

Take your e-waste to an R2 or e-Stewards certified recycler.

Repair didn’t go as planned? Try some basic troubleshooting, or ask our Answers community for help.

Nick Schultz

于03/24/24注册

19,120 声望

创作了113篇指南

团队

iFixit iFixit 的会员

Staff

118 名成员

创作了19,526篇指南

0条评论

添加评论

浏览统计数据:

过去 24 小时: 1

过去 7 天: 6

过去 30 天: 25

总计 192