跳转到主内容

Left Joy-Con Buttons Replacement

你所需要的

  1. Left Joy-Con Buttons Replacement, Left Face Buttons: 步骤 1 中的图像 1,2 Left Joy-Con Buttons Replacement, Left Face Buttons: 步骤 1 中的图像 2,2
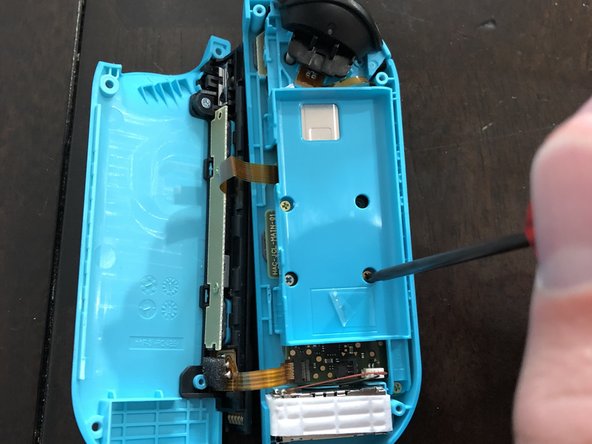
    • Remove the four screws located on the back casing with a Y00 screwdriver.

    • Insert a plastic opening tool or pick into the side of the Joy-Con without the rail and gently pry downwards to release the back plate.

  2. Left Joy-Con Buttons Replacement: 步骤 2 中的图像 1,1
    • Open the Joy-Con toward the rail side, like a book.

    • Be careful not to damage the two fragile ribbon cables attaching the rails to the motherboard.

  3. Left Joy-Con Buttons Replacement: 步骤 3 中的图像 1,1
    • Insert a spudger or plastic opening tool underneath the battery and gently begin prying downward to release the adhesive holding the battery in place.

    • Remove the battery from the inner casing.

    • Be careful not to pull too hard on the battery, as it is connected to the motherboard by a cord and you could risk damaging it.

  4. Left Joy-Con Buttons Replacement: 步骤 4 中的图像 1,1
    • Gently pull the cord that's connecting the battery to the motherboard up and out of the Joy-Con.

  5. Left Joy-Con Buttons Replacement: 步骤 5 中的图像 1,2 Left Joy-Con Buttons Replacement: 步骤 5 中的图像 2,2
    • Use a Phillips #2 screwdriver to remove the three screws that are locking the inner casing into place.

  6. Left Joy-Con Buttons Replacement: 步骤 6 中的图像 1,1
    • Open up the inner casing in the opposite direction you opened up the outer casing.

    • Be careful not to damage the one fragile ribbon cable attaching the inner casing to the motherboard.

  7. Left Joy-Con Buttons Replacement: 步骤 7 中的图像 1,1
    • Using tweezers, gently lift up on the black or grey clasps holding down each of the 5 ribbon cables connected to the motherboard.

    • Using the tweezers, gently pull each of the ribbon cables out from their connections.

  8. Left Joy-Con Buttons Replacement: 步骤 8 中的图像 1,1
    • Using a Phillips #2 screwdriver, unscrew both screws connecting the analog stick to the motherboard.

  9. Left Joy-Con Buttons Replacement: 步骤 9 中的图像 1,1
    • Carefully lift the analog stick up and out from the Joy-Con.

  10. Left Joy-Con Buttons Replacement: 步骤 10 中的图像 1,1
    • Using a Phillips #2 screwdriver, remove the two screws holding the motherboard in place.

  11. Left Joy-Con Buttons Replacement: 步骤 11 中的图像 1,2 Left Joy-Con Buttons Replacement: 步骤 11 中的图像 2,2
    • Carefully remove the rumble pack connected to the motherboard by gently lifting it out of its casing.

    • You may need to lift with a little force, as this piece is connected with adhesive.

    • Do not disconnect the cord connecting the rumble pack to the motherboard.

    • Carefully lift both the rumble pack and motherboard out of the outer casing.

  12. Left Joy-Con Buttons Replacement: 步骤 12 中的图像 1,1
    • Using a Phillips #2 screwdriver, remove the three screws holding the minus button and L button into place.

  13. Left Joy-Con Buttons Replacement: 步骤 13 中的图像 1,1
    • Locate and remove all of the rubber casings covering the buttons.

  14. Left Joy-Con Buttons Replacement: 步骤 14 中的图像 1,1
    • Use tweezers to remove all the buttons that you would like to replace.

    • Be careful not to turn the Joy-Con over as the buttons are now loose and could fall out.

  15. Left Joy-Con Buttons Replacement: 步骤 15 中的图像 1,1
    • Using tweezers, carefully place all your new buttons into the Joy-Con.

    • Make sure each of the notches on the buttons are properly lined up to the notches in the Joy-Con. Failure to do so could lead to non-responsive buttons.

结论

To reassemble your device, follow these instructions in reverse order. Make sure when you are screwing the motherboard back into place you do not screw it in too tightly. If the motherboard is too tight to the buttons it could keep the buttons from pushing properly.

30等其他人完成本指南。

8条评论

My left directional button is nonresponsive. Can I fix this by dropping in a replacement left directional button? Would the rubber cover need to be replaced as well?

Blade Dub - 回复

just incase you havent done so already, it might not be the button. it might be the motherboard, connectors, and a whole slew of other problems.

john gerardo -

What type of switch is the minus button? It’s on the same ribbon as the L micro switch. My L switch is bad and I’m replacing it I just would like to know the name of the type of switch used on the minus button.

brantleycmd - 回复

Thank you for the helpful guide! Is there a guide for the right Joy Con available anywhere?

ericsajedi - 回复

Eric, no one has made a guide for the right Joy-Con yet! I’ve taken them both apart and the buttons are pretty similar. I think you can use Joshua’s button guide here and this joystick guide to guide you to the buttons in the other Joy-Con! If you do end up attempting it, consider taking some photos and making a guide for future right Joy-Con fixers. :)

Taylor Dixon -

添加评论

浏览统计数据:

过去 24 小时: 40

过去 7 天: 282

过去 30 天: 1,325

总计 66,684