跳转到主内容
加入维修社区 - 创建账户

LCD Replacement

  1. LCD Replacement, Rear Cover: 步骤 1 中的图像 1,1
    • First ensure your laptop is turned off and check if you have the necessary tools

    询问修复机器人

    添加评论

  2. LCD Replacement: 步骤 2 中的图像 1,2 LCD Replacement: 步骤 2 中的图像 2,2
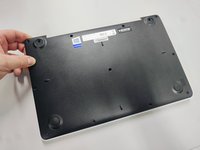
    • All screws are identified by circles. Pay special attention to the yellow circles, as the rubber feet hide screws.

    询问修复机器人

    添加评论

  3. LCD Replacement: 步骤 3 中的图像 1,3 LCD Replacement: 步骤 3 中的图像 2,3 LCD Replacement: 步骤 3 中的图像 3,3
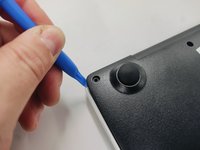
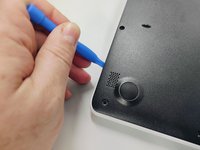
    • With the opening tool, remove a rubber foot.

    • For this action you will have to exert some force, because the foot is glued with a resistant glue.

    询问修复机器人

    添加评论

  4. LCD Replacement: 步骤 4 中的图像 1,1
    • Remove all screws with a Philips screwdriver PH1

    • All screws are the same so don't worry about identifying them.

    询问修复机器人

    添加评论

  5. LCD Replacement: 步骤 5 中的图像 1,3 LCD Replacement: 步骤 5 中的图像 2,3 LCD Replacement: 步骤 5 中的图像 3,3
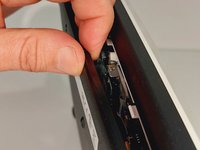
    • With the plastic tool, insert between the plastics and gently pry open.

    • With your fingers continue to force open the bottom cover on the side indicated in the figure.

    • You will feel and hear several clicks, perfectly normal, nothing is breaking. Remove the cover completely.

    询问修复机器人

    添加评论

  6. LCD Replacement: 步骤 6 中的图像 1,1
    • Finally, we have the laptop open and ready to replace most of its components. Look elsewhere on how to replace a component.

    • To close the laptop just follow this guide in reverse.

    询问修复机器人

    添加评论

    • Insert instructions here.

    询问修复机器人

    添加评论

结论

To reassemble your device, follow the previous steps in inverse order.

取消:我没有完成这个指南。

由衷感谢以下译者:

pt en

100%

David正在帮助我们修复这个世界! 您也想加入吗?
开始翻译 ›

0指南评论

添加评论

浏览统计数据:

过去 24 小时: 0

过去 7 天: 11

过去 30 天: 50

总计 473