跳转到主内容

Koosh Vortex Tornado Loading Spring Replacement

你所需要的

  1. Koosh Vortex Tornado Loading Spring Replacement, Barrel Shield Spring: 步骤 1 中的图像 1,1
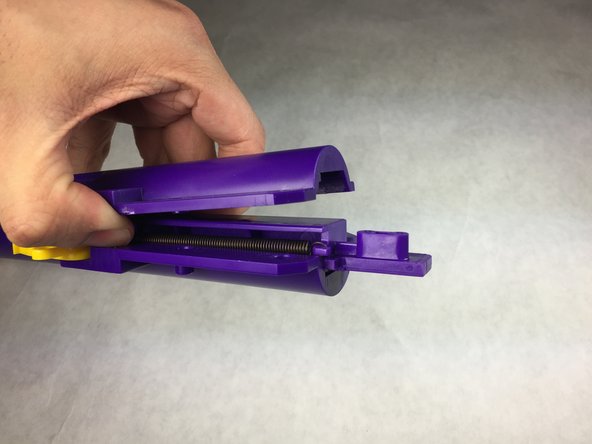
    • Remove the fourteen 15 mm Phillips #1 screws on the side of the body.

  2. Koosh Vortex Tornado Loading Spring Replacement: 步骤 2 中的图像 1,1
    • Pull the halves of the toy gun apart to show the inside. Set the left half aside (all of the inside components are on the right half).

  3. Koosh Vortex Tornado Loading Spring Replacement: 步骤 3 中的图像 1,1
    • Using a spudger, unhook the barrel shield's spring from the right half of the toy gun. One side should still be connected to the shield barrel shield.

  4. Koosh Vortex Tornado Loading Spring Replacement, Trigger: 步骤 4 中的图像 1,1
    • Slide the barrel shield and shield slide off of the gun and set aside.

  5. Koosh Vortex Tornado Loading Spring Replacement: 步骤 5 中的图像 1,1
    • Slide the rubber ring off of the barrel and set it aside.

  6. Koosh Vortex Tornado Loading Spring Replacement: 步骤 6 中的图像 1,1
    • Lift the yellow trigger from its pin and set aside.

  7. Koosh Vortex Tornado Loading Spring Replacement, Loading Spring: 步骤 7 中的图像 1,1
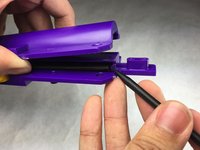
    • Use a Phillips #1 screwdriver to unscrew the two 12 mm long washer head screws from the yellow loading bar lever.

  8. Koosh Vortex Tornado Loading Spring Replacement: 步骤 8 中的图像 1,1
    • Lift the yellow lever bar out of place and set aside.

  9. Koosh Vortex Tornado Loading Spring Replacement: 步骤 9 中的图像 1,1
    • Use a Phillips #1 Screwdriver to unscrew the six 10 mm long screws from the central firing assembly.

    • Use Phillips #1 Screwdriver to unscrew the four 9 mm long screws from the central firing assembly.

  10. Koosh Vortex Tornado Loading Spring Replacement: 步骤 10 中的图像 1,1
    • Pull the shell of the central firing assembly aside off (contains the loading spring).

  11. Koosh Vortex Tornado Loading Spring Replacement: 步骤 11 中的图像 1,2 Koosh Vortex Tornado Loading Spring Replacement: 步骤 11 中的图像 2,2
    • Open the back side of the central firing assembly apart to expose the loading spring. Remove it, and change it with your desired spring.

    • The two sides cannot be fully separated due to a pin holding the yellow collar tightly together.

结论

To reassemble your device, follow these instructions in reverse order.

Lingbin Meng

于02/16/16注册

204 声望

创作了2篇指南

团队

IUPUI, Team 2-4, Harley Spring 2016 IUPUI, Team 2-4, Harley Spring 2016 的会员

IUPUI-HARLEY-S16S2G4

4 名成员

创作了3篇指南

0条评论

添加评论

浏览统计数据:

过去 24 小时: 0

过去 7 天: 0

过去 30 天: 6

总计 299