简介
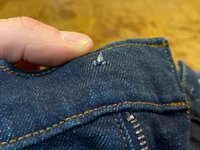
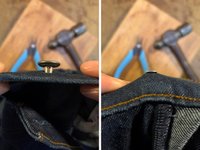
牛仔裤纽扣(又称铆钉扣)用于牢固固定裤腰部位。
本指南将演示如何安装新的牛仔裤纽扣。
开始维修前请完整阅读本指南,并准备好所需工具和材料。虽然Patagonia原装配件最理想,但并非必需。您可以通过联系Patagonia客服获取替换零件。
或者,您可以将Patagonia产品送至当地零售店进行维修评估,或通过邮寄维修服务寄回Patagonia。
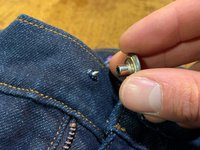
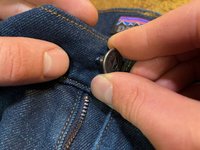
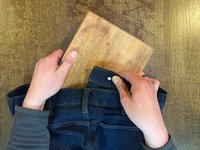
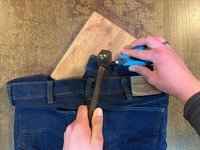
开始维修吧!
警告!小零件。Patagonia不建议对3岁及以下儿童的服装进行此类维修。我们建议将产品送回进行专业维修服务。
相关教程:工装裤铆钉更换指南
你所需要的


51等其他人完成本指南。


10指南评论
Nice, but let's consider how this situation occurs. The tack comes out of its hole, just simply replacing it is not realistic, unless the new tack is significantly bigger. So how do you "repair" the hole such that it will hold a tack again?
Gabe Misura - 回复 分享
As noted in step 2, you can move the tack over to where the denim isn't damaged. If that will cause the jeans not to fit properly, you can sew a folded piece of denim behind the hole (sew around the edges on the inside of the jeans) and punch the tack through the new piece.
I didn´t have a new button and was in a pinch. Just ripped the old button off completely, jammed it in the tail end of a hammer and yanked it apart with som pliers. Then i followed the instructions in this fix. Worked like a charm, so far...
Thanks I’m gonna try this first!
The best thing to do is patch the hole. I simply use fabric glue and some pieces of blue jeans that you probably have hanging around. Trim off the extra threads and then apply fabric glue to the back of the waist band covering the hole made by the old button. Do the same on the front and then let dry. about 30 minutes or so, if you have a machine I always stitch back and for on the edges. Trim any edges or use additional glue to tack them down. Now because you have strengthened the hole carefully push the back of the button through where you can see the end, add the front to the nail end and turning the garment face down on a protected hard surface hammer about 3 times and check to see if it is sturdy, continue to hammer until you have reached the objective. Now you have got many more years with that button.
melanie1150 - 回复 分享