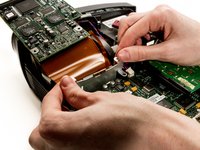
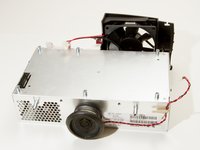
跳转到主内容
加入维修社区 - 创建账户

InFocus LP435Z Main Fan Replacement

你所需要的

  1. InFocus LP435Z Main Fan Replacement, External Shell: 步骤 1 中的图像 1,2 InFocus LP435Z Main Fan Replacement, External Shell: 步骤 1 中的图像 2,2
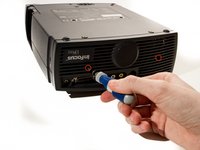
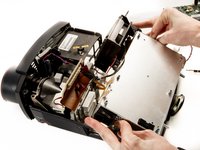
    • Place the projector on its back (buttons down) with the lens facing away from you.

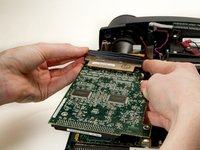
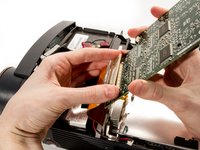
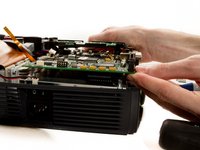
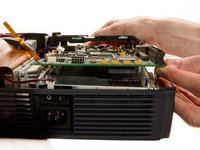
    • Remove the two 84mm screws in the upper left and right corners of the projector using the Phillips #2 screwdriver.

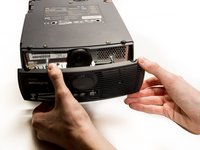
    • Remove the remaining three 8.5mm screws using the Phillips #1 screwdriver.

    询问修复机器人
  2. InFocus LP435Z Main Fan Replacement: 步骤 2 中的图像 1,2 InFocus LP435Z Main Fan Replacement: 步骤 2 中的图像 2,2
    • Use the plastic opening tools to push down the clips holding the lamp cover in place, and remove it.

    • There is no lamp assembly in the projector used in this guide, yours may appear different.

    询问修复机器人
  3. InFocus LP435Z Main Fan Replacement: 步骤 3 中的图像 1,2 InFocus LP435Z Main Fan Replacement: 步骤 3 中的图像 2,2
    • Remove the two 8.5mm rear screws holding the rear case plate to the projector using the Phillips #1 screwdriver.

    • Pull the rear plate straight off and set it aside.

    询问修复机器人
  4. InFocus LP435Z Main Fan Replacement: 步骤 4 中的图像 1,3 InFocus LP435Z Main Fan Replacement: 步骤 4 中的图像 2,3 InFocus LP435Z Main Fan Replacement: 步骤 4 中的图像 3,3
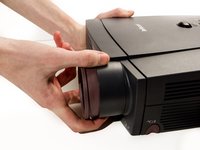
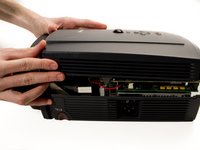
    • Flip the projector over and turn around so that the lens faces you.

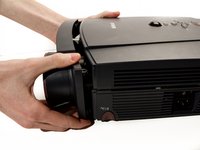
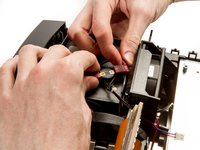
    • Twist the gray zoom adjustment ring clockwise and extend the lens all the way out, and then slide the zoom adjustment ring all the way towards the end of the lens as far as it will go.

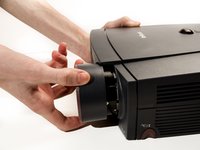
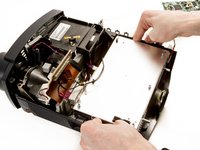
    • Slide the front case plate towards the loosened zoom adjustment ring, until the top plate of the projector is freed from underneath the lip of the front case plate.

    • The front case plate will not come all the way off due to the zoom adjustment ring obstructing it. It will merely slide forward a bit.

    询问修复机器人
  5. InFocus LP435Z Main Fan Replacement: 步骤 5 中的图像 1,2 InFocus LP435Z Main Fan Replacement: 步骤 5 中的图像 2,2
    • Lift away the top case plate and set it aside.

    询问修复机器人
  6. InFocus LP435Z Main Fan Replacement, Main Fan: 步骤 6 中的图像 1,1
    • Remove the four T10 Torx 8.5 mm screws holding the DLP board in place.

    询问修复机器人
  7. InFocus LP435Z Main Fan Replacement: 步骤 7 中的图像 1,1
    • Unplug the small ribbon cable attaching the DLP board to the motherboard.

    询问修复机器人
  8. InFocus LP435Z Main Fan Replacement: 步骤 8 中的图像 1,1
    • Remove Secondary Fan Cable

    询问修复机器人
  9. InFocus LP435Z Main Fan Replacement: 步骤 9 中的图像 1,2 InFocus LP435Z Main Fan Replacement: 步骤 9 中的图像 2,2
    • Detach the DLP board from where it is connected to the motherboard by a large 100 pin connector.

    • Pry up gently while wiggling from left to right if needed.

    • The ribbon cable on the other side of the board could break if pulled too hard.

    询问修复机器人
  10. InFocus LP435Z Main Fan Replacement: 步骤 10 中的图像 1,1
    • Remove the 2 remaining T10 Torx 8mm screws securing the motherboard to the power supply.

    询问修复机器人
  11. InFocus LP435Z Main Fan Replacement: 步骤 11 中的图像 1,1
    • Remove the speaker power cable.

    询问修复机器人
  12. InFocus LP435Z Main Fan Replacement: 步骤 12 中的图像 1,1
    • Remove DLP Power Cable.

    询问修复机器人
  13. InFocus LP435Z Main Fan Replacement: 步骤 13 中的图像 1,2 InFocus LP435Z Main Fan Replacement: 步骤 13 中的图像 2,2
    • Pry out the DLP support piece by gently wiggling it side to side while applying a steady pull. It will slide out.

    询问修复机器人
  14. InFocus LP435Z Main Fan Replacement: 步骤 14 中的图像 1,2 InFocus LP435Z Main Fan Replacement: 步骤 14 中的图像 2,2
    • Remove the black plastic retaining clip reinforcing the large ribbon cable connector by prying it from the left edge.

    • Gently pry the large ribbon cable connector from the DLP board, and remove the board.

    • Using too much force could damage the connector.

    询问修复机器人
  15. InFocus LP435Z Main Fan Replacement: 步骤 15 中的图像 1,3 InFocus LP435Z Main Fan Replacement: 步骤 15 中的图像 2,3 InFocus LP435Z Main Fan Replacement: 步骤 15 中的图像 3,3
    • Remove the two 1/4" screws using the nut driver.

    • The second screw is located behind the right side of the 100 pin connector.

    • Gently pry up the motherboard from the connector on top of the power supply.

    询问修复机器人
  16. InFocus LP435Z Main Fan Replacement: 步骤 16 中的图像 1,2 InFocus LP435Z Main Fan Replacement: 步骤 16 中的图像 2,2
    • Disconnect the lamp power supply cables from the top of the lamp housing, by gently pulling the two wires in opposite directions.

    询问修复机器人
  17. InFocus LP435Z Main Fan Replacement: 步骤 17 中的图像 1,3 InFocus LP435Z Main Fan Replacement: 步骤 17 中的图像 2,3 InFocus LP435Z Main Fan Replacement: 步骤 17 中的图像 3,3
    • Use your thumbs to pry the sides of the external shell away from the power supply so it can be lifted out.

    询问修复机器人
  18. InFocus LP435Z Main Fan Replacement: 步骤 18 中的图像 1,1
    • Detach the main fan power cable from the power supply.

    询问修复机器人
  19. InFocus LP435Z Main Fan Replacement: 步骤 19 中的图像 1,3 InFocus LP435Z Main Fan Replacement: 步骤 19 中的图像 2,3 InFocus LP435Z Main Fan Replacement: 步骤 19 中的图像 3,3
    • Use the needle nose pliers to pull out the grommets securing the main fan to its housing.

    • To replace grommets, pull the center pins from their housing, and slip the exteriors of the grommets back into their holes in the fan housing, then push the centers in to secure them in place.

    询问修复机器人
  20. InFocus LP435Z Main Fan Replacement: 步骤 20 中的图像 1,1
    • Remove the fan from its housing.

    询问修复机器人
结论

To reassemble your device, follow these instructions in reverse order.

2等其他人完成本指南。

团队

Cal Poly, Team 20-3, Maness Winter 2013 Cal Poly, Team 20-3, Maness Winter 2013 的会员

CPSU-MANESS-W13S20G3

4 名成员

创作了7篇指南

0指南评论

添加评论

浏览统计数据:

过去 24 小时: 1

过去 7 天: 6

过去 30 天: 57

总计 2,714