跳转到主内容
加入维修社区 - 创建账户

How to Apply Rear Cover Adhesive in Your Google Pixel 7a

你所需要的

    1. How to Apply Rear Cover Adhesive in Your Google Pixel 7a, Remove the old adhesive from the frame: 步骤 1 中的图像 1,3 How to Apply Rear Cover Adhesive in Your Google Pixel 7a, Remove the old adhesive from the frame: 步骤 1 中的图像 2,3 How to Apply Rear Cover Adhesive in Your Google Pixel 7a, Remove the old adhesive from the frame: 步骤 1 中的图像 3,3
      在这个步骤中使用的工具:
      Tweezers
      $4.99
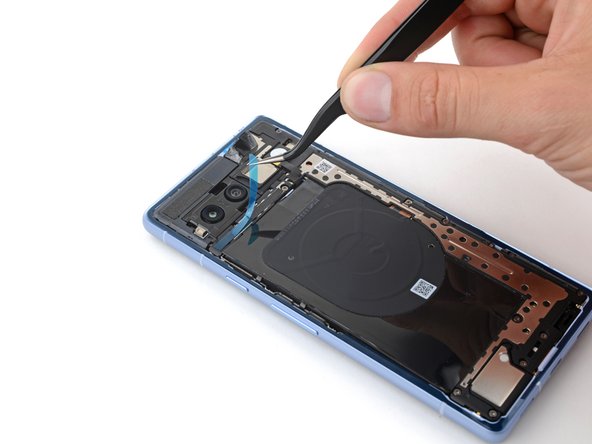
      • Use the point of a spudger to scrape up an edge of the rear cover adhesive from the frame until you have a large enough clump to grab on to.

      • Use tweezers or your fingers to peel the adhesive from the entire perimeter of the frame.

      • Remove the adhesive from the antenna housing.

      添加评论

    2. How to Apply Rear Cover Adhesive in Your Google Pixel 7a, Remove the old adhesive from the rear cover: 步骤 2 中的图像 1,3 How to Apply Rear Cover Adhesive in Your Google Pixel 7a, Remove the old adhesive from the rear cover: 步骤 2 中的图像 2,3 How to Apply Rear Cover Adhesive in Your Google Pixel 7a, Remove the old adhesive from the rear cover: 步骤 2 中的图像 3,3
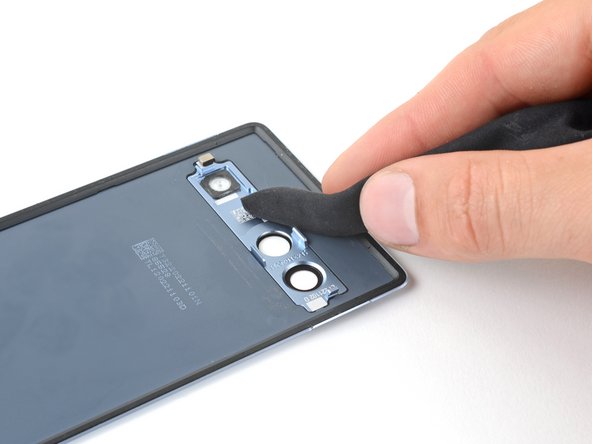
      • Be careful not to touch the lens covers on your rear cover. If they're dirty, wipe them with a clean and dry microfiber cloth.

      • If you're reusing your rear cover, remove any old adhesive:

      • If necessary, soften the adhesive near the camera bar with a heated iOpener or hair dryer.

      • Use your finger to roll the adhesive strips until you can grab them.

      • Peel the adhesive strips from the rear cover.

      询问修复机器人

      添加评论

    3. How to Apply Rear Cover Adhesive in Your Google Pixel 7a, Clean the frame and rear cover: 步骤 3 中的图像 1,3 How to Apply Rear Cover Adhesive in Your Google Pixel 7a, Clean the frame and rear cover: 步骤 3 中的图像 2,3 How to Apply Rear Cover Adhesive in Your Google Pixel 7a, Clean the frame and rear cover: 步骤 3 中的图像 3,3
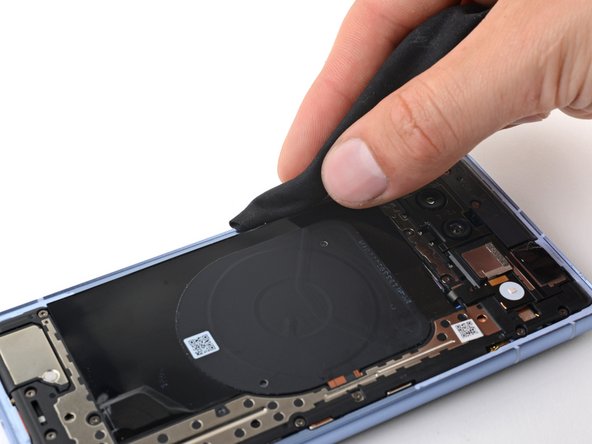
      • Use a pipette or syringe to apply a few drops of highly-concentrated isopropyl alcohol (over 90%) to the perimeter of the frame and the antenna housing.

      • Wipe any adhesive residue away using a microfiber or lint-free cloth.

      • If you're reusing your rear cover, clean it just as you did the frame.

      询问修复机器人

      添加评论

    4. How to Apply Rear Cover Adhesive in Your Google Pixel 7a, Apply the lower rear cover adhesive: 步骤 4 中的图像 1,2 How to Apply Rear Cover Adhesive in Your Google Pixel 7a, Apply the lower rear cover adhesive: 步骤 4 中的图像 2,2
      • If you have a new rear cover, your part may come with the lower and top rear cover adhesive pre-installed and you can skip down two steps to apply the perimeter adhesive.

      • Remove the long, thin strip of rear cover adhesive from its liner.

      • Place the adhesive onto the logic board cover, just below the rear cameras.

      询问修复机器人

      添加评论

    5. How to Apply Rear Cover Adhesive in Your Google Pixel 7a, Apply the top rear cover adhesive: 步骤 5 中的图像 1,2 How to Apply Rear Cover Adhesive in Your Google Pixel 7a, Apply the top rear cover adhesive: 步骤 5 中的图像 2,2
      • Peel the short, wide strip of rear cover adhesive from its liner.

      • Place the adhesive onto the antenna housing, just above the rear cameras.

      询问修复机器人

      添加评论

    6. How to Apply Rear Cover Adhesive in Your Google Pixel 7a, Orient the rear cover perimeter adhesive: 步骤 6 中的图像 1,3 How to Apply Rear Cover Adhesive in Your Google Pixel 7a, Orient the rear cover perimeter adhesive: 步骤 6 中的图像 2,3 How to Apply Rear Cover Adhesive in Your Google Pixel 7a, Orient the rear cover perimeter adhesive: 步骤 6 中的图像 3,3
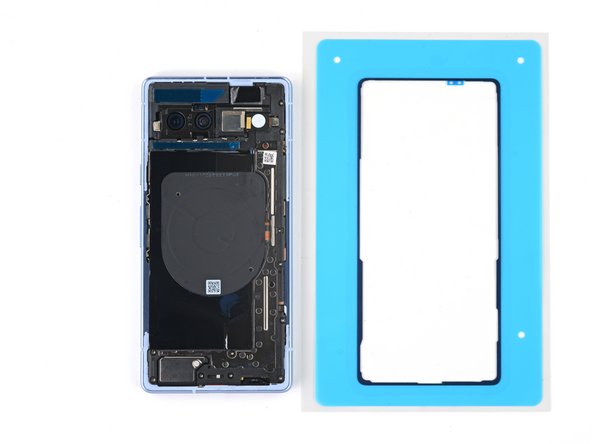
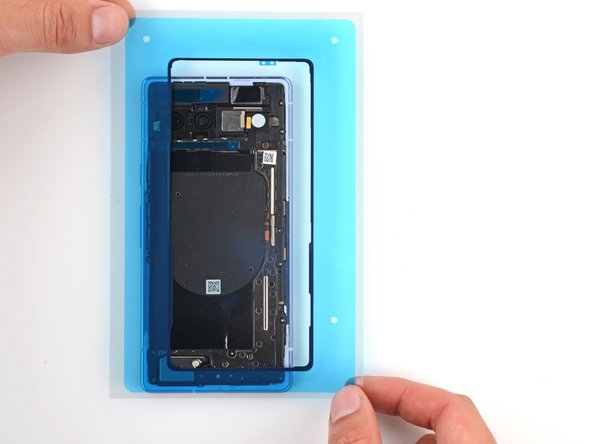
      • Before installing new adhesive, it's helpful to make sure both the phone and adhesive sheet are aligned and ready to go.

      • Orient your replacement adhesive over the frame so that its pull tabs are in the upper right corner.

      询问修复机器人

      添加评论

    7. How to Apply Rear Cover Adhesive in Your Google Pixel 7a, Apply the perimeter adhesive: 步骤 7 中的图像 1,3 How to Apply Rear Cover Adhesive in Your Google Pixel 7a, Apply the perimeter adhesive: 步骤 7 中的图像 2,3 How to Apply Rear Cover Adhesive in Your Google Pixel 7a, Apply the perimeter adhesive: 步骤 7 中的图像 3,3
      • The perimeter adhesive is difficult to align and can't be adjusted after it adheres. Work slowly and make sure the edges stay lined up with the frame as you go.

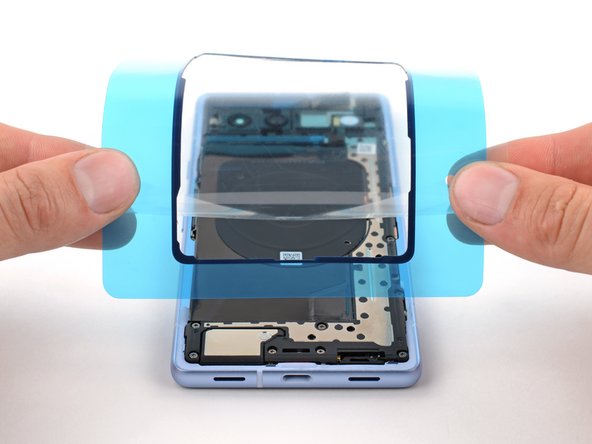
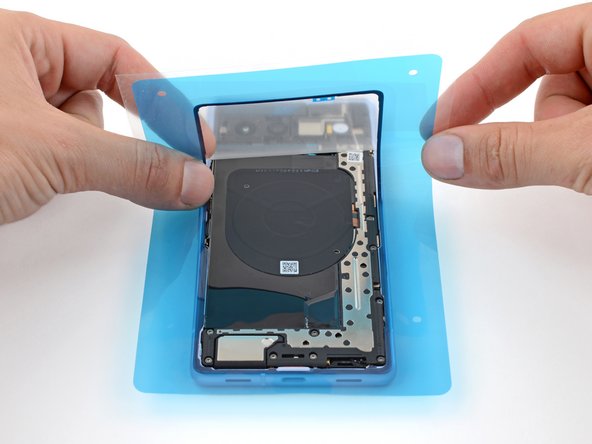
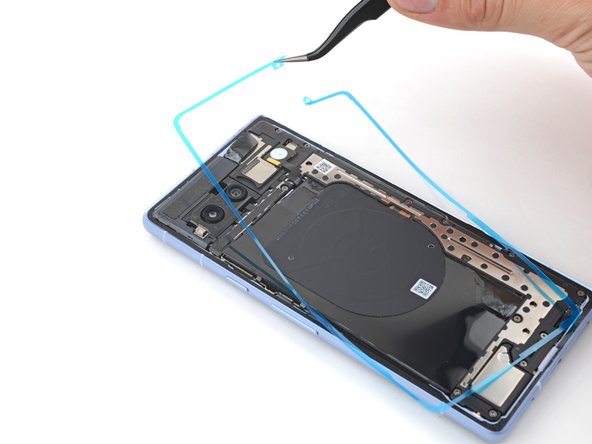
      • Peel the bottom edge of the rear cover perimeter adhesive from its liner. Leave the rest of the liner in place to protect it while you lay the adhesive down.

      • Hold the large liner out of the way and align the bottom edge of the adhesive with the frame.

      • Press the bottom edge of the adhesive into place.

      添加评论

    8. How to Apply Rear Cover Adhesive in Your Google Pixel 7a: 步骤 8 中的图像 1,3 How to Apply Rear Cover Adhesive in Your Google Pixel 7a: 步骤 8 中的图像 2,3 How to Apply Rear Cover Adhesive in Your Google Pixel 7a: 步骤 8 中的图像 3,3
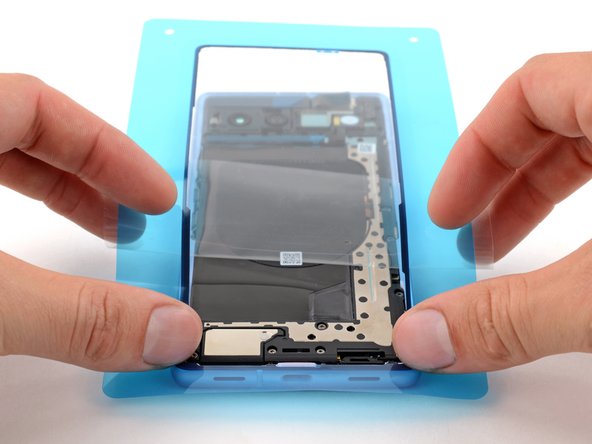
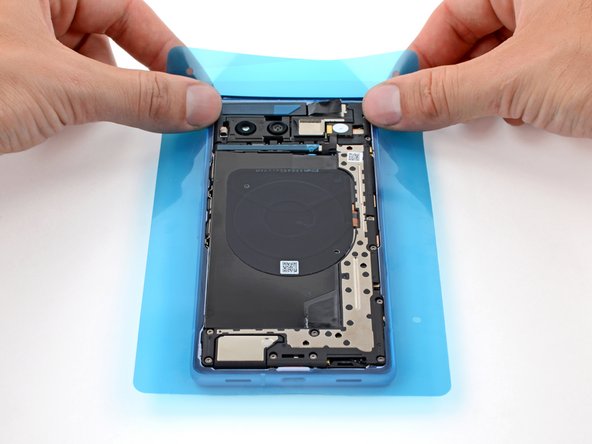
      • Slowly peel the large liner from the adhesive and work up the frame, laying the long edges of the adhesive into place as you go.

      • Before placing the top edge of the adhesive, fully remove the liner.

      • The adhesive may stretch or compress before reaching the top edge. Adjust it to fit the top edge if it comes out of alignment.

      • Press the top edge of the adhesive into place.

      询问修复机器人

      添加评论

    9. How to Apply Rear Cover Adhesive in Your Google Pixel 7a, Secure the adhesive: 步骤 9 中的图像 1,3 How to Apply Rear Cover Adhesive in Your Google Pixel 7a, Secure the adhesive: 步骤 9 中的图像 2,3 How to Apply Rear Cover Adhesive in Your Google Pixel 7a, Secure the adhesive: 步骤 9 中的图像 3,3
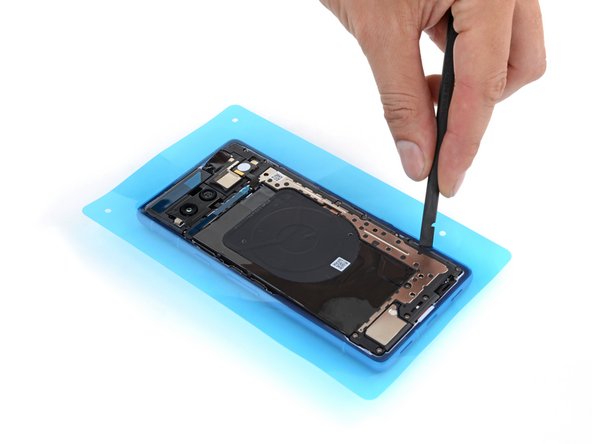
      • Use the flat end of your spudger to press around the entire perimeter of the adhesive to strengthen its bond to the frame.

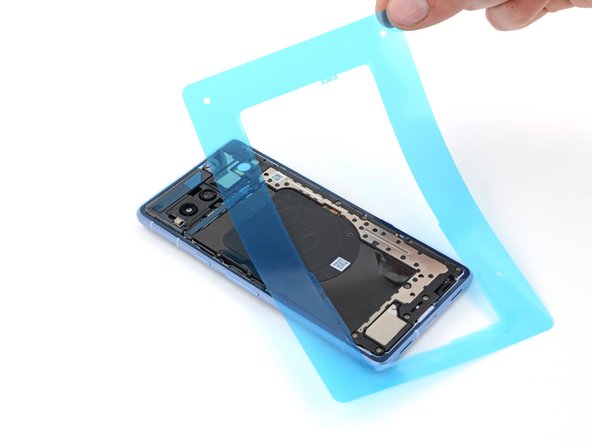
      • Peel the large blue adhesive liner from the frame.

      添加评论

    10. How to Apply Rear Cover Adhesive in Your Google Pixel 7a, Remove the liners: 步骤 10 中的图像 1,3 How to Apply Rear Cover Adhesive in Your Google Pixel 7a, Remove the liners: 步骤 10 中的图像 2,3 How to Apply Rear Cover Adhesive in Your Google Pixel 7a, Remove the liners: 步骤 10 中的图像 3,3
      • If you have a new rear cover, you only have the perimeter adhesive liner to remove.

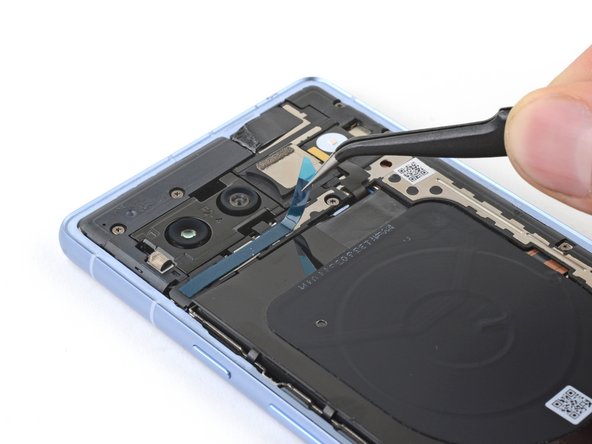
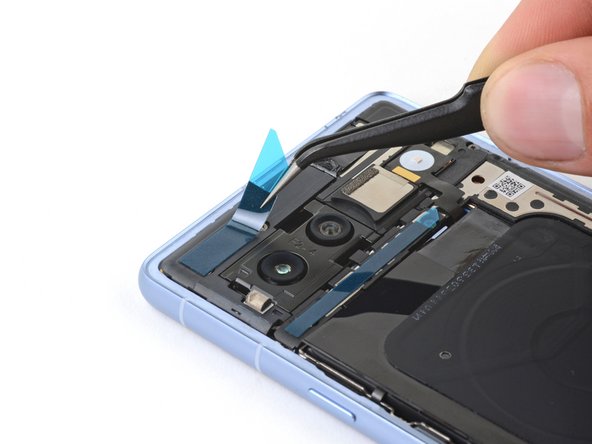
      • Use tweezers or your fingers to grab the pull tabs and remove all three liners from the adhesives on the frame:

      • The strip above the rear cameras

      • The strip below the rear cameras

      • The thin perimeter adhesive

      询问修复机器人

      添加评论

    11. How to Apply Rear Cover Adhesive in Your Google Pixel 7a, Install the rear cover: 步骤 11 中的图像 1,3 How to Apply Rear Cover Adhesive in Your Google Pixel 7a, Install the rear cover: 步骤 11 中的图像 2,3 How to Apply Rear Cover Adhesive in Your Google Pixel 7a, Install the rear cover: 步骤 11 中的图像 3,3
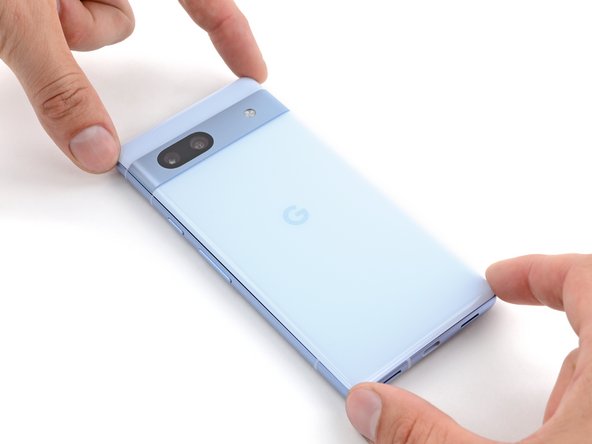
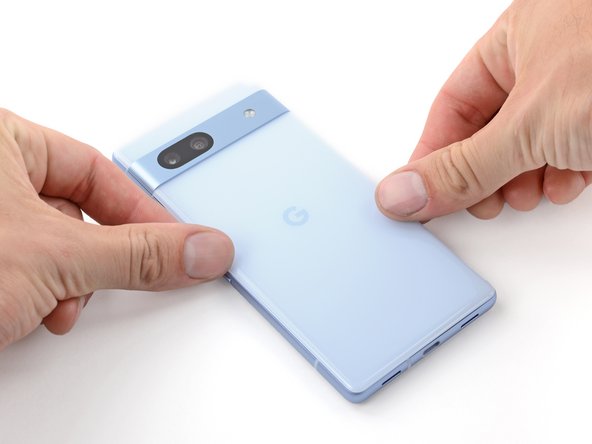
      • Align the rear cover over the frame and press it into place.

      • Firmly press around the perimeter of the rear cover to secure it.

      • To further strengthen the adhesive bond, lightly heat it with a hair dryer or heat gun before pressing around the rear cover's perimeter.

      询问修复机器人

      添加评论

结论

Repair didn’t go as planned? Try some basic troubleshooting, or ask our Answers community for help.

取消:我没有完成这个指南。

40等其他人完成本指南。

Clay Eickemeyer

于09/19/22注册

106,037 声望

创作了472篇指南

团队

Guide Team Guide Team 的会员

Staff

10 名成员

创作了43,343篇指南

7指南评论

Everything went smoothly thanks to this clear, comprehensive guide- thank you!

pinballwizard - 回复 分享

How does the kit does'nt come with the torx 1 bit? it is really unnaceptable, fortunately I had one but what happens to people that buys the kit to then realize it is incomplete?

juan felipe rueda roman - 回复 分享

I made the rear screen clear as a mod. but to do this I had to completly remove the metalic camera as not to scratch it.

How is this part called? And where can I find the adhesive to attach that to the rear cover again?

There was extra adhesive wich was glueing it to the rear cover.

Joey - 回复 分享

it's the first time i disassemble something, reassemble it and have no left over screws. Superb guide! thanks

Edoardo - 回复 分享

Most challenging part was getting the back cover off.

For me, my battery was swelling, so there already was a gap up by the camera. I found 90+% IPA (I was actually using 99% IPA) was absolutely essential to remove the back cover and remove the battery. The pipette that comes with the kit worked great for controlling the amount of IPA. It was also very useful to get the adhesive entirely off.

All in all, this was an excellent guide.

Keith Kyzivat (Keithel) - 回复 分享

添加评论

浏览统计数据:

过去 24 小时: 16

过去 7 天: 125

过去 30 天: 547

总计 11,292