跳转到主内容

HTC One Mini 2 Charging Port Replacement

你所需要的

  1. HTC One Mini 2 Charging Port Replacement, Sim and MicroSD Card: 步骤 1 中的图像 1,3 HTC One Mini 2 Charging Port Replacement, Sim and MicroSD Card: 步骤 1 中的图像 2,3 HTC One Mini 2 Charging Port Replacement, Sim and MicroSD Card: 步骤 1 中的图像 3,3
    • Insert the end of a paper clip into the holes on each side of the phone to eject the SIM card and Micro SD card.

    • Set the cardholders aside.

  2. HTC One Mini 2 Charging Port Replacement: 步骤 2 中的图像 1,1
    • Heat up the top grey speaker plate with the iFixit iOpener for two minutes.

  3. HTC One Mini 2 Charging Port Replacement, Front Plate: 步骤 3 中的图像 1,3 HTC One Mini 2 Charging Port Replacement, Front Plate: 步骤 3 中的图像 2,3 HTC One Mini 2 Charging Port Replacement, Front Plate: 步骤 3 中的图像 3,3
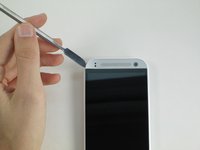
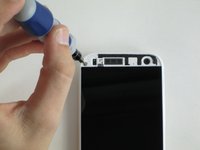
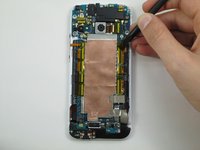
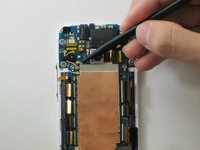
    • Use a metal spudger to pry up the left edge of the upper grey front plate.

    • Place the spudger between the inside white plastic edge and the grey plate. Do not pry between the two white plastic frames.

    • Don’t pry against the glass. Pry against only the left side as there is a delicate antenna under the plate.

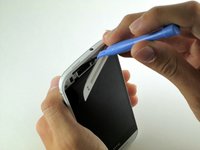
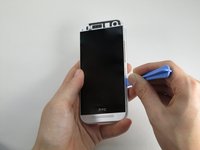
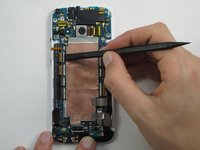
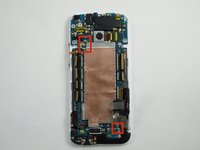
    • Use the narrow plastic pry tool to carefully separate the black ribbon antenna from the grey plate.

  4. HTC One Mini 2 Charging Port Replacement: 步骤 4 中的图像 1,2 HTC One Mini 2 Charging Port Replacement: 步骤 4 中的图像 2,2
    • Remove the 2mm screw with a T5 torx screwdriver head from the iFixit tool kit.

  5. HTC One Mini 2 Charging Port Replacement: 步骤 5 中的图像 1,2 HTC One Mini 2 Charging Port Replacement: 步骤 5 中的图像 2,2
    • Use the plastic pry tool to pry around the edge of the phone.

    • Pry carefully around the card slots.

    • Slowly pull up from the right side of the screen like opening a book.

    • The plastic piece for the power button may fall out. Set it aside for reassembly.

    • Use the plastic spudger to peel the foam adhesive around the camera away from the back plate.

  6. HTC One Mini 2 Charging Port Replacement, Motherboard: 步骤 6 中的图像 1,2 HTC One Mini 2 Charging Port Replacement, Motherboard: 步骤 6 中的图像 2,2
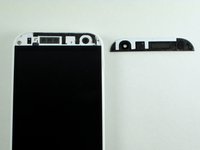
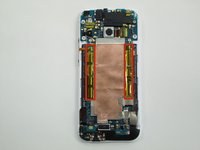
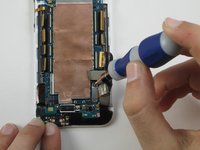
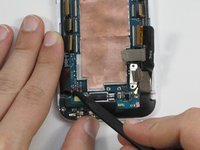
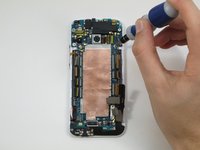
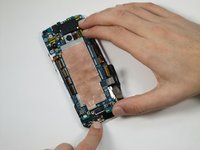
    • Peel off the long yellow pieces of tape on the right and left side of the copper plate.

  7. HTC One Mini 2 Charging Port Replacement: 步骤 7 中的图像 1,1
    • Starting from the copper plate, peel up all three woven, silver colored tapes using the spudger or narrow pry tool.

  8. HTC One Mini 2 Charging Port Replacement: 步骤 8 中的图像 1,3 HTC One Mini 2 Charging Port Replacement: 步骤 8 中的图像 2,3 HTC One Mini 2 Charging Port Replacement: 步骤 8 中的图像 3,3
    • Using the flat end of the spudger, pop up the white tabs on all ribbon cable connectors located to the left and right of the copper plate.

    • On the left side, pop the white tab up to the left. On the right, pop up to the right.

    • Carefully pull out the ribbon cables.

  9. HTC One Mini 2 Charging Port Replacement: 步骤 9 中的图像 1,3 HTC One Mini 2 Charging Port Replacement: 步骤 9 中的图像 2,3 HTC One Mini 2 Charging Port Replacement: 步骤 9 中的图像 3,3
    • Using a Phillips #00 screwdriver, unscrew the two 1 mm screws from the bottom right corner of the motherboard that hold the power connector down.

    • Pop up the battery connector using the flat end of the spudger.

  10. HTC One Mini 2 Charging Port Replacement: 步骤 10 中的图像 1,3 HTC One Mini 2 Charging Port Replacement: 步骤 10 中的图像 2,3 HTC One Mini 2 Charging Port Replacement: 步骤 10 中的图像 3,3
    • Use the pointed end of the spudger to pop off the four antenna connectors. Three are located on the top left corner of the motherboard and one on the bottom right.

  11. HTC One Mini 2 Charging Port Replacement: 步骤 11 中的图像 1,2 HTC One Mini 2 Charging Port Replacement: 步骤 11 中的图像 2,2
    • Using the pointed end of the spudger, pull the wires for the rumble motor to the left to pull the connector out of the board.

    • The connector is very small and easy to break so take caution when pulling it out. Wiggling the wires as you pull to the left helps.

  12. HTC One Mini 2 Charging Port Replacement: 步骤 12 中的图像 1,3 HTC One Mini 2 Charging Port Replacement: 步骤 12 中的图像 2,3 HTC One Mini 2 Charging Port Replacement: 步骤 12 中的图像 3,3
    • Using a T5 torx screwdriver, remove four 2mm screws from the four corners of the motherboard.

    • Once the screws are removed, carefully pull the copper plated motherboard out.

  13. HTC One Mini 2 Charging Port Replacement, Charging Port: 步骤 13 中的图像 1,1
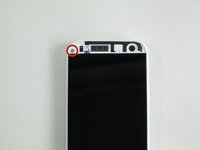
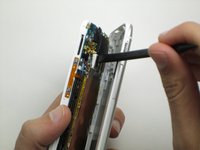
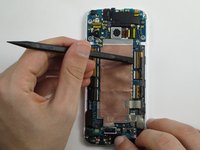
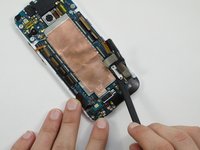
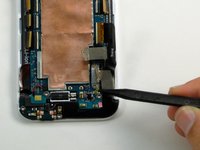
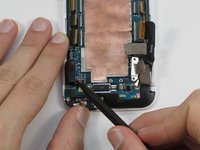
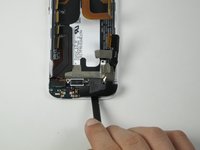
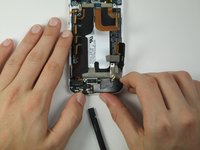
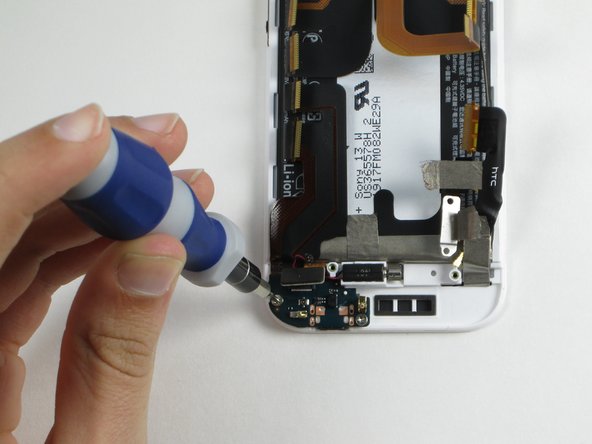
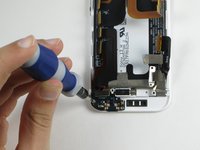
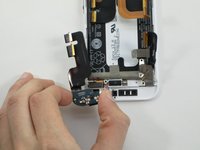
    • Use the narrow plastic tool to pry up the black foam covered rectangular connector.

  14. HTC One Mini 2 Charging Port Replacement: 步骤 14 中的图像 1,2 HTC One Mini 2 Charging Port Replacement: 步骤 14 中的图像 2,2
    • Use the flat end of the plastic spudger to pry the lower speaker out.

    • Holding the phone, pull the speaker to the right pulling the connector out of the board.

    • The connector is very small and easy to break so take caution when pulling it out. It helps to gently wiggle the wires as you pull the speaker out.

  15. HTC One Mini 2 Charging Port Replacement: 步骤 15 中的图像 1,3 HTC One Mini 2 Charging Port Replacement: 步骤 15 中的图像 2,3 HTC One Mini 2 Charging Port Replacement: 步骤 15 中的图像 3,3
    • Use the T5 torx screwdriver from the iFixit toolkit to remove the two 2mm screws that hold the power connector board in.

    • Pull the board out.

结论

To reassemble your device, follow these instructions in reverse order.

8等其他人完成本指南。

Chad Facciolo

于10/14/14注册

248 声望

撰写一个指南

团队

Cal Poly, Team 4-48, Amido Fall 2014 Cal Poly, Team 4-48, Amido Fall 2014 的会员

CPSU-AMIDO-F14S4G48

5 名成员

创作了17篇指南

2条评论

I wanna take to a shop and pay for the repairs.Please could you give me places to go

Paul Volpe - 回复

Please advise me on any places I could take my phone for repair.I live in the Sydney area.

Paul Volpe - 回复

添加评论

浏览统计数据:

过去 24 小时: 0

过去 7 天: 1

过去 30 天: 6

总计 8,547