跳转到主内容
加入维修社区 - 创建账户

HP PSC 2355 Scanner Glass Replacement

你所需要的

  1. HP PSC 2355 Scanner Glass Replacement, Scanner Lid: 步骤 1 中的图像 1,1
    • Grasp the scanner lid cover from the front of the device and lift lid all the way up until it stands on its own.

    询问修复机器人

    添加评论

  2. HP PSC 2355 Scanner Glass Replacement: 步骤 2 中的图像 1,1
    • With two hands, grasp the lid on both sides near the hinges and lift straight up to release the lid from each hinge.

    询问修复机器人

    添加评论

  3. HP PSC 2355 Scanner Glass Replacement, Scanner Glass: 步骤 3 中的图像 1,2 HP PSC 2355 Scanner Glass Replacement, Scanner Glass: 步骤 3 中的图像 2,2
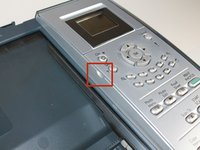
    • Locate the finger notch on the inside top left half of the bezel (control) panel cover.

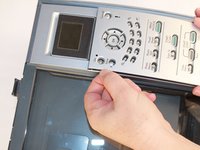
    • Place your index finger in the notch and lift up to unsnap the panel.

    • Set the panel cover aside.

    询问修复机器人

    添加评论

  4. HP PSC 2355 Scanner Glass Replacement: 步骤 4 中的图像 1,1
    • Use a T9 Torx screwdriver to remove the 9 mm screw.

    询问修复机器人

    添加评论

  5. HP PSC 2355 Scanner Glass Replacement: 步骤 5 中的图像 1,1
    • From the front of the printer, remove the button panel by pulling it towards you while slightly lifting it up.

    询问修复机器人

    添加评论

  6. HP PSC 2355 Scanner Glass Replacement: 步骤 6 中的图像 1,2 HP PSC 2355 Scanner Glass Replacement: 步骤 6 中的图像 2,2
    • Disconnect the white ribbon cable by grasping it between your thumb and forefinger.

    • Gently pull to release the ribbon from the green circuit board.

    询问修复机器人

    添加评论

  7. HP PSC 2355 Scanner Glass Replacement: 步骤 7 中的图像 1,1
    • Next, use a spudger to pry the flat ribbon computer cable by the plastic connection end loose. Carefully separate it from the prongs on the button panel.

    • Now the whole button should be completely disconnected from the printer.

    • Set button panel aside.

    询问修复机器人

    添加评论

  8. HP PSC 2355 Scanner Glass Replacement: 步骤 8 中的图像 1,1
    • Use the T9 Torx screwdriver to remove the seven 9 mm screws on the top plastic frame around the glass.

    询问修复机器人

    添加评论

  9. HP PSC 2355 Scanner Glass Replacement: 步骤 9 中的图像 1,1
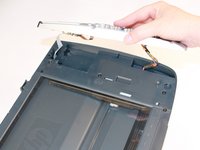
    • From the back of the printer, locate the two large plastic tabs as shown.

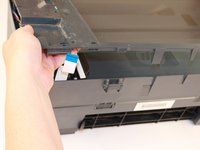
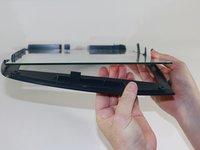
    • With your index fingers underneath each tab, gently and simultaneously pull the tabs towards you and upwards to release the tabs from the plastic clasps behind them.

    • Remove the whole plastic frame that holds the glass.

    询问修复机器人

    添加评论

  10. HP PSC 2355 Scanner Glass Replacement: 步骤 10 中的图像 1,2 HP PSC 2355 Scanner Glass Replacement: 步骤 10 中的图像 2,2
    • Gently lift the glass/plastic bed from the edge on the side opposite of the button/control panel section.

    • As shown in the second image, gently lift the glass pane up so that it is above the plastic tab that holds it into place.

    询问修复机器人

    添加评论

  11. HP PSC 2355 Scanner Glass Replacement: 步骤 11 中的图像 1,1
    • Proceed to slide the glass pane out and over the plastic tab to remove it completely from the plastic bed.

    • Replace the glass with your new glass pane. To fully reassemble the printer, follow these instructions in reverse order.

    询问修复机器人

    添加评论

结论

To reassemble your device, follow these instructions in reverse order.

取消:我没有完成这个指南。

另外一个人完成了本指南。

团队

0指南评论

添加评论

浏览统计数据:

过去 24 小时: 0

过去 7 天: 8

过去 30 天: 35

总计 1,274