简介
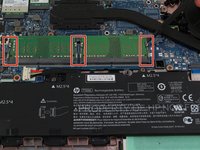
The Random Access Memory, or RAM, is a hardware memory built into computers for short-term memory. If you are experiencing difficulties with web pages loading extremely slow, or other symptoms of a faulty RAM storage, then here is the step-by-step guide to replacing the RAM storage within your HP Elitebook 840 G5. Ensure that you proceed with caution when moving the fragile sticks to the side when accessing the RAM during disassembly.
你所需要的
-
-
Use a Phillips #1 screwdriver to undo the five screws. The top three screws are 10 mm and the two side screws are 7 mm.
-
Unscrew the bottom three screws using the same screwdriver.
 询问修复机器人
-
-
-
Turn computer so that the hinged side is facing up.
-
Use the plastic opening tool to pry open the back plate.
-
Drag the plastic opening tool along the edge from left to right and use a second opening tool to pry open the top right corner.
-
Repeat the 3rd step for the other side.
-
Repeat on Left and Right sides of the system. There are two points in the middle (on the left and right sides of the center screw) that will release with slight lifting pressure.
-
-


To reassemble your device, follow these instructions in reverse order.
14等其他人完成本指南。
团队

Cal Poly, Team S25-G13, Maness Spring 2018 Cal Poly, Team S25-G13, Maness Spring 2018 的会员
CPSU-MANESS-S18S25G13
4 名成员
创作了18篇指南
3指南评论
ACHTUNG ZERSTÖRUNGSGEFAHR - Die Beschreibung ist Fehlerhaf!!!
Beim 840 g5 gibt es in den beiden „oberen ecken“ 2 versenkte Schrauben die UNBEDINGT gelöst werden müssen - tut man das nicht kann man den Boden NICHT ZERSTÖRUNGSFREI abheben!!!
Außerdem gibt es die beiden „mittleren äußern“ Schrauben beim 840 g5 NICHT
Zusatz: Alle Schrauben müssen nur gelöst, nicht aber entfernt werden.
Bei dem in dieser Anleitung beschrieben Gerät handelt es sich offensichtlich um ein 850 g5…
Whats the max ram capacity ?
DARK SHADOW - 回复 分享