跳转到主内容
加入维修社区 - 创建账户

Gateway NV52 Cooling Fan Replacement

你所需要的

  1. Gateway NV52 Cooling Fan  Replacement, Battery: 步骤 1 中的图像 1,1
    • Turn the laptop on its backside with the stickers and barcode facing you.

    • Locate the latches on the top left corner.

    询问修复机器人

    添加评论

  2. Gateway NV52 Cooling Fan  Replacement: 步骤 2 中的图像 1,1
    • In order to unlock the battery, slide the vertical latch downward where it indicates the unlocking icon.

    询问修复机器人

    添加评论

  3. Gateway NV52 Cooling Fan  Replacement: 步骤 3 中的图像 1,1
    • Slide the horizontal latch to the right to pop open the battery pack.

    询问修复机器人

    添加评论

  4. Gateway NV52 Cooling Fan  Replacement, Motherboard: 步骤 4 中的图像 1,1
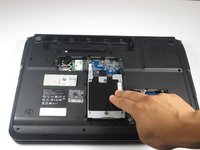
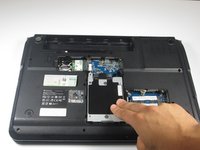
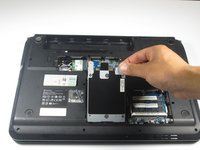
    • Remove the five identical 3/16" Phillips #0 screws that secure the hard drive and memory cover.

    询问修复机器人

    添加评论

  5. Gateway NV52 Cooling Fan  Replacement: 步骤 5 中的图像 1,1
    • Lift up the base cover from the the top with your hands to a 90 degree angle.

    • Remove the base cover.

    询问修复机器人

    添加评论

  6. Gateway NV52 Cooling Fan  Replacement: 步骤 6 中的图像 1,1
    • Remove the 1/4" Phillips #0 screw located at the top right of the hard drive.

    询问修复机器人

    添加评论

  7. Gateway NV52 Cooling Fan  Replacement: 步骤 7 中的图像 1,3 Gateway NV52 Cooling Fan  Replacement: 步骤 7 中的图像 2,3 Gateway NV52 Cooling Fan  Replacement: 步骤 7 中的图像 3,3
    • Remove the hard drive component from its compartment. To do so, slide the component downward away from the battery pack.

    • Lift the hard drive to a 90 degree angle and out of its slot.

    询问修复机器人

    添加评论

  8. Gateway NV52 Cooling Fan  Replacement: 步骤 8 中的图像 1,1
    • Remove the 3/16" Phillips #0 screw located at the bottom left corner of the WiFi card.

    询问修复机器人

    添加评论

  9. Gateway NV52 Cooling Fan  Replacement: 步骤 9 中的图像 1,1
    • Locate the black and white cables attached to the WiFi card.

    • Gently wiggle the black cable until it detaches from the WiFi card.

    • Repeat the previous step for the white cable.

    询问修复机器人

    添加评论

  10. Gateway NV52 Cooling Fan  Replacement: 步骤 10 中的图像 1,1
    • Gently, remove the Wifi card from its slot, and place it in a dry and safe place.

    • Turn the laptop with the keyboard compartment facing up.

    询问修复机器人

    添加评论

  11. Gateway NV52 Cooling Fan  Replacement: 步骤 11 中的图像 1,1
    • Remove the five identical 9/32" Phillips #0 screws located under the battery and both upper corners.

    • Remove the 9/32" Phillips #0 screw fastening the optical disc drive.

    询问修复机器人

    添加评论

  12. Gateway NV52 Cooling Fan  Replacement: 步骤 12 中的图像 1,1
    • Using your hands, gently slide the optical drive out of the slot.

    询问修复机器人

    添加评论

  13. Gateway NV52 Cooling Fan  Replacement: 步骤 13 中的图像 1,1
    在这个步骤中使用的工具:
    Heavy-Duty Spudger
    $4.99
    • Flip the device so the keyboard and display screen are faced upright.

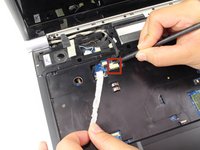
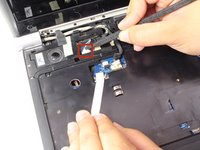
    • Lift up the media button board cover using the heavy duty spudger. Apply a minimum amount of upward force to the media button board cover at the right bottom corner. Starting from the right, continuously lift the cover to the left edge until completely separated.

    • Do not lift up the media button board cover too much, it’s still connected to the motherboard. Set the media button board cover upside down on the keyboard.

    询问修复机器人

    添加评论

  14. Gateway NV52 Cooling Fan  Replacement: 步骤 14 中的图像 1,1
    • Disconnect the dark colored locking tab by pulling at a 90 degree angle, and then slightly pull away the ribbon from the locking tab.

    询问修复机器人

    添加评论

  15. Gateway NV52 Cooling Fan  Replacement: 步骤 15 中的图像 1,1
    • Lift up the keyboard with the spudger. Rotate the keyboard until its face down on top of its base.

    • The keyboard is still connected to the access keyboard connector, so do not attempt to detach the keyboard from the laptop, yet.

    询问修复机器人

    添加评论

  16. Gateway NV52 Cooling Fan  Replacement: 步骤 16 中的图像 1,1
    • Disconnect the brown-colored locking tab by pulling at a 90 degree angle and slightly pulling away from the locking tab.

    • Do not apply too much force to the locking tab, because a damaged connector will disable the keyboard.

    • Remove the keyboard.

    询问修复机器人

    添加评论

  17. Gateway NV52 Cooling Fan  Replacement: 步骤 17 中的图像 1,1
    • Locate the three LCD connectors.

    询问修复机器人

    添加评论

  18. Gateway NV52 Cooling Fan  Replacement: 步骤 18 中的图像 1,3 Gateway NV52 Cooling Fan  Replacement: 步骤 18 中的图像 2,3 Gateway NV52 Cooling Fan  Replacement: 步骤 18 中的图像 3,3
    • Use the pointy end of the spudger to gently pry each side of the LCD connector until they are detached from their respective ports.

    • Do not pull with excessive force, since it could damage the LCD cable plug-in.

    询问修复机器人

    添加评论

  19. Gateway NV52 Cooling Fan  Replacement: 步骤 19 中的图像 1,1
    • Using the flat edge of the spudger, disconnect the big white LCD cable connector by slightly pulling on it until it's detached from its respective port.

    询问修复机器人

    添加评论

  20. Gateway NV52 Cooling Fan  Replacement: 步骤 20 中的图像 1,1
    在这个步骤中使用的工具:
    Tweezers
    $4.99
    • Using the tweezers, pull out the black and white cables located at the right side of the laptop.

    询问修复机器人

    添加评论

  21. Gateway NV52 Cooling Fan  Replacement: 步骤 21 中的图像 1,2 Gateway NV52 Cooling Fan  Replacement: 步骤 21 中的图像 2,2
    • Remove the two 9/32" Phillips #0 screws on the top left and right corners.

    • Lift the entire display screen straight up using both hands.

    询问修复机器人

    添加评论

  22. Gateway NV52 Cooling Fan  Replacement: 步骤 22 中的图像 1,1
    • Turn the laptop upside down.

    • Remove ten 9/32" screws with a Phillips #0 Screwdriver.

    询问修复机器人

    添加评论

  23. Gateway NV52 Cooling Fan  Replacement: 步骤 23 中的图像 1,1
    • Flip the laptop over.

    • Remove the three 9/32"screws that secures the top cover with a Phillips #0 screwdriver.

    询问修复机器人

    添加评论

  24. Gateway NV52 Cooling Fan  Replacement: 步骤 24 中的图像 1,1
    • Gently disconnect the two ribbons from the motherboard using the black tweezers.

    询问修复机器人

    添加评论

  25. Gateway NV52 Cooling Fan  Replacement: 步骤 25 中的图像 1,1
    • Separate the top cover from the base using the heavy duty spudger. Insert the spudger in between the keyboard base and the base of the laptop with a minimum amount of force to separate them. Follow this procedure around the perimeter until the parts are separated.

    询问修复机器人

    添加评论

  26. Gateway NV52 Cooling Fan  Replacement: 步骤 26 中的图像 1,1
    • Remove the 3/16" screw securing the motherboard with a Phillips #0 screwdriver.

    添加评论

  27. Gateway NV52 Cooling Fan  Replacement: 步骤 27 中的图像 1,1
    • Cautiously disconnect the USB board cable that is situated on the top right corner of the motherboard.

    询问修复机器人

    添加评论

  28. Gateway NV52 Cooling Fan  Replacement: 步骤 28 中的图像 1,1
    • Disconnect the modem cable located at the bottom right of the motherboard.

    询问修复机器人

    添加评论

  29. Gateway NV52 Cooling Fan  Replacement: 步骤 29 中的图像 1,1
    • Cautiously remove the motherboard and lie it down.

    询问修复机器人

    添加评论

  30. Gateway NV52 Cooling Fan  Replacement, Cooling Fan: 步骤 30 中的图像 1,1
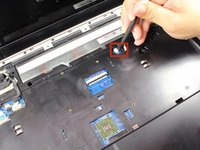
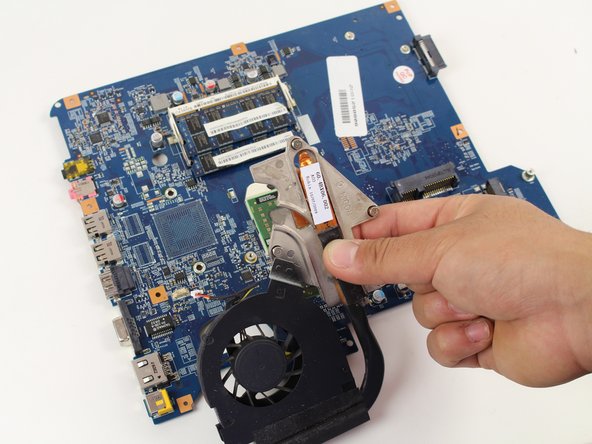
    • Loosen the four 13/32" screws that connects the cooling fan to the motherboard using the Phillips #0 Screwdriver.

    • The four 13/32" Phillip screws do not come off the metal fan support. Do not force to take the screws off, else the screw attachment can get damaged.

    询问修复机器人

    添加评论

  31. Gateway NV52 Cooling Fan  Replacement: 步骤 31 中的图像 1,1
    • Disconnect the fan cable from the motherboard.

    • Do not pull on the fan cable will excessive force. It will result with a non-working cooling fan and a damaged wire.

    询问修复机器人

    添加评论

  32. Gateway NV52 Cooling Fan  Replacement: 步骤 32 中的图像 1,1
    • Carefully lift up and remove the cooling fan using your hands, and place it in a dry and safe zone.

    询问修复机器人

    添加评论

结论

To reassemble your device, follow these instructions in reverse order.

取消:我没有完成这个指南。

2等其他人完成本指南。

Ruben

于04/22/14注册

298 声望

创作了2篇指南

团队

Cal Poly, Team 7-24, Regan Spring 2014 Cal Poly, Team 7-24, Regan Spring 2014 的会员

CPSU-REGAN-S14S7G24

4 名成员

创作了18篇指南

0指南评论

添加评论

浏览统计数据:

过去 24 小时: 3

过去 7 天: 7

过去 30 天: 36

总计 3,515