跳转到主内容

当前版本的文档还未经巡查,您可以查看最新的已查核版本

你所需要的

  1. 这个步骤还没有翻译 帮忙翻译一下

    : 步骤 1 中的图像 1,1
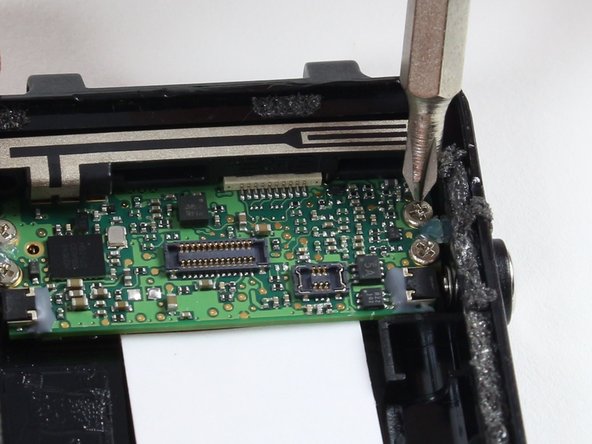
    • Hold the the metal screwdriver, with a T5 Torx bit, in your dominant hand.

    • Hold the rubber screwdriver, with a Hex T6 Torx bit, in your other hand.

    • While holding the rubber screwdriver in place, simultaneously unscrew the pin (counterclockwise) with the metal screwdriver in your dominant hand.

  2. 这个步骤还没有翻译 帮忙翻译一下

    : 步骤 2 中的图像 1,2 : 步骤 2 中的图像 2,2
    • Once the 1mm screw is removed, reinsert the metal screwdriver in that same hole.

    • Gently push the strap's pin out. It will begin to protrude from the other end.

    • Use your fingers to grab the exposed pin and slide it free. The strap should now be disconnected from the device.

  3. , 显示模块: 步骤 3 中的图像 1,1
    • 在显示器上放置加热的iOpener以融化粘胶。

    • 大约一分钟后可以拿开iOpener 。

    • 有关使用iOpener的详细说明,请参阅iOpener 指南

  4. : 步骤 4 中的图像 1,2 : 步骤 4 中的图像 2,2
    • 将蓝色塑料撬棍置于手表的屏幕和塑料外壳之间,然后慢慢地撬起屏幕的一侧。

  5. : 步骤 5 中的图像 1,1
    • 手表和显示模块之间,一旦有一边出现缝隙,把蓝色翘片插入缝隙中。

    • 绕着屏幕一圈,打开屏幕四边的粘合剂。

    • 插入翘片时,插入最小的距离以避免损坏内部组件。

  6. : 步骤 6 中的图像 1,1
    • 使用蓝色塑料开口工具撬起玻璃的侧面。 将其提升到指甲可以插入的大小。

    • 在设备的另一侧做同样的动作,直到可以抓住屏幕。

  7. : 步骤 7 中的图像 1,1
    • 从两侧小心的抓住屏幕。

    • 慢慢地从主机上提起屏幕。 将其分开,避免损坏与主板的连接。

  8. : 步骤 8 中的图像 1,1
    • 使用塑料开口工具轻轻抬起连接屏幕与主板的橙色标签。

    • 完成此步骤后,屏幕应该与设备的其余部分分离。

  9. 这个步骤还没有翻译 帮忙翻译一下

    : 步骤 9 中的图像 1,2 : 步骤 9 中的图像 2,2
    • Follow previous guides until you've exposed the battery as shown.

    • Begin by removing the battery connector tab.

    • Be sure not to use a metal implement or your fingers to remove this tab. Doing so may cause personal harm or damage to the electrical components.

  10. 这个步骤还没有翻译 帮忙翻译一下

    : 步骤 10 中的图像 1,2 : 步骤 10 中的图像 2,2
    • Use a plastic opening pick to gently pry out the battery as shown.

    • The battery is Lithium Polymer, follow safe handling procedures and DO NOT deform it upon removal.

  11. 这个步骤还没有翻译 帮忙翻译一下

    : 步骤 11 中的图像 1,3 : 步骤 11 中的图像 2,3 : 步骤 11 中的图像 3,3
    • With the battery loose from the case, rotate it to expose the attached tab

    • Gently pry up the attached tab with a fingernail.

    • Keep the vibrator, circled in red, as you may need to solder it to the new battery upon re-installation later.

  12. 这个步骤还没有翻译 帮忙翻译一下

    : 步骤 12 中的图像 1,2 : 步骤 12 中的图像 2,2
    • Remove the four 2.4 mm screws with a PH00 Phillips head screwdriver.

    • Make an effort not to damage any nearby components of the motherboard with the screwdriver.

  13. 这个步骤还没有翻译 帮忙翻译一下

    : 步骤 13 中的图像 1,2 : 步骤 13 中的图像 2,2
    • Use the spudger to pry up the board from the case.

    • Insert the spudger a minimum distance beneath the board as there are components below.

    • Wiggle the exposed side of the board from each end until it comes free.

    • Use proper electrostatic discharge safety when removing and handling the board.

  14. 这个步骤还没有翻译 帮忙翻译一下

    : 步骤 14 中的图像 1,2 : 步骤 14 中的图像 2,2
    • Remove the GPS antenna by sliding it away from the board.

    • Keep track of the antenna and add it to the new board upon replacement.

终点

2等其他人完成本指南。

Tessa Gunnin

于10/01/15注册

466 声望

创作了2篇指南

团队

Cal Poly, Team 1-21, Maness Fall 2015 Cal Poly, Team 1-21, Maness Fall 2015 的会员

CPSU-MANESS-F15S1G21

4 名成员

创作了17篇指南

2条评论

Any tips on where to buy a motherboard?

Breener - 回复

Only <3 months, the motherboard is gone?

Do you have any service shop where I can mail for repairing? I am not going to mail order a motherboard and install by myself every 3 months.

Ming

Yong-Ming Yu - 回复

添加评论

浏览统计数据:

过去 24 小时: 1

过去 7 天: 16

过去 30 天: 40

总计 14,072