跳转到主内容
加入维修社区 - 创建账户

Flydigi Apex 5 Battery Replacement

你所需要的

  1. Flydigi Apex 5 Battery Replacement, Battery: 步骤 1 中的图像 1,2 Flydigi Apex 5 Battery Replacement, Battery: 步骤 1 中的图像 2,2
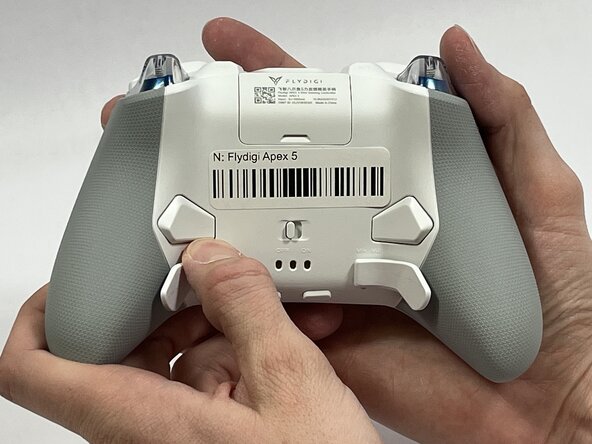
    • Orient the controller so that its back is facing you.

    • Apply firm downward pressure to remove both the M3 and M4 back paddles.

    询问修复机器人
  2. Flydigi Apex 5 Battery Replacement: 步骤 2 中的图像 1,3 Flydigi Apex 5 Battery Replacement: 步骤 2 中的图像 2,3 Flydigi Apex 5 Battery Replacement: 步骤 2 中的图像 3,3
    • Turn the controller over so its front faces you.

    • Remove the D-pad by firmly pulling it away from the body of the controller.

    询问修复机器人
  3. Flydigi Apex 5 Battery Replacement: 步骤 3 中的图像 1,3 Flydigi Apex 5 Battery Replacement: 步骤 3 中的图像 2,3 Flydigi Apex 5 Battery Replacement: 步骤 3 中的图像 3,3
    • Remove the clear, magnetically-adhered faceplate of the controller by firmly pulling it away from the body of the controller starting from the edge of the faceplate.

    询问修复机器人
  4. Flydigi Apex 5 Battery Replacement: 步骤 4 中的图像 1,3 Flydigi Apex 5 Battery Replacement: 步骤 4 中的图像 2,3 Flydigi Apex 5 Battery Replacement: 步骤 4 中的图像 3,3
    • Remove the small cover from the rear of the controller by pushing it upward.

    • Remove the two 5.8mm screws behind the battery cover using a Phillips #0 screwdriver.

    询问修复机器人
  5. Flydigi Apex 5 Battery Replacement: 步骤 5 中的图像 1,2 Flydigi Apex 5 Battery Replacement: 步骤 5 中的图像 2,2
    • Turn the controller over so its front faces you.

    • Remove the six 10mm long screws from the front of the controller using a Torx T6 screwdriver.

    询问修复机器人
  6. Flydigi Apex 5 Battery Replacement: 步骤 6 中的图像 1,3 Flydigi Apex 5 Battery Replacement: 步骤 6 中的图像 2,3 Flydigi Apex 5 Battery Replacement: 步骤 6 中的图像 3,3
    • Insert the plastic opening tool between the top and bottom plastic controller molds, then pry until the two pieces separate.

    • Be careful not to fully separate the two pieces of the controller. There is a fragile ribbon cable connecting the two sides that must be carefully disconnected in the next step.

    询问修复机器人
  7. Flydigi Apex 5 Battery Replacement: 步骤 7 中的图像 1,3 Flydigi Apex 5 Battery Replacement: 步骤 7 中的图像 2,3 Flydigi Apex 5 Battery Replacement: 步骤 7 中的图像 3,3
    • Carefully remove the back paddle ribbon cable with the angled tweezers or spudger.

    询问修复机器人
  8. Flydigi Apex 5 Battery Replacement: 步骤 8 中的图像 1,3 Flydigi Apex 5 Battery Replacement: 步骤 8 中的图像 2,3 Flydigi Apex 5 Battery Replacement: 步骤 8 中的图像 3,3
    • Press a prong of each side of the angled tweezers under the lip of the power supply cable connector and pull the plastic connector out of its terminal.

    • Pull the power supply cable through the plastic cable guides.

    询问修复机器人
  9. Flydigi Apex 5 Battery Replacement: 步骤 9 中的图像 1,3 Flydigi Apex 5 Battery Replacement: 步骤 9 中的图像 2,3 Flydigi Apex 5 Battery Replacement: 步骤 9 中的图像 3,3
    • Optional: Drip isopropyl alcohol along the sides of the battery. Then rotate the controller to distribute the alcohol and dissolve the adhesive holding the battery to the mount

    • Pry up the battery with the plastic hook and pry tool.

    • Do not use sharp metal tools to pry the battery out. That action risks puncturing the battery.

    询问修复机器人
结论

To reassemble your device, follow these instructions in reverse order.

另外一个人完成了本指南。

0指南评论

添加评论

浏览统计数据:

过去 24 小时: 1

过去 7 天: 7

过去 30 天: 45

总计 99