跳转到主内容

此翻译可能不反映源指南的最新更新。 帮助更新翻译查看源指南

DualShock 4 电池更换

你所需要的

  1. DualShock 4 电池更换, 拆解DualShock 4控制器: 步骤 1 中的图像 1,1
    • 使用Phillips #00 螺丝刀移除四颗6.0mm固定后面板的螺丝。

    • 切勿使用强力来松开螺丝,否则会造成螺纹的永久性损坏,从而导致无法拆卸手柄。

    Yo usé un Phillips #000, ya que el #00 quedaba grande y podía dañar el tornillo.

    Adolfo Gomez Toledo - 回复

    A plain #0 works way better for me

    Jennica Tapia - 回复

    I agree with Jennica, it's a #0 screw

    Peeter - 回复

    to re-torque these PH00 screw... i found 19Ncm to be about the max. (since 27Ncm was too much)

    Dreamcat 4 - 回复

  2. DualShock 4 电池更换: 步骤 2 中的图像 1,3 DualShock 4 电池更换: 步骤 2 中的图像 2,3 DualShock 4 电池更换: 步骤 2 中的图像 3,3
    • 左肩处开始

    • 将撬棒插入左肩来撬开一个开口

    • 在开口处滑动来打开更多的空间

    • 取下撬棒,打开手柄壳。

    • 右肩重复这些步骤。

    Shoulders are where L1/L2/R1/R2 are, not the %#*@ handles. Confusing instructions.

    foxhoundunit89 - 回复

    Quick tip: Be VERY careful at this step not to dislodge the tiny spring attached to the L2/R2 buttons. While removing the cover, it's easy to pull off either L2/R2 button. Inadvertently pulling off either button will also remove the tiny spring as well. While not too difficult to reassemble, it's not obvious where the spring goes as the spring is almost completely hidden along the side of the button (on the inside).

    I just successfully completed analog stick replacements for two controllers. I completed the first repair without any trouble but managed to dislodge (and almost lose) the spring on the second time around. Needless to say, I spent some time trying to figure out where the spring is supposed to go (no photos of this anywhere). By sheer luck, I figured it out on my own. :)

    Good luck and take your time--especially the first time!

    Michael Whang - 回复

    couldn't have posted pics for me? :D

    kimsballs -

    Golden tip but I would add a thing or two.

    Most probably both triggers R1&R2 will stay in lower half of the pad case with springs hanging there.

    You must take them of their lower case sockets before assembly and fit them bellow L1&L2

    When you feel click when fitting them and spring works like on normal assembled pad you're done.

    If thats not the case do not try to assemble lower casing half as triggers will not work properly.

    Simon -

    if you lost the springs unfortunately, the triggers would still work but it is harder to get to the precise digital press. In other words you will have hard time to create a light press than a hard press.

    meaningless -

    My controller broke

    Gary - 回复

    So what I seem to see a lot of sources fail to mention with this model (and promptly break without noticing) are the two plastic tabs attached to the front shell on either side of the headphone jack ; in order to properly pry that section open, all you need to do is lightly push those plastic tabs in, and the section should open up easily. That seems to be one of the main things that prevent people from prying the shell open.

    The updated models have the tabs as well, but aren’t as stubborn considering the bars between the shoulder buttons on those are inside as opposed to being a part of the shell.

    Hope this helps, and feel free to discuss, especially if you’re more familiar with the issue than me.

    Rifter - 回复

    Thank you so much for mentioning exactly where the internal tabs are located, I couldn't for the life of me get into the controller otherwise.

    I found using two thin plastic guitar picks, the kind that bend more freely, worked very well to shimmy into place on either side of the headphone jack and pop the tabs to get the device to open.

    I did break a small piece from one of the teeth on the back half of the shell that inserts into the tabs, but I believe this was accidentally done before I came across your comment and was prying with a spudger willy-nilly.

    Gently wiggling the front half of the shell containing the main portion of the electronics allowed me to release the triggers and open the controller the rest of the way.

    Fizzwidgy -

    Very helpful, Rifter. Thank you.

    I found this shell assembly surprisingly difficult to separate if you don’t want to break the hook/tabs (and I’m a mechanic, fwiw). There are two pairs of hooks, and none of them are near the “share” and “options” buttons as Step 3 suggests. Like Rifter mentioned, one pair is on either side of the headphone interface. The other is along the sides, right up near the L and R paddles.

    With whatever tool you’re using (bike-tire levers work for me), pry it under the outside base of one of the handles (not inside), lever the tool downward a bit (controller is right-side-up), and slide it forward toward the L/R paddle. That downward rotation should help ease the tab off the hook. For the headphone tabs, pushing inward on the two top-half joystick mounds will help ease those off of the hooks, but you have to push pretty hard.

    If you get them apart, you’ll then be able to gently wriggle the circuit ribbon connector off of the top-half pc board (don’t use a tool - you’ll break it).

    John Branum - 回复

    Why is this guide about unlatching the plastic clips before forcing the halves apart, completely separate and just linked here? I missed it and now 3/4 of my plastic clips are broken. It should not be a separate guide, it should be in the main guide, it's only a couple pictures!

    retrorocket160 - 回复

  3. DualShock 4 电池更换: 步骤 3 中的图像 1,3 DualShock 4 电池更换: 步骤 3 中的图像 2,3 DualShock 4 电池更换: 步骤 3 中的图像 3,3
    • 将一个撬棒楔入壳体来打开以下按钮附近的卡扣:

    • Share键

    • Options键

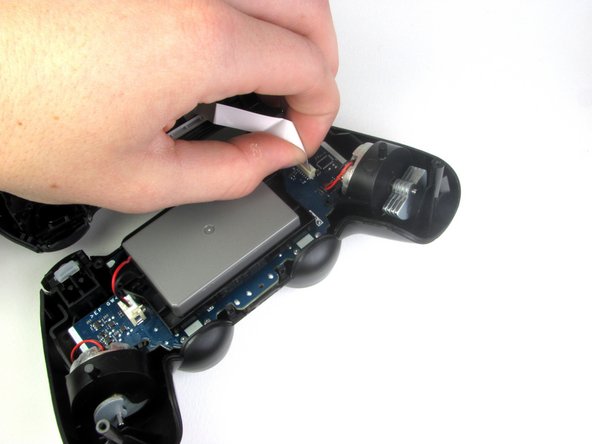
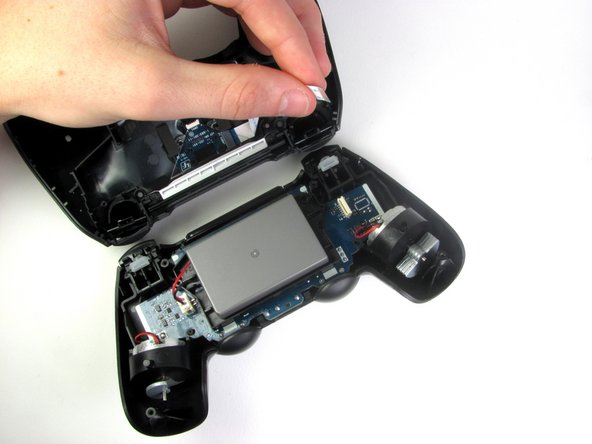
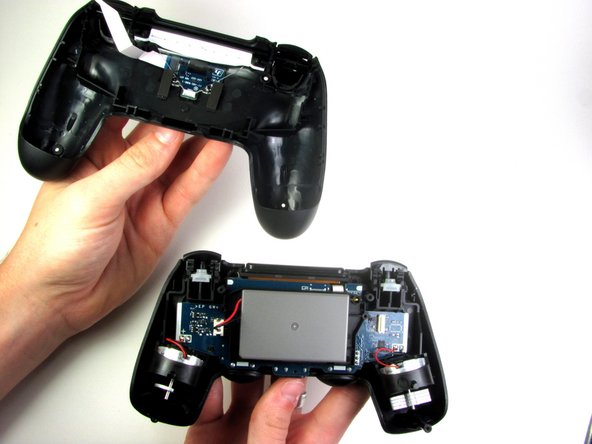
    • 将控制器塑料外壳分开,注意两者依然通过排线连接。

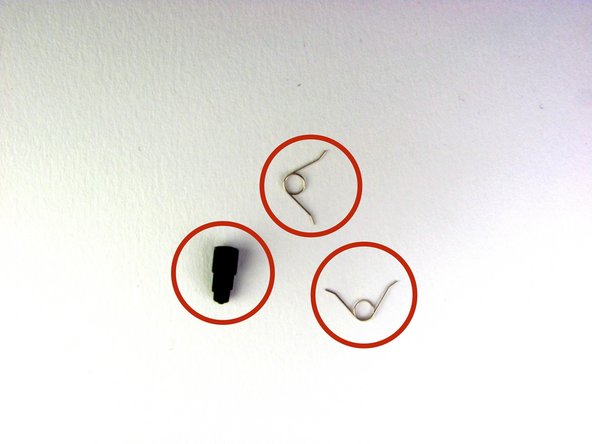
    • 3个小模块经常从框架中跑出,为了避免损失,请保持工作台的干净整洁。

    • 2个触发弹簧

    • 1个灰色复位按钮扩展

    You can't just pull the casing halves apart. There is a plastic bar that is part of the casing and separates the L1 and R1 buttons from the L2 and R2 buttons. To get this loose, pull the casing outward perpendicular to the L and R buttons until you can slide the L2 and R2 buttons from behind the plastic bar.

    dzturbd - 回复

    SO yesterday replaced the thumb stick on my controller, and now the R2 button is stuck, know any way to remedy this?

    ScootsMcgoots -

    I know you put a warning, but I lost the grey reset button extension. Any idea where to get a replacement part?

    miamiman77 - 回复

    Hey, not even sure when you wrote this, but wanted to share my solution for this problem. I lost one of my reset button rubber pieces when I was doing a different repair, and found that a standard bamboo skewer is just about the perfect diameter to function as a replacement. Just cut it to the proper length and you should be able to get it in there and get your reset functionality back.

    tcbrekke -

    You don't really need it. A long paper clip will work fine.

    Ron Smith - 回复

    I've removed and changed all buttons all seemed ok but now the options and share button don't work, as in when I pressed them down there is no longer a click (bounce) I'm certain it's back in the correct place and I don't think they can be put the wrong way up, does anyone have any advice please :)

    Rachel - 回复

    My share button stopped 'clicking'. When I stripped the controller down I noticed a small copper coloured dimple on the motherboard was depressed instead of proud like the one for the options button. With bluetack I was able to pull it out but each time I tested it with my finger it clicked once and stayed depressed. I don't think there is a permanent solution to this as it's probably metal fatigue or similar so i put a tiny bit of blue tack overy the dimple so the plunger could push that bit further and hopefully pull it out each time. Seems to work as I reassemble the controller. Fingers crossed it holds out a while! I'd love to know if someone else had a different solution.

    The5HD -

    I had an extra part, and it wasn’t gray. Thank goodness for the picture of the black one. It’s rubbery. The small end should be inserted down towards the gold colored spot. It’s next to the word RESET on the mobo.

    J Coyote - 回复

    When reassembling: If, like me, your R2/L2 buttons stayed with the bottom of the controller when you took it apart, it will be impossible to reassemble and get the tiny springs back in place.

    To remedy, remove the buttons, and attach them, with the springs correctly placed, to the top of the controller. There are two tiny grooves, one on the button, and one on the controller top, into which the spring fits.

    Jeff Human - 回复

    Jeff, we owe you a six pack for this comment.

    James Goldie -

    Thank You!! The spring came out and I looked for a way to reinsert it. So I led a thread through its opening (so it couldn´t jump away), and compressed it with pliers. So it was easy to put it in.

    VauWeh -

    Jeff, you've been a wonderfully helpful Human. Thanks for the ingenious tip.

    Kris W -

    Thanks man i was struggling there

    Shut-_-Up -

    My controller broke

    Gary - 回复

    Something is stopping me from opening it cause it cut both by splitting tools

    Josuke Higashikata - 回复

    Mine was also really really resistant to being pried open. In the end, i did my best to loosen the entire gap at least once, then inserted along the middle bottom and used more force than i would have been comfortable with. The plastic on the edges is slightly shot now and it’s not as smooth a grip-feeling anymore, but it came apart fine and I didn’t break anything important. There is just a lot of surface for a friction fit like this and the joysticks keep pulling it back down, which in combination makes it really resilliant. In my case it also was exuberated by a minor soda spill along the right handle which ‘glued’ it together, and i imagine that can also happen just with use and ‘hand cheese’, especially on the outer edges. There is a lot of surface area to stick together there.

    Seleen Shadowpaw -

    no advice for disconnecting those? there's a warning that they're there... then all the next steps just have it already separated?

    Rook - 回复

    The ribbon cable can be removed without having to pull too much https://youtu.be/y40RUDSPeiA?si=9Y3gNB1w...

    Andrea Collet - 回复

  4. DualShock 4 电池更换, 电池: 步骤 4 中的图像 1,3 DualShock 4 电池更换, 电池: 步骤 4 中的图像 2,3 DualShock 4 电池更换, 电池: 步骤 4 中的图像 3,3
    • 使用手指来断开控制器两侧的主板排线。

    • 注意排线的方向,并且在重新连接的时候确认其方向正确。

    • 断开后,将控制器的顶部放在一边。

  5. DualShock 4 电池更换: 步骤 5 中的图像 1,3 DualShock 4 电池更换: 步骤 5 中的图像 2,3 DualShock 4 电池更换: 步骤 5 中的图像 3,3
    • 使用镊子,轻轻地将镊子轻轻摇动,松开插头,取出电池插头。

    • 在断开主板上的插头后电池就可以从控制器中提起。

    • 匆忙移除电池可能扭坏塑料把手。

结论

要重新组装您的设备,请按照本指南的相反顺序进行操作。

204等其他人完成本指南。

由衷感谢以下译者:

en zh

50%

这些译者帮助我们修补全世界! 您也想加入吗?
开始翻译 ›

Mark

于01/21/14注册

7,710 声望

创作了7篇指南

团队

Cal Poly, Team 6-21, Maness Winter 2014 Cal Poly, Team 6-21, Maness Winter 2014 的会员

CPSU-MANESS-W14S6G21

4 名成员

创作了41篇指南

29条评论

My Dualshock 4 wont turn on after the battery replacement.

Any idea on why this happened?

Alexander - 回复

have you tried to charge it?

Mohamed Aden -

I had a problem with my console but with your guide it is possible to solve this one I think.

Praska - 回复

I found a replacement battery here, you have to mod the tray a little, but it works like a champ and doubles the life.

http://www.ebay.com/itm/PS4-Controller-B...

binazriel - 回复

The x button on my controller want working properly so I ordered new rubber mounts. I followed the guide, taking my time to make sure I didn't damage anything.

With the new rubber in place I put everything back together and the controller was working fine but now I've realised it doesn't charge. The battery goes completely dead and switches off. If I then connect it with usb cable it doesn't charge but will turn on the controller for maybe 10 seconds before switching off again.

Anyone any idea what is going on? Thanks.

Kenny - 回复

my controller is not starting today

Harry Patidar - 回复

Did this fix to the letter, controller works now but the light bar does not and I'm unsure if it charges. It shows it's fully charged. Could it be that the micro-usb connection is frapped?

the00brotherhood - 回复

Ok, so it shows it’s fully charged on the PS4 but the light on the controller is out if I’m reading you right. Method I would use… connect the controller to your computer with a wired cable (eliminating the PS4 from the equation).

Check Device Manager in Windows or System Report on a Mac. Does it show your controller?

Yes = USB port on controller is fine, you may have damaged the LED on it during the repair.

No = USB port may be damaged or the cable may be fried.

Your problem doesn’t seem like it would have anything to do with the USB port. If it works but with no lighting, you should be ok unless you use the controller with the PS4 camera.

Brad S -

The battery outlet got ripped off. Can it still be fixed?

nextinline3900 - 回复

Anything can be fixed. But without knowing how severe the damage is it’s hard to say how difficult it would be, although it may involve cannibalizing another controller. At this point it may be cheaper to just purchase a new Dual Shock.

Brad S -

Hi I have two PS 4 controller that wont charged. I had checked with all the possibilities before purchasing two new 2000 Mah replacement batterries. But after replacing the old batteries, I noticed that one of them stopped charging. I thought it had reached the capacity to the full, but to my surprise it did not work, the light is just blinking when I turned it on. I reset the unit but remmained the same !!!

Could it be the charging port got damaged ??? Kindly advice

my other controller is still charging and I have not tested it.

Wushangkehan - 回复

By the way, I plugged into the computer…the device manager did not read the presence of the PS 4 controller , could it be the USB port is damaged ???Kindly advice

Wushangkehan - 回复

I have a simple question…..I replaced my sons PS4 battery with a replacement battery and charging cable……I plugged it all back in as shown…..Now the controller is working……But the battery level on the console/tv is showing it’s charging…..But it does work…….Any idea or reason why the new battery or controller is showing charging still without being connected to the usb? Ty

myfam73 - 回复

Be carefull with 2000mah batteries. I’m talking about V2 Dualshock 4. The original battery : 54mm x 35mm x 8,5 mm and 24g with the hardcase. In this space, you can’t have a 2000mah. Check the size of a true 2000mah 3,7v cell, and you will see a really bigger size. So, these replacement batteries with the same look as the original one, are fake ! If they work, because many are dead and don’t work at all, you will never have 2000mah. I found a true new 3,7v li-ion cell on Ebay, that fits perfectly, but it’s a 1500mah, and without a hardcase. I had to weld the original connector, but it fits perfectly. Not any voltage problem. So, if you need a new battery, don’t bought any hardcase version, and check the dimensions and weight.

KOULLIT - 回复

The blue plastic thingy goes away from the battery. There are letters (maybe symbols) on the ribbon opposite of the blue plastic thingy and they are pointing toward the battery

Ryan A - 回复

so what happens if your controller requires a smaller insert (that is circular and not a square input [which is provided standard in the 2k mah? Same module number but different connectors?

mhoffmanmobile - 回复

I had trouble with analoge, I fixed that but FPC (flat connector) on mainboard broken and I soldered new 12 pin FPC on mainboard again, but in reverse!

then I put charging cable and the dualshock did not turn on , and I sensed that the dualshock is heating up, I remove charging cable as soon as possible.

problem is this : negative and positive putted in reverse.

I don’t kwow what happen if I solder new FPC in right position .

Does it work or somethings going to out of service?

sorry formy poor English language .

regards,

Hamed

hamed1379 - 回复

i struggled with the reassembly; its much easier if you attach the L2 and R2 buttons to the upper half of the controller.

follow these steps:

reattach first the battery, then the cable with the blue pull tab.

then assemble the L2 and R2 buttons as follows: make sure to position the springs in their appropriate slots (especially at the hinge receptecle at the upper shell, align the spring and hinges and push it into the holder.

only then assemble the two body halfes together by first guiding the L1&2 and R1&2 buttons in their correct location. finally slightly bend the long studs into the handle grips and tighten all 4 screws.

wooghee - 回复

I can’t get the battery connector cable out of the socket. I tried to remove it for 15 minutes and it wouldn’t come out.

marcus2159 - 回复

After replacing the battery, the controller can only be used while charging with the cable.

What is the cause of this?

RK-pkmn - 回复

My dualshock 4 is charging but isn't turning on

Derrick Egwalusor - 回复

How can I check which model/version is my controller? (I dont have the back sticker , it fell out a while ago)

Ariel Peteri - 回复

Hi! From looking at the V2 guides, I found a couple distinguishing factors in each controller. The body design near the vibration motors, the shape and color of the motherboard, and the shape of the plastic around the triggers are all key features to compare between models. Use photos from our disassembly guides for each model, and compare the parts of your controller to parts sold on this site or elsewhere to identify your model.

Clay Eickemeyer -

As of March 14, 2023, this guide has been updated! Comments regarding step procedures may no longer be relevant.

Clay Eickemeyer - 回复

Will this guide work with the cuh-zct1e PS4 controller model?

Nick Cellini - 回复

It's likely to be physically the same. There may be a minor component missing or added between variations of these controllers. But, for a battery replacement, it will be at least close to the same opening process.

Clay Eickemeyer -

Thanks Clay! I'll give it a go and coment here if I come across any devastating differences or difficulties!

Nick Cellini -

Sure thing, I'll watch my notifications. When you do open it up, be mindful of the small shoulder clips. Everything else can be experimented on, without too much risk of breaking clips.

Clay Eickemeyer -

SWo when I pluggeged un the battery you I bought from you I bnlew up my controlner and it smelt fvery bad

gooka booka - 回复

添加评论

浏览统计数据:

过去 24 小时: 111

过去 7 天: 662

过去 30 天: 3,197

总计 367,817