跳转到主内容

当前版本的文档还未经巡查,您可以查看最新的已查核版本

DualShock 4 (CUH-ZCT1U) 按键更换

你所需要的

  1. 这个步骤还没有翻译 帮忙翻译一下

    DualShock 4 (CUH-ZCT1U) 按键更换: 步骤 1 中的图像 1,1
    • Check the model number on the back of your controller. This guide was written using model CUH-ZCT1U. If you have another model, the guide procedure and replacement parts may differ slightly.

    • If you have the second generation DualShock 4, model CUH-ZCT2U, use these guides.

  2. 这个步骤还没有翻译 帮忙翻译一下

    DualShock 4 (CUH-ZCT1U) 按键更换: 步骤 2 中的图像 1,2 DualShock 4 (CUH-ZCT1U) 按键更换: 步骤 2 中的图像 2,2
    在这个步骤中使用的工具:
    Microfiber Cleaning Cloths
    $3.99
    购买
    • If you need to stabilize your controller during this repair, lay it on a soft surface such as a microfiber cloth.

    • Use a Phillips screwdriver to remove the four 6.4 mm-long screws securing the rear case.

  3. 这个步骤还没有翻译 帮忙翻译一下

    DualShock 4 (CUH-ZCT1U) 按键更换: 步骤 3 中的图像 1,3 DualShock 4 (CUH-ZCT1U) 按键更换: 步骤 3 中的图像 2,3 DualShock 4 (CUH-ZCT1U) 按键更换: 步骤 3 中的图像 3,3
    • Use an opening pick to pry each corner of the L1 button from the front case.

    • Cover the button to prevent it from ejecting out of your workspace.

    • Remove the button.

  4. 这个步骤还没有翻译 帮忙翻译一下

    DualShock 4 (CUH-ZCT1U) 按键更换: 步骤 4 中的图像 1,1
    • Use your opening pick to pry and remove the R1 button, just as you did for the L1 button.

  5. 这个步骤还没有翻译 帮忙翻译一下

    DualShock 4 (CUH-ZCT1U) 按键更换: 步骤 5 中的图像 1,3 DualShock 4 (CUH-ZCT1U) 按键更换: 步骤 5 中的图像 2,3 DualShock 4 (CUH-ZCT1U) 按键更换: 步骤 5 中的图像 3,3
    • Six plastic clips secure the rear case to the front case. The next four steps demonstrate how to release these clips before you can open the controller.

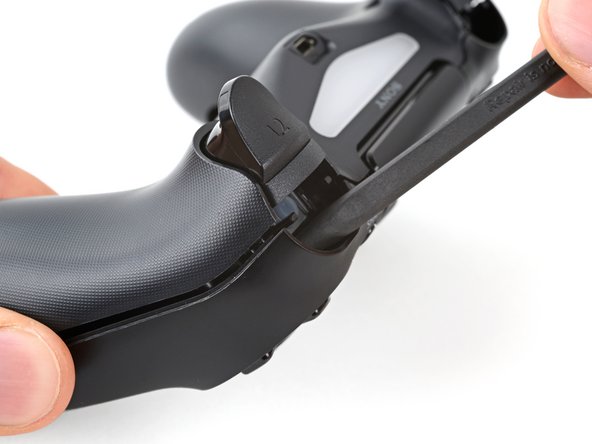
    • Insert your opening pick at a downward angle between the front case and rear case, halfway between the handle and the action buttons.

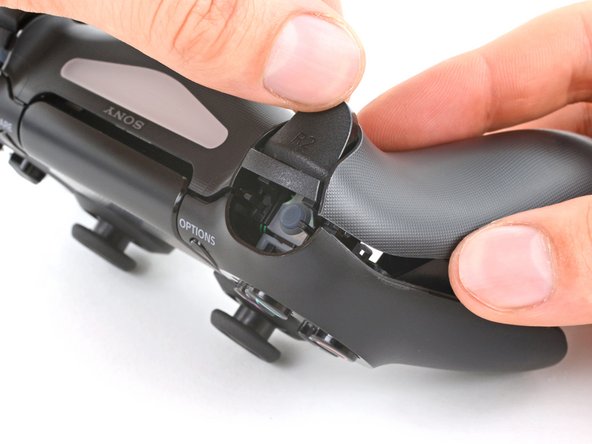
    • Slide your pick toward the handle and pry up to release the first clip.

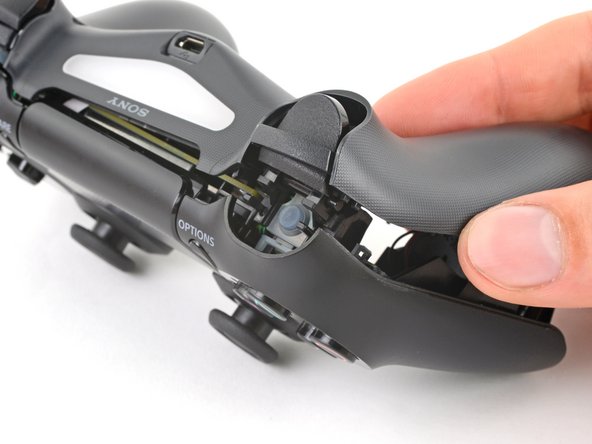
    • Repeat this procedure on the other side of the controller to release the second clip.

  6. 这个步骤还没有翻译 帮忙翻译一下

    DualShock 4 (CUH-ZCT1U) 按键更换: 步骤 6 中的图像 1,3 DualShock 4 (CUH-ZCT1U) 按键更换: 步骤 6 中的图像 2,3 DualShock 4 (CUH-ZCT1U) 按键更换: 步骤 6 中的图像 3,3
    • Two more clips secure the rear case near the extension port and the headphone jack.

    • Insert your opening pick between the front case and rear case at either side of the ports.

    • Twist your pick to unclip this section of the rear case from the front case.

    • If the rear case feels stuck, insert and twist your pick from different angles.

    • Don't open the controller yet, as it's still held together by two very delicate clips near the triggers.

  7. 这个步骤还没有翻译 帮忙翻译一下

    DualShock 4 (CUH-ZCT1U) 按键更换: 步骤 7 中的图像 1,1
    • The final two clips are very delicate, and must be disengaged from inside the controller. If you break them, don't worry—it won't affect this repair or your controllers functionality.

    • Locate the clips by looking through the gap above the R2 or L2 buttons.

  8. 这个步骤还没有翻译 帮忙翻译一下

    DualShock 4 (CUH-ZCT1U) 按键更换: 步骤 8 中的图像 1,3 DualShock 4 (CUH-ZCT1U) 按键更换: 步骤 8 中的图像 2,3 DualShock 4 (CUH-ZCT1U) 按键更换: 步骤 8 中的图像 3,3
    • Insert the point of a spudger through the gap above the R2 button and push the retaining clip outward.

    • While pushing the clip outward, slowly pull the rear case away from the front case until you feel them separate.

    • Don't fully open the controller until each of the R2 and L2 clips have been disengaged.

    • Repeat this procedure for the clip near the L2 button.

  9. 这个步骤还没有翻译 帮忙翻译一下

    DualShock 4 (CUH-ZCT1U) 按键更换: 步骤 9 中的图像 1,3 DualShock 4 (CUH-ZCT1U) 按键更换: 步骤 9 中的图像 2,3 DualShock 4 (CUH-ZCT1U) 按键更换: 步骤 9 中的图像 3,3
    • Press the R2 button and slide the rear case over it.

  10. 这个步骤还没有翻译 帮忙翻译一下

    DualShock 4 (CUH-ZCT1U) 按键更换: 步骤 10 中的图像 1,1
    • Press the L2 button and slide the rear case over it.

  11. 这个步骤还没有翻译 帮忙翻译一下

    DualShock 4 (CUH-ZCT1U) 按键更换: 步骤 11 中的图像 1,3 DualShock 4 (CUH-ZCT1U) 按键更换: 步骤 11 中的图像 2,3 DualShock 4 (CUH-ZCT1U) 按键更换: 步骤 11 中的图像 3,3
    • Flip the rear case over the top of the controller and lay it down, being careful not to strain the interconnect cable.

  12. 这个步骤还没有翻译 帮忙翻译一下

    DualShock 4 (CUH-ZCT1U) 按键更换: 步骤 12 中的图像 1,3 DualShock 4 (CUH-ZCT1U) 按键更换: 步骤 12 中的图像 2,3 DualShock 4 (CUH-ZCT1U) 按键更换: 步骤 12 中的图像 3,3
    • Use tweezers or your fingers to remove the interconnect cable by pulling its blue pull tab straight out of the socket.

    • During reassembly, reconnect the cable with its blue pull tab facing the outside of the controller.

  13. 这个步骤还没有翻译 帮忙翻译一下

    DualShock 4 (CUH-ZCT1U) 按键更换, 电池: 步骤 13 中的图像 1,2 DualShock 4 (CUH-ZCT1U) 按键更换, 电池: 步骤 13 中的图像 2,2
    • Use tweezers or your fingers to grab and disconnect the head of the battery cable from the motherboard.

    • Only pull on the head of the connector—don't pull on the cable itself.

  14. 这个步骤还没有翻译 帮忙翻译一下

    DualShock 4 (CUH-ZCT1U) 按键更换: 步骤 14 中的图像 1,1
    • Remove the battery.

  15. 这个步骤还没有翻译 帮忙翻译一下

    DualShock 4 (CUH-ZCT1U) 按键更换: 步骤 15 中的图像 1,2 DualShock 4 (CUH-ZCT1U) 按键更换: 步骤 15 中的图像 2,2
    • Grab and remove the reset button extension from its recess in the battery bracket.

  16. 这个步骤还没有翻译 帮忙翻译一下

    DualShock 4 (CUH-ZCT1U) 按键更换: 步骤 16 中的图像 1,3 DualShock 4 (CUH-ZCT1U) 按键更换: 步骤 16 中的图像 2,3 DualShock 4 (CUH-ZCT1U) 按键更换: 步骤 16 中的图像 3,3
    • Locate the two clips securing the battery bracket to the motherboard.

    • Insert the point of your spudger into the opening behind the right bracket clip.

    • Depress the clip to disengage it from the motherboard.

    • Lift up the right edge of the battery bracket.

  17. 这个步骤还没有翻译 帮忙翻译一下

    DualShock 4 (CUH-ZCT1U) 按键更换: 步骤 17 中的图像 1,2 DualShock 4 (CUH-ZCT1U) 按键更换: 步骤 17 中的图像 2,2
    • Insert the point of your spudger in the opening behind the left bracket clip.

    • Depress the clip to disengage it from the motherboard.

    • Remove the battery bracket.

  18. 这个步骤还没有翻译 帮忙翻译一下

    DualShock 4 (CUH-ZCT1U) 按键更换: 步骤 18 中的图像 1,3 DualShock 4 (CUH-ZCT1U) 按键更换: 步骤 18 中的图像 2,3 DualShock 4 (CUH-ZCT1U) 按键更换: 步骤 18 中的图像 3,3
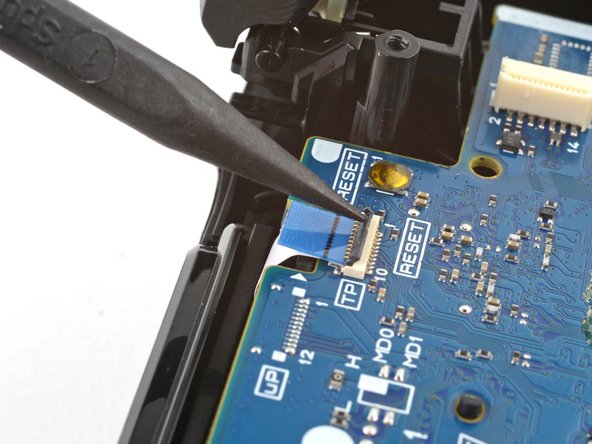
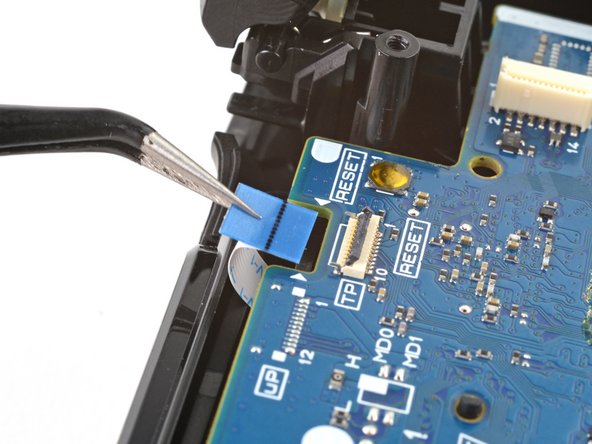
    • Use the point of your spudger to flip up the locking flap securing the touch pad cable ZIF connector.

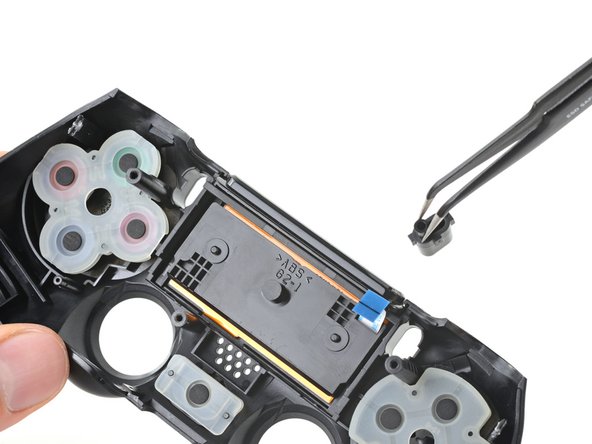
    • Use tweezers or your fingers to disconnect the cable using its blue pull tab.

  19. 这个步骤还没有翻译 帮忙翻译一下

    DualShock 4 (CUH-ZCT1U) 按键更换: 步骤 19 中的图像 1,1
    • Use your Phillips screwdriver to remove the 6.4 mm screw securing the motherboard.

    • During reassembly, hold the motherboard tight to the front case before fastening it. Test each button to ensure the silicone button pads are properly aligned. If each button presses as expected, fasten the motherboard.

  20. 这个步骤还没有翻译 帮忙翻译一下

    DualShock 4 (CUH-ZCT1U) 按键更换: 步骤 20 中的图像 1,2 DualShock 4 (CUH-ZCT1U) 按键更换: 步骤 20 中的图像 2,2
    • Grab the midframe by its plastic protrusions or the vibration motors and remove it.

    • Be careful not to separate the motherboard from the midframe, as they're only connected to each other by the vibration motor cables.

    • During reassembly, take your time positioning the midframe. Use the alignment posts to help guide it into place, and make sure the touch pad cable doesn't become trapped underneath.

  21. DualShock 4 (CUH-ZCT1U) 按键更换, 移除“共享”和“选项”按钮: 步骤 21 中的图像 1,3 DualShock 4 (CUH-ZCT1U) 按键更换, 移除“共享”和“选项”按钮: 步骤 21 中的图像 2,3 DualShock 4 (CUH-ZCT1U) 按键更换, 移除“共享”和“选项”按钮: 步骤 21 中的图像 3,3
    • 将“共享”和“选项”按钮从前壳中移除。

    • 在重新组装过程中,每个按钮只有一种插入方式。如果其中一个不合适,翻转它,然后尝试另一个凹槽。

  22. DualShock 4 (CUH-ZCT1U) 按键更换, 拆下硅胶按钮垫: 步骤 22 中的图像 1,3 DualShock 4 (CUH-ZCT1U) 按键更换, 拆下硅胶按钮垫: 步骤 22 中的图像 2,3 DualShock 4 (CUH-ZCT1U) 按键更换, 拆下硅胶按钮垫: 步骤 22 中的图像 3,3
    • 从前壳中的按钮上拆下三个硅胶按钮垫:

    • 方向键的方形垫

    • 动作键的圆形垫

    • 主页键的小键盘

    • 如果要卸下触摸板、共享和选项按钮的硅胶按钮板,请执行此步骤。否则,请继续使用标准按钮集。

    • 在重新组装过程中,将衬垫对准前壳体中的切口,并施加压力将其固定。方向板和动作按钮板可以在任何方向上旋转。调整主页按钮板的方向,使U形切口的开口朝向触摸板。

  23. DualShock 4 (CUH-ZCT1U) 按键更换, 拆下其余按键: 步骤 23 中的图像 1,3 DualShock 4 (CUH-ZCT1U) 按键更换, 拆下其余按键: 步骤 23 中的图像 2,3 DualShock 4 (CUH-ZCT1U) 按键更换, 拆下其余按键: 步骤 23 中的图像 3,3
    • 从前壳体上拆下方向键、动作键和主页键。

    • 在重新组装过程中,使用对齐卡扣将每个按键定向到其凹槽中。每一个凹槽都是为其深度和方向专门设置的。

结论

将新更换的零件与原装零件进行比较——安装前,您可能需要转移剩余部件或去除新零件上的粘合衬垫。

要重新组装您的设备,请按照本指南的相反顺序进行操作。

将您的电子垃圾送到R2或e-Stewards认证的回收商处。

维修没有按计划进行?尝试一些基本故障排除,或询问我们的论坛的帮助。

119等其他人完成本指南。

由衷感谢以下译者:

en zh

100%

这些译者帮助我们修补全世界! 您也想加入吗?
开始翻译 ›

Clay Eickemeyer

于09/19/22注册

66,730 声望

创作了453篇指南

团队

iFixit iFixit 的会员

Staff

135 名成员

创作了17,163篇指南

23条评论

I pulled out my touch pad along with the motherboard when it was still attached how can I put this back in

Landen Nipper - 回复

Pull out the ribbon the way the tutorial says and then you can place the touchpad back correctly. It needs to be put in from the inside of the controller, not the outside.

Luis Rodriguez -

where is how replace L2/R2? D=

ps4 - 回复

This guide could be enhanced by showing the L1/L2, R1/R2 button cluster in some photos. I needed to replace the silicone grommet underneath the buttons due to Sony's design flaw of having R2/L2 press on the silicone with a blade shaped extension.

Joseph Bruni - 回复

What to do If after cleaning some buttons no longer work? I was very careful when disassembling and reassembling the remote.

Amanda G Clark - 回复

添加评论

浏览统计数据:

过去 24 小时: 28

过去 7 天: 226

过去 30 天: 1,143

总计 256,322