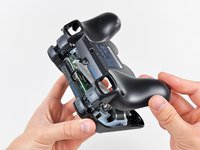
跳转到主内容

DualShock 3 Vibration Motors Replacement

你所需要的

  1. DualShock 3 Vibration Motors Replacement, Rear Cover: 步骤 1 中的图像 1,1
    • Remove the five 7.2 mm Phillips screws securing the rear cover to the controller.

  2. DualShock 3 Vibration Motors Replacement: 步骤 2 中的图像 1,1
    • Press on the rear cover between the analog sticks and slightly lift the lower edge of it away from the rest of the controller.

  3. DualShock 3 Vibration Motors Replacement: 步骤 3 中的图像 1,2 DualShock 3 Vibration Motors Replacement: 步骤 3 中的图像 2,2
    • Push the rear cover slightly toward the top edge of the controller to clear the front edge of the #2 triggers.

    • Pull the rear cover away from the rest of the controller, being careful not to pop off the #2 triggers.

    • If you happen to accidentally pop off the trigger buttons, we have a trigger button guide to reattach them.

  4. DualShock 3 Vibration Motors Replacement, Battery: 步骤 4 中的图像 1,1
    • Lift the battery off the motherboard for enough clearance to access the battery connector.

  5. DualShock 3 Vibration Motors Replacement: 步骤 5 中的图像 1,1
    • Carefully pull the battery connector away from its socket on the motherboard.

    • It may be helpful to use a pair of tweezers or pliers to grab the battery connector when you disconnect it for the first time. Only pull on the connector. Do not try to remove by pulling on the red and black wires.

  6. DualShock 3 Vibration Motors Replacement, Vibration Motors: 步骤 6 中的图像 1,2 DualShock 3 Vibration Motors Replacement, Vibration Motors: 步骤 6 中的图像 2,2
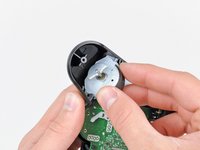
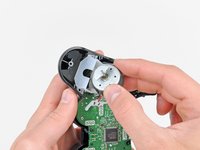
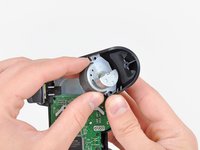
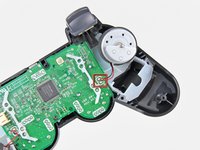
    • Pull the vibration motor out of its plastic frame, being careful not to strain the wires connecting it to the motherboard.

  7. DualShock 3 Vibration Motors Replacement: 步骤 7 中的图像 1,1
    • Use a soldering iron to de-solder both vibration motor wires from the motherboard.

    • Not too much experience with soldering? Check out our soldering guide for detailed instructions.

    • The positive (red) wire connects nearest the top of the motherboard.

    • When soldering on circuit boards, be sure not to overheat the connection as permanent damage may result.

  8. DualShock 3 Vibration Motors Replacement: 步骤 8 中的图像 1,2 DualShock 3 Vibration Motors Replacement: 步骤 8 中的图像 2,2
    • If desired, repeat this procedure for the other vibration motor.

    • The two vibration motors are non-interchangeable, as the left motor has more counterweights than the right motor.

结论

To reassemble your device, follow these instructions in reverse order.

15等其他人完成本指南。

6条评论

That is not how the innards of a European Model DS3 controller are. Wrong guide. Not useful at all

Stathis Kiriakos - 回复

Just because the internals are different and it doesn’t match what you own, it doesn’t mean you need to discredit him…

Davide -

I know this comment is almost a decade old but its still quite sad that you’re giving this guy flack for not showing the differences between the EUR and USA controller models when they’re basically the exact same and it’s a guide that is completely free.

f1pp3r -

My DS3’s rumble motor died out after 8 years of use so i went out and came to know that there’re many such motors available on market,so i wanna know exact specifications of the rumble motors (both left and right ones) on Dualshock 3 controller,like Voltage,RPM,Dimensions,weight and so.

Please can you provide me the required info ?

montgomeryjohnny - 回复

Will my controller still work if I remove the two motors completely?

Paul Wright - 回复

添加评论

浏览统计数据:

过去 24 小时: 6

过去 7 天: 54

过去 30 天: 171

总计 42,592