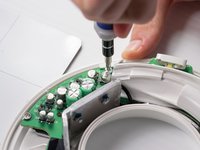
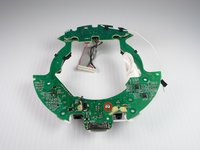
跳转到主内容

Disassembling the Circuit Board

你所需要的

  1. Disassembling the Circuit Board, Cracking the Case: 步骤 1 中的图像 1,1
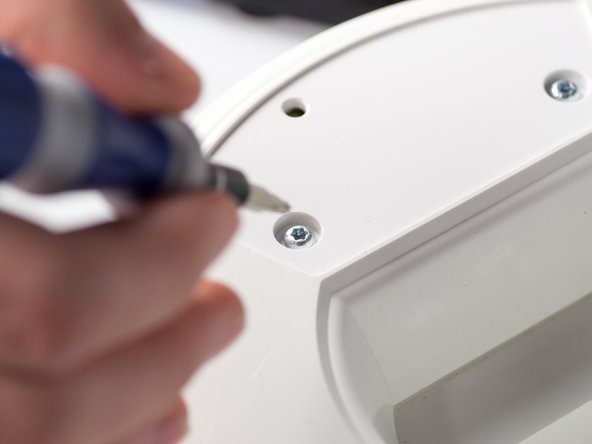
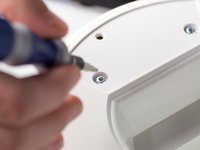
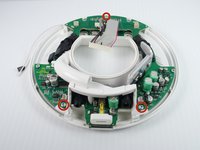
    • Turn the device upside down so that the three rubber pads are facing up.

  2. Disassembling the Circuit Board: 步骤 2 中的图像 1,1
    • Use a heat gun (set to low) to apply heat to one of the rubber pads until you can easily remove the pad. This step takes around 5-7 minutes.

  3. Disassembling the Circuit Board: 步骤 3 中的图像 1,1
    • Remove the heated rubber pad with a plastic opening tool.

    • Repeat steps 2 and 3 for the two remaining rubber pads.

  4. Disassembling the Circuit Board: 步骤 4 中的图像 1,2 Disassembling the Circuit Board: 步骤 4 中的图像 2,2
    • Remove the six 1cm T-10 torx screws on the bottom of the device (found under the rubber pads) using a T-10 Torx screwdriver.

  5. Disassembling the Circuit Board: 步骤 5 中的图像 1,3 Disassembling the Circuit Board: 步骤 5 中的图像 2,3 Disassembling the Circuit Board: 步骤 5 中的图像 3,3
    • Open the device along its seam.

    • Be careful when separating the device because there are wires connecting the two seperate halves.

  6. Disassembling the Circuit Board: 步骤 6 中的图像 1,1
    • Disconnect the ribbon cable connector from the top half of the device by pulling outward and parallel to the connecting pins.

  7. Disassembling the Circuit Board: 步骤 7 中的图像 1,2 Disassembling the Circuit Board: 步骤 7 中的图像 2,2
    • Locate and disconnect the two molex connectors found on either side of the ribbon cable connector on the bottom half of the device.

  8. Disassembling the Circuit Board, Circuit Board: 步骤 8 中的图像 1,2 Disassembling the Circuit Board, Circuit Board: 步骤 8 中的图像 2,2
    • Remove the three 1 cm T-10 Torx screws.

  9. Disassembling the Circuit Board: 步骤 9 中的图像 1,1
    • Carefully press out the white base tube and push up on the circuit board.

    • Note that there is a small wire connecting the circuit board to the base.

  10. Disassembling the Circuit Board: 步骤 10 中的图像 1,2 Disassembling the Circuit Board: 步骤 10 中的图像 2,2
    • Pull the white wire out of the hot glue.

  11. Disassembling the Circuit Board: 步骤 11 中的图像 1,3 Disassembling the Circuit Board: 步骤 11 中的图像 2,3 Disassembling the Circuit Board: 步骤 11 中的图像 3,3
    • Unbolt the heatsink with a 5.5-mm socket and a Phillips PH1 screwdriver.

    • Remove the heat sink; it should detach from the bottom of the device.

  12. Disassembling the Circuit Board: 步骤 12 中的图像 1,3 Disassembling the Circuit Board: 步骤 12 中的图像 2,3 Disassembling the Circuit Board: 步骤 12 中的图像 3,3
    • Remove the T-10 torx screw on the bottom of the device that attaches the base tube to the circuit board.

    • Turn the device so that the base tube is on top.

    • Remove the base tube by pulling up.

    • May need to cut the rubber adhesive between the base tube to the circuit board.

结论

To reassemble your device, follow these steps in reverse order.

2等其他人完成本指南。

团队

Cal Poly, Team 9-28, Maness Winter 2014 Cal Poly, Team 9-28, Maness Winter 2014 的会员

CPSU-MANESS-W14S9G28

4 名成员

创作了7篇指南

0条评论

添加评论

浏览统计数据:

过去 24 小时: 0

过去 7 天: 2

过去 30 天: 8

总计 4,622