跳转到主内容

Disassembling HKC P886A Overall Device Disassembly

仅作为前提条件
本指南仅用作其他指南的先决条件。不能单独食用。

你所需要的

  1. Disassembling HKC P886A Overall Device Disassembly, Disassembling HKC P886A Overall Device Disassembly: 步骤 1 中的图像 1,2 Disassembling HKC P886A Overall Device Disassembly, Disassembling HKC P886A Overall Device Disassembly: 步骤 1 中的图像 2,2
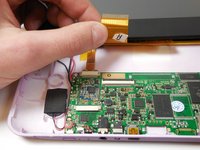
    • Insert the flat tip of the metal spudger into the seam between the back panel and the screen.

    • The easiest insertion point for the metal spudger is at the corners of the device.

    • Slide the spudger across the perimeter of the device and gently pry apart at each corner.

    • When the screen is separated from the back panel there will be two connected ribbon cables between the two halves of the device. These cables must be disconnected before further disassembly.

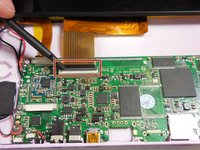
    • After the pressure clamps are released orient the device so that the speaker is to the right and the screen is tilted away from you.

  2. Disassembling HKC P886A Overall Device Disassembly: 步骤 2 中的图像 1,2 Disassembling HKC P886A Overall Device Disassembly: 步骤 2 中的图像 2,2
    • The device is oriented with the camera to the right and the external button towards the top of the picture.

    • Locate the shorter ribbon cable and the black pressure tabs that hold the ribbon cable in place.

    • The tabs used to connect the ribbon cables are fragile and can easily be damaged.

    • Use the plastic spudger to gently slide the tabs about 2mm away from connector.

    • Once tabs are successfully disconnected the ribbon cable should come out of the port without resistance.

  3. Disassembling HKC P886A Overall Device Disassembly: 步骤 3 中的图像 1,3 Disassembling HKC P886A Overall Device Disassembly: 步骤 3 中的图像 2,3 Disassembling HKC P886A Overall Device Disassembly: 步骤 3 中的图像 3,3
    • Locate the longer ribbon cable and the pressure clamp that holds the cable in the connection port.

    • Using the plastic spudger, flip the black locking clip up.

    • The pressure clip will click when it has been disengaged.

    • Once the clip is unlocked, the cable should slide out without resistance

    • In photo 1 the device is oriented with the camera to the left and external buttons towards the bottom. In photo 2 the device is oriented with the camera toward the user. In photo 3 the camera is to the left.

结论

To reassemble your device, follow these instructions in reverse order.

Cassidy

于03/11/15注册

409 声望

创作了3篇指南

团队

0条评论

添加评论

浏览统计数据:

过去 24 小时: 0

过去 7 天: 0

过去 30 天: 0

总计 274