简介
This guide will walk you through how to remove the fan from a Dell Precision 3541. The fan is an important part of the laptop because it keeps everything from overheating, so it’s important to handle it carefully. You don’t need a lot of experience, just some basic tools and a steady hand. If you follow the steps closely, you should be able to remove the fan safely without causing any damage.
Before you begin the repair, power off and disconnect your laptop from the charger and any peripheral devices.
你所需要的
-
-
-
Flip your laptop over so the bottom is facing up.
-
Use a Phillips #1 screwdriver to remove eight small screws from the bottom panel.
-
Insert the end of an opening tool into the seam between the bottom cover and frame of the device.
-
Slide it around the edges to release the clips holding it together.
-
Remove the bottom panel.
 询问修复机器人
-
-
-
-
Remove the battery for safety On the battery, you will find one screw on the right side and two on the top. Unscrew all three carefully, putting them in a safe holding place.
-
Afterwards, locate a small black cable that runs along a crevice in the underside of the battery that connects a separate component of the device to the bottom of the battery. To do this, lift the battery up and out of its designated spot, and the cable should be apparent.
-
Carefully unplug the side that connects into the battery and remove the cable from its crevice. Then the battery will fully be removed and you can safely start removing the fan.
-
-
-
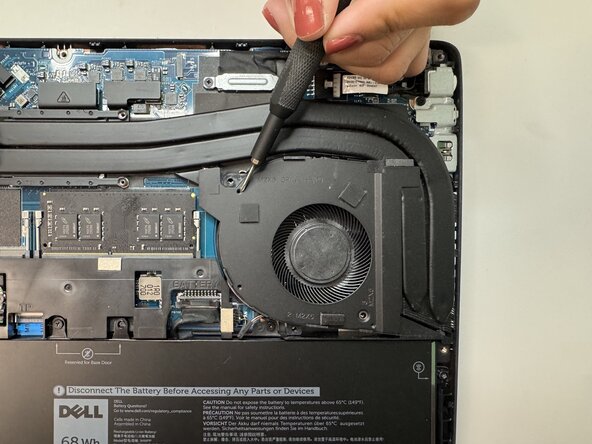
Locate and unscrew the fan The fan is located on the top right of the bottom of the laptop.
-
The fan is located on the top right of the bottom of the laptop.
-
Once you have located the fan you should see it held in place by 3 small screws and 3 larger screws as well.
-
To unscrew, you must use a #000 or 1.5mm cross-head screwdriver to unscrew the screws.
-
Once you have removed all of the screws, locate the fan cable which is a long wire running along the bottom of the computer that is connected to the fan.
-
To remove these screws, you must change to a #00 or 2mm cross-head screwdriver.
-
Then, remove the 4 screws (2 on each side) from the wire to remove it and then carefully remove the fan.
-
-




To reassemble your device, follow these instructions in reverse order. Take your e-waste to an R2 or e-Stewards certified recycler.

团队

Austin Community College, Team 49-4, Cox Spring 2026 Austin Community College, Team 49-4, Cox Spring 2026 的会员
AUSTINCC-COX-S26S49G4
3 名成员
创作了35篇指南
