跳转到主内容

Dell Latitude 7490 Screen Replacement

你所需要的

  1. Dell Latitude 7490 Screen Replacement, Prepare your laptop for disassembly: 步骤 1 中的图像 1,2 Dell Latitude 7490 Screen Replacement, Prepare your laptop for disassembly: 步骤 1 中的图像 2,2
    • Allow your laptop's battery to drain below 25% before starting this repair—a charged battery may catch fire if damaged.

    • Unplug all cables and fully shut down your laptop.

  2. Dell Latitude 7490 Screen Replacement, Flip your laptop over: 步骤 2 中的图像 1,1
    • Flip your laptop over so the rubber feet strips are facing up.

  3. Dell Latitude 7490 Screen Replacement, Loosen the captive screws: 步骤 3 中的图像 1,2 Dell Latitude 7490 Screen Replacement, Loosen the captive screws: 步骤 3 中的图像 2,2
    • Use a Phillips screwdriver to fully loosen the eight captive screws securing the back cover.

  4. Dell Latitude 7490 Screen Replacement, Insert an opening pick: 步骤 4 中的图像 1,3 Dell Latitude 7490 Screen Replacement, Insert an opening pick: 步骤 4 中的图像 2,3 Dell Latitude 7490 Screen Replacement, Insert an opening pick: 步骤 4 中的图像 3,3
    • Plastic clips secure the back cover to the frame. You'll hear and feel them release as you work.

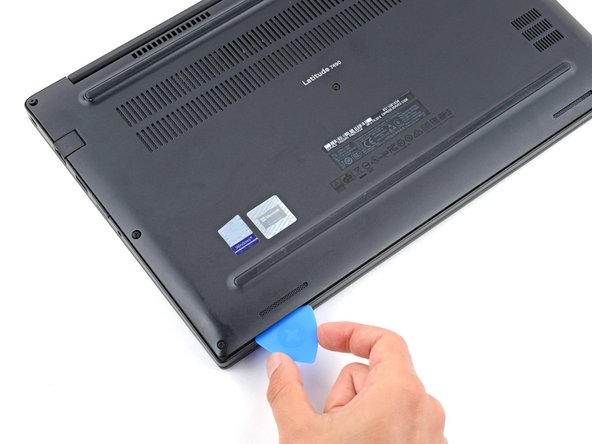
    • Insert the long side of an opening pick between the top right corner of the back cover and frame.

    • Pry the back cover up to release the clips securing the top right corner.

  5. Dell Latitude 7490 Screen Replacement, Release the clips: 步骤 5 中的图像 1,3 Dell Latitude 7490 Screen Replacement, Release the clips: 步骤 5 中的图像 2,3 Dell Latitude 7490 Screen Replacement, Release the clips: 步骤 5 中的图像 3,3
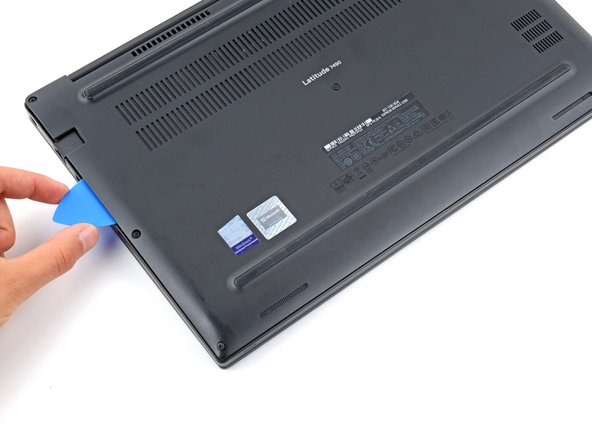
    • Slide the opening pick down the right edge and around the bottom right corner to release the clips.

  6. Dell Latitude 7490 Screen Replacement: 步骤 6 中的图像 1,3 Dell Latitude 7490 Screen Replacement: 步骤 6 中的图像 2,3 Dell Latitude 7490 Screen Replacement: 步骤 6 中的图像 3,3
    • Slide the opening pick along the front edge and up to the top left corner to release the remaining clips securing the back cover.

  7. Dell Latitude 7490 Screen Replacement, Remove the back cover: 步骤 7 中的图像 1,3 Dell Latitude 7490 Screen Replacement, Remove the back cover: 步骤 7 中的图像 2,3 Dell Latitude 7490 Screen Replacement, Remove the back cover: 步骤 7 中的图像 3,3
    • Remove the back cover.

    • During reassembly, lay the back cover on the frame and press down firmly around the perimeter to engage all the clips.

  8. Dell Latitude 7490 Screen Replacement, Disconnect the battery: 步骤 8 中的图像 1,2 Dell Latitude 7490 Screen Replacement, Disconnect the battery: 步骤 8 中的图像 2,2
    • Grip the plastic tab on the battery connector and pull straight up to disconnect it.

    • During reassembly, align this connector over its socket and press down until it clicks into place. If it doesn't connect, re‑align it and try again.

  9. Dell Latitude 7490 Screen Replacement, Unfasten the WLAN card: 步骤 9 中的图像 1,3 Dell Latitude 7490 Screen Replacement, Unfasten the WLAN card: 步骤 9 中的图像 2,3 Dell Latitude 7490 Screen Replacement, Unfasten the WLAN card: 步骤 9 中的图像 3,3
    在这个步骤中使用的工具:
    Tweezers
    $4.99
    购买
    • Use a Phillips screwdriver to remove the 3.5 mm‑long screw securing the WLAN card and its bracket.

    • Use tweezers or your fingers to remove the WLAN card bracket.

  10. Dell Latitude 7490 Screen Replacement, Disconnect the WLAN card: 步骤 10 中的图像 1,3 Dell Latitude 7490 Screen Replacement, Disconnect the WLAN card: 步骤 10 中的图像 2,3 Dell Latitude 7490 Screen Replacement, Disconnect the WLAN card: 步骤 10 中的图像 3,3
    • Insert an arm of your angled tweezers under the metal neck of one the WLAN card's coaxial connectors.

    • Gently lift as close to the head as possible to disconnect the cable.

    • Repeat the process for the second antenna cable.

    • To reconnect coaxial connectors, hold each one in place over its socket and press down with the flat end of your spudger. The connector will snap into place.

  11. Dell Latitude 7490 Screen Replacement, Reposition the WLAN card cables: 步骤 11 中的图像 1,2 Dell Latitude 7490 Screen Replacement, Reposition the WLAN card cables: 步骤 11 中的图像 2,2
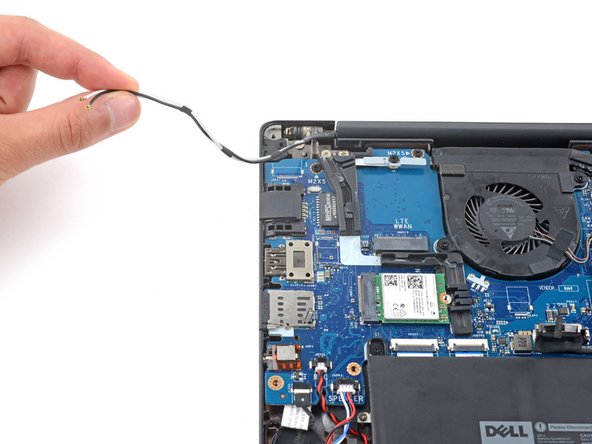
    • Pull the WLAN cables out of their rubber routing grooves and reposition them out of the way, over the left side of the laptop.

    • During reassembly, push the wires into their grooves with your fingers or a spudger to secure them.

  12. Dell Latitude 7490 Screen Replacement, Disconnect the IR cables: 步骤 12 中的图像 1,3 Dell Latitude 7490 Screen Replacement, Disconnect the IR cables: 步骤 12 中的图像 2,3 Dell Latitude 7490 Screen Replacement, Disconnect the IR cables: 步骤 12 中的图像 3,3
    在这个步骤中使用的工具:
    Tweezers
    $4.99
    购买
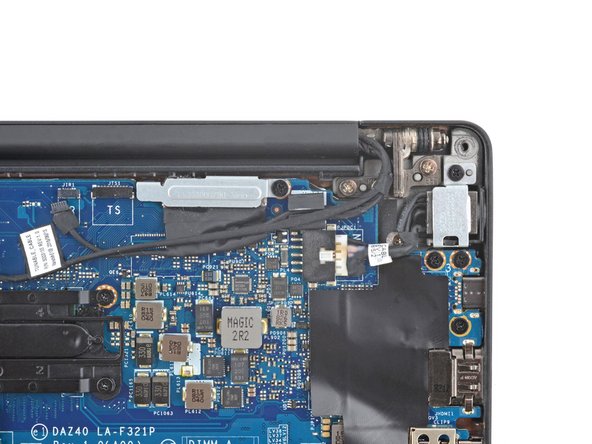
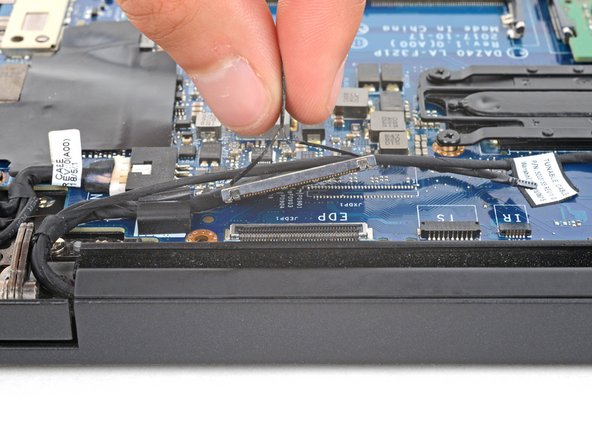
    • Use blunt nose tweezers to firmly grip the antenna cable by the tape just below its connector.

    • Pull the connector straight out of its socket.

    • Grip the IR cable by its tape and pull it out of its socket.

  13. Dell Latitude 7490 Screen Replacement, Remove the display cable bracket: 步骤 13 中的图像 1,3 Dell Latitude 7490 Screen Replacement, Remove the display cable bracket: 步骤 13 中的图像 2,3 Dell Latitude 7490 Screen Replacement, Remove the display cable bracket: 步骤 13 中的图像 3,3
    • Use a Phillips screwdriver to remove the 5.7 mm‑long screw securing the display cable bracket.

    • Remove the display cable bracket.

  14. Dell Latitude 7490 Screen Replacement, Disconnect the display cable: 步骤 14 中的图像 1,2 Dell Latitude 7490 Screen Replacement, Disconnect the display cable: 步骤 14 中的图像 2,2
    • Grip the plastic tab on the display cable connector and pull straight up to disconnect it.

  15. Dell Latitude 7490 Screen Replacement, Reposition the display cables: 步骤 15 中的图像 1,3 Dell Latitude 7490 Screen Replacement, Reposition the display cables: 步骤 15 中的图像 2,3 Dell Latitude 7490 Screen Replacement, Reposition the display cables: 步骤 15 中的图像 3,3
    • Grab the antenna and display cables and reposition them out of the way, over the right side of the laptop.

    • The IR cables may be lightly taped to the motherboard.

  16. Dell Latitude 7490 Screen Replacement, Lay your laptop completely flat: 步骤 16 中的图像 1,3 Dell Latitude 7490 Screen Replacement, Lay your laptop completely flat: 步骤 16 中的图像 2,3 Dell Latitude 7490 Screen Replacement, Lay your laptop completely flat: 步骤 16 中的图像 3,3
    • Before continuing, clear your work surface. Consider putting something soft under the display to prevent damaging it.

    • Open your laptop until it's completely flat.

    • Flip your laptop over and lay it screen-side down on your work surface.

  17. Dell Latitude 7490 Screen Replacement, Unfasten the hinges: 步骤 17 中的图像 1,2 Dell Latitude 7490 Screen Replacement, Unfasten the hinges: 步骤 17 中的图像 2,2
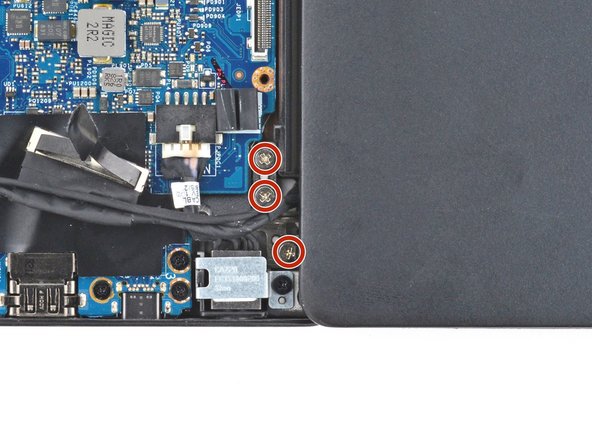
    • Use a Phillips screwdriver to remove the six 4.7 mm‑long screws securing the hinges.

  18. Dell Latitude 7490 Screen Replacement, Remove the screen: 步骤 18 中的图像 1,3 Dell Latitude 7490 Screen Replacement, Remove the screen: 步骤 18 中的图像 2,3 Dell Latitude 7490 Screen Replacement, Remove the screen: 步骤 18 中的图像 3,3
    • Lift the screen straight up and remove it.

    • During reassembly, make sure no cables are stuck under the hinges before guiding them into their recesses in the frame.

结论

To reassemble your device, follow these instructions in reverse order.

Take your e-waste to an R2 or e-Stewards certified recycler.

Repair didn’t go as planned? Try some basic troubleshooting, or ask our Answers community for help.

Spencer Day

于09/14/22注册

54,989 声望

创作了407篇指南

团队

iFixit iFixit 的会员

Staff

136 名成员

创作了17,303篇指南

一条评论

It works but I am afraid to pull the display cable. It's too strong and i am constantly afraid I might break it and even break the motherboard by pulling it. I tried to pull a little hard and the mother board made a small noise and I thought it was sound of breaking. So, I stopped. Thanks for the guide but I will still take to a repair shop.

adythshu - 回复

添加评论

浏览统计数据:

过去 24 小时: 6

过去 7 天: 18

过去 30 天: 97

总计 829