跳转到主内容

Back Panel Replacement

你所需要的

  1. Back Panel Replacement, Back Panel: 步骤 1 中的图像 1,3 Back Panel Replacement, Back Panel: 步骤 1 中的图像 2,3 Back Panel Replacement, Back Panel: 步骤 1 中的图像 3,3
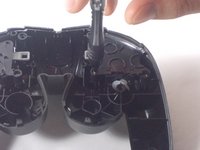
    • First, remove the 6 screws in the back panel and pull the back panel off.

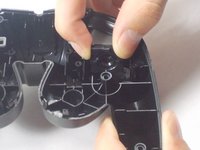
    • Separate the halves of the controller. However, be careful when separating due to the little wires that could get mixed up.

  2. Back Panel Replacement: 步骤 2 中的图像 1,3 Back Panel Replacement: 步骤 2 中的图像 2,3 Back Panel Replacement: 步骤 2 中的图像 3,3
    • Next, remove the rumble motor by unscrewing the 2 screws connecting it.

  3. Back Panel Replacement: 步骤 3 中的图像 1,3 Back Panel Replacement: 步骤 3 中的图像 2,3 Back Panel Replacement: 步骤 3 中的图像 3,3
    • Finally remove the screws holding in the right and left triggers. It's easiest to hold the trigger together as shown in the third picture. Remove both the left and right trigger, and then you have successfully removed your back panel.

结论

To reassemble your device, follow these instructions in reverse order.

David Mistretta

于10/26/16注册

101 声望

撰写一个指南

团队

UMass Dartmouth, Team 3-5, Isaacson Fall 2016 UMass Dartmouth, Team 3-5, Isaacson Fall 2016 的会员

UMASSD-ISAACSON-F16S3G5

3 名成员

创作了10篇指南

0条评论

添加评论

浏览统计数据:

过去 24 小时: 0

过去 7 天: 2

过去 30 天: 6

总计 286