跳转到主内容

Acer Aspire 5253 Keyboard Replacement

你所需要的

  1. Acer Aspire 5253 Keyboard Replacement, Battery: 步骤 1 中的图像 1,1
    • Turn the laptop over.

  2. Acer Aspire 5253 Keyboard Replacement: 步骤 2 中的图像 1,1
    • "Unlock" your battery by moving the switch as shown so that an unlocked lock on a red background is shown.

  3. Acer Aspire 5253 Keyboard Replacement: 步骤 3 中的图像 1,1
    • Next move the other switch, while the unlocked symbol is still showing. The battery should pop up, and no longer be flush with the bottom of the laptop.

  4. Acer Aspire 5253 Keyboard Replacement: 步骤 4 中的图像 1,1
    • Now remove the battery by lifting it out of the laptop by the side closest to the switches.

  5. Acer Aspire 5253 Keyboard Replacement: 步骤 5 中的图像 1,1
    • You have successfully removed the battery. Congratulations!

  6. Acer Aspire 5253 Keyboard Replacement, Keyboard: 步骤 6 中的图像 1,1
    • Fling your laptop over and open it as shown in the image.

  7. Acer Aspire 5253 Keyboard Replacement: 步骤 7 中的图像 1,1
    • Locate the tabs keeping the keyboard in place.

  8. Acer Aspire 5253 Keyboard Replacement: 步骤 8 中的图像 1,2 Acer Aspire 5253 Keyboard Replacement: 步骤 8 中的图像 2,2
    • Using thin tweezers push the tabs in the keyboard in and pull up on the edge of the keyboard.

    • The keyboard will bend and it will seem like its breaking, but don't worry this is OK!

  9. Acer Aspire 5253 Keyboard Replacement: 步骤 9 中的图像 1,1
    • Once the keyboard begins popping out of place use your hand to keep the part that has been detached from the laptop in the air.

    • Continue pushing in tabs and lifting up the keyboard as described above.

  10. Acer Aspire 5253 Keyboard Replacement: 步骤 10 中的图像 1,1
    • Once the keyboard has been separated from the body of the laptop carefully lift the keyboard up and tilt it forward, leaving it to rest on the laptop as shown.

    • Do not pull the keyboard up with too much force because you may cause damage to your laptop!

  11. Acer Aspire 5253 Keyboard Replacement: 步骤 11 中的图像 1,2 Acer Aspire 5253 Keyboard Replacement: 步骤 11 中的图像 2,2
    • Using tweezers pull the white tab down on both sides. This will release the blue and black connector.

  12. Acer Aspire 5253 Keyboard Replacement: 步骤 12 中的图像 1,1
    • Pull the blue and black connector out of its socket.

    • Make sure it comes off easily or you may rip it.

  13. Acer Aspire 5253 Keyboard Replacement: 步骤 13 中的图像 1,1
    • Now you can pull the keyboard away from the laptop.

结论

To reassemble your device, follow these instructions in reverse order.

10等其他人完成本指南。

团队

Cal Poly, Team 8-11, Regan Spring 2014 Cal Poly, Team 8-11, Regan Spring 2014 的会员

CPSU-REGAN-S14S8G11

4 名成员

创作了15篇指南

3条评论

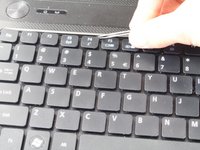
I'm probably going to have to replace my 5253 keyboard, and this guide is head and shoulders above anything else I've seen. However, I'm stuck on step 8.

It says "push the tabs ... in". Is that "in", meaning "away from the keyboard back into the chassis"?

Then, "pull up on the edge of the keyboard". Do I pull up with the tweezers somehow?

On what? The photo on step 8 shows working on the middle tab. Presumably the tabs closer to the left corner have already been pushed in? I'm not getting past that first tab on the top-left.

Any help would be very much appreciated. Thank you.

Tom Asbury - 回复

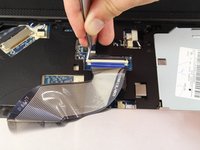
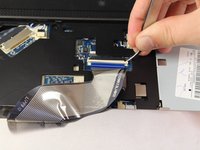
Gently pull the small white bar that holds the wires in place that hold the keyboard towards you one side at a time so you don’t break the wires accidentally! Be very careful when moving the small white bar so you don’t break the wires that connect to the keyboard! It is not difficult at all! It only takes about 10-12 second to move the small white bar towards you! When you can’t move the small white bar any further towards you then you know it’s safe to remove the keyboard!

Hector E -

Thanks….this guide was really helpful for me to change my key board

John H 10 -25-2017

j_ohn3150 - 回复

添加评论

浏览统计数据:

过去 24 小时: 3

过去 7 天: 11

过去 30 天: 41

总计 13,576