跳转到主内容

2019年13寸带Retina 显示屏 MacBook Air 显示屏更换

你所需要的

  1. 2019年13寸带Retina 显示屏 MacBook Air 显示屏更换, 移除固定底壳的螺丝: 步骤 1 中的图像 1,1
    • 在开始此过程之前,请禁用 Mac 的自动启动功能。 当你打开底壳时,自动启动会自动将Mac开机。 使用本指南 禁用自动启动。

    • 如果你的 MacBook 运行的是 Big Sur v11.1 或更高版本,禁用自动启动可能不起作用。 你可以正常进行拆卸,但请务必在打开后盖后立即断开电池连接。
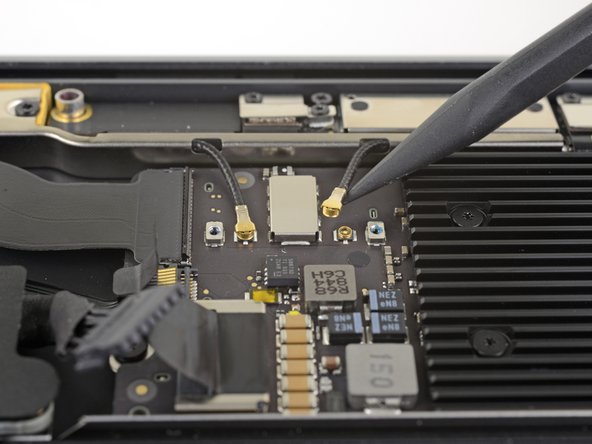
    • 使用本指南或按照下面的缩写说明禁用自动启动。开始之前,请完全关闭电源并拔下MacBook Air的电源。关闭显示屏,然后将整个笔记本电脑上下翻转。

    • 使用P5 螺丝刀卸下以下螺丝:

    • 2个7.9毫米螺丝

    • 2个7.1毫米螺丝

    • 6个2.6毫米螺丝

  2. 2019年13寸带Retina 显示屏 MacBook Air 显示屏更换, 移除底壳: 步骤 2 中的图像 1,1
    • 在显示屏和底壳之间放进手指,然后向上拉以将底壳从夹扣中弹出。

    • 移除底壳。

  3. 2019年13寸带Retina 显示屏 MacBook Air 显示屏更换, 断开电池连接: 步骤 3 中的图像 1,1
    • 剥下覆盖电池接口的胶带,以露出下面的接口。

  4. 2019年13寸带Retina 显示屏 MacBook Air 显示屏更换: 步骤 4 中的图像 1,2 2019年13寸带Retina 显示屏 MacBook Air 显示屏更换: 步骤 4 中的图像 2,2
    • 使用撬棒将电池接口行于主板滑动并从主上的插座中取出。

  5. 2019年13寸带Retina 显示屏 MacBook Air 显示屏更换, 断开天线条: 步骤 5 中的图像 1,2 2019年13寸带Retina 显示屏 MacBook Air 显示屏更换, 断开天线条: 步骤 5 中的图像 2,2
    • 使用T3梅花螺丝刀卸下固定天线电缆支架的两颗1.4毫米螺丝。

    • 卸下天线电缆支架。

  6. 2019年13寸带Retina 显示屏 MacBook Air 显示屏更换: 步骤 6 中的图像 1,3 2019年13寸带Retina 显示屏 MacBook Air 显示屏更换: 步骤 6 中的图像 2,3 2019年13寸带Retina 显示屏 MacBook Air 显示屏更换: 步骤 6 中的图像 3,3
    • 将撬棒的尖端插入靠近连接器的一根天线电缆下方。

    • 笔直向上撬起以断开电缆接口。

    • 重复另一条天线电缆。

  7. 2019年13寸带Retina 显示屏 MacBook Air 显示屏更换: 步骤 7 中的图像 1,2 2019年13寸带Retina 显示屏 MacBook Air 显示屏更换: 步骤 7 中的图像 2,2
    • 使用T3梅花螺丝刀卸下固定显示屏电缆连接器支架的两颗1.5毫米螺丝。

    • 卸下显示屏电缆接口支架。

  8. 2019年13寸带Retina 显示屏 MacBook Air 显示屏更换: 步骤 8 中的图像 1,2 2019年13寸带Retina 显示屏 MacBook Air 显示屏更换: 步骤 8 中的图像 2,2
    • 使用撬棒的平端撬起显示屏电缆接口。

  9. 2019年13寸带Retina 显示屏 MacBook Air 显示屏更换: 步骤 9 中的图像 1,1
    • 使用T5梅花螺丝刀卸下以下螺丝:

    • 四个7.4毫米螺丝

    • 两颗4.5毫米螺丝

  10. 2019年13寸带Retina 显示屏 MacBook Air 显示屏更换, 移除天线条: 步骤 10 中的图像 1,3 2019年13寸带Retina 显示屏 MacBook Air 显示屏更换, 移除天线条: 步骤 10 中的图像 2,3 2019年13寸带Retina 显示屏 MacBook Air 显示屏更换, 移除天线条: 步骤 10 中的图像 3,3
    • 垂直向上提起天线杆,将其从外壳中取出。注意不要将天线杆挂在任何电缆或接口上。

    • 可能会遇到天线杆中间夹住它的夹子的阻力。你可以用力拉,而不会损坏任何东西,只要你垂直向上拉垂直于外壳即可。

    • 卸下天线条。

  11. 2019年13寸带Retina 显示屏 MacBook Air 显示屏更换, 移除显示屏: 步骤 11 中的图像 1,2 2019年13寸带Retina 显示屏 MacBook Air 显示屏更换, 移除显示屏: 步骤 11 中的图像 2,2
    • 使用T9梅花槽螺丝刀卸下将显示屏铰链固定到上壳的六颗4.9毫米螺丝。

  12. 2019年13寸带Retina 显示屏 MacBook Air 显示屏更换: 步骤 12 中的图像 1,2 2019年13寸带Retina 显示屏 MacBook Air 显示屏更换: 步骤 12 中的图像 2,2
    • 在MacBook屏幕朝下的情况下,小心向上提起上盖,以尽可能打开MacBook。

  13. 2019年13寸带Retina 显示屏 MacBook Air 显示屏更换: 步骤 13 中的图像 1,3 2019年13寸带Retina 显示屏 MacBook Air 显示屏更换: 步骤 13 中的图像 2,3 2019年13寸带Retina 显示屏 MacBook Air 显示屏更换: 步骤 13 中的图像 3,3
    • 提起MacBook,然后小心地将显示屏与上壳旋转至90度角。

    • 铰链不得相对于显示屏移动,而应略微旋转出机箱。

    • 将显示屏与外壳成90度角,保持外壳静止不动,将显示屏笔直向下移动,以使铰链滑出外壳底部。

结论

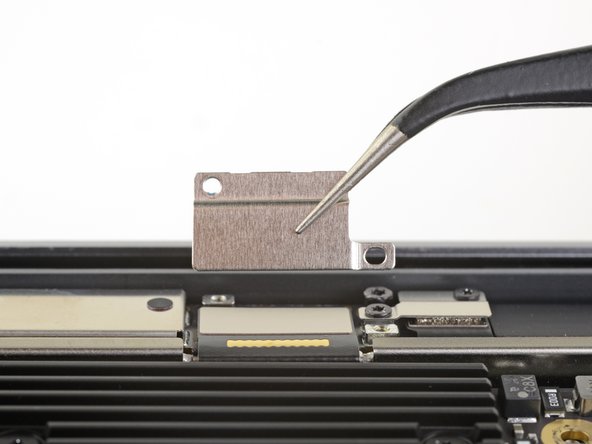
将新的更换零件与原始零件进行比较-在安装之前,你可能需要转移剩余的零件或从新零件上取下粘性衬板。

请按逆序重组你的设备。

把你的电子废料带到 R2 或 e-Stewards 认证的回收商.

维修未按计划进行?请查阅论坛 来获取帮助。

15等其他人完成本指南。

由衷感谢以下译者:

en zh

100%

Yuting Zhao正在帮助我们修复这个世界! 您也想加入吗?
开始翻译 ›

Adam O'Camb

于04/11/15注册

196,656 声望

创作了416篇指南

12条评论

Thanks a lot for the useful guide! I have found some difficulties removing the antenna bar with this description, since there is no information to remove the 4 screws holding the antenna assembly in place. Additionally the force to remove the antenna is very high and may damage the complete antenna. I have used some angled tweezers to remove it and they came right our without any force.

Another question I have for the display replacement on a 2019 MacBook Air is how to get the true tone function and keyboard backlight working again. I have found no infos for the 2019 Air but some people had the same issue with 2018 and up MacBook Pros. Any suggestions on how I could fix this up? (Already made a SMC and PRAM reset)

Thanks in advance!

Josef G - 回复

Thanks for the comments! We’ll fix the missing steps right up!

Arthur Shi -

Those are good questions. I would like to know also.

QuickTech -

May I know where to buy a replacement screen from a reliable supplier ?

Alan Li - 回复

Hi Alan, we sell replacement screens in our store.

Adam O'Camb -

添加评论

浏览统计数据:

过去 24 小时: 25

过去 7 天: 145

过去 30 天: 692

总计 36,392