简介
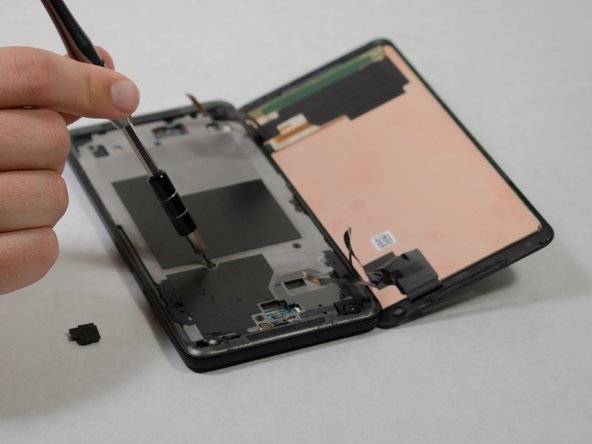
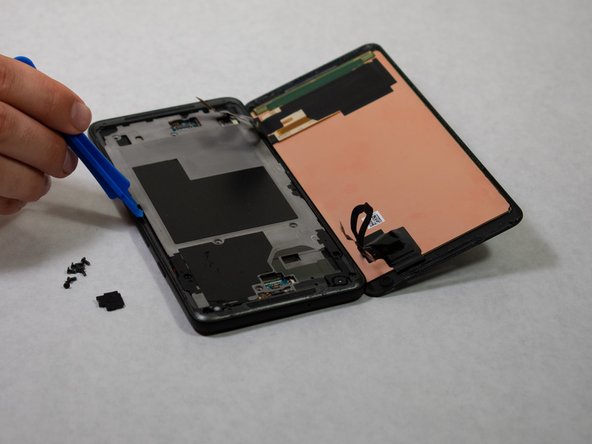
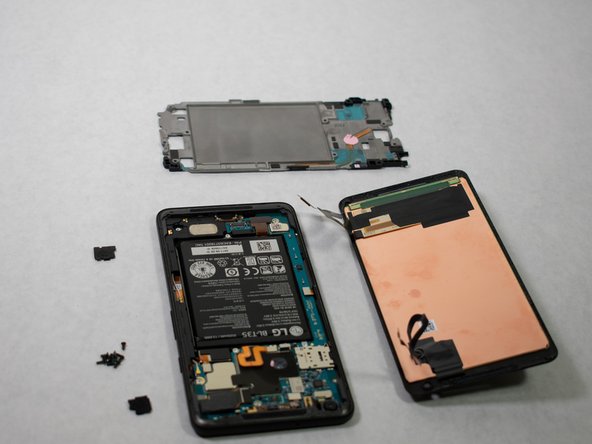
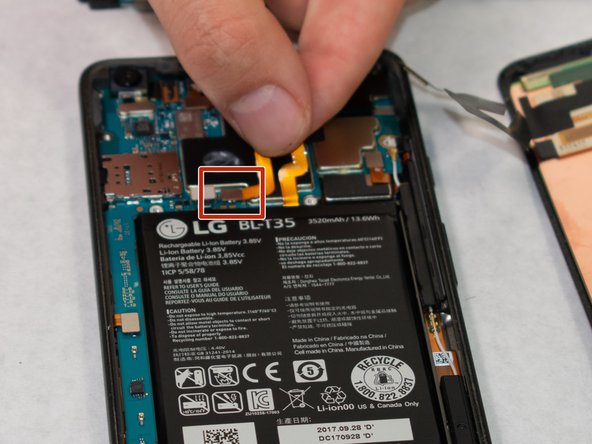
电池给手机提供能量。这份指南能告诉你如何在不损坏其他元件的情况下拆下有缺陷的电池。在开始前你要确保自己拥有下列为了有效地完成电池更换的所有工具。我们同时建议你在用吸盘和撬棍打开手机时要格外小心。
你所需要的


倒叙操作来重装你的设备。
倒叙操作来重装你的设备。
61等其他人完成本指南。

团队

Cal Poly, Team S7-G1, Paton Spring 2020 Cal Poly, Team S7-G1, Paton Spring 2020 的会员
CPSU-PATON-S20S7G1
3 名成员
创作了14篇指南
19条评论
Just completed this last night. They weren't kidding when they all say the battery is no fun.
I managed to get it, but doesn't mean the old one wasn't bent like crazy when I was done. I was planning on keeping it as a backup since it wasn't bad, but I don't think I would risk it at this rate. Getting a thin stiff plastic to push through the adhesive along with the spudger helped.
There are a lot of components and boards along the edge of the battery. It's hard to pry without touching them. I saw a guide recommend taking the guts out to remove the battery.
One thing I would recommend while you're in there is to replace the thermal paste. Mine wasn't too bad after a year, but I'm sure it won't make a solid and effective cover on the processor to the heat pipe.
Can I just use Artic silver MX4 for thermal paste? Or is there a paste specifically for it?
DheerajR -
Arctic Silver should be fine!
Its pretty easy to do if you use the iPhone battery tool/pryer thing!
Never again, a nightmare to get it changed out.
What is the recommended adhesive when putting the screen back on?
Batteries wear out, that’s a fact of life and should be as easy to replace in a phone like they are in a flashlight. The phone manufacturers just want to sell replacement phones not batteries. They all suck!
Thanks iFixit team. Can you please sell the battery replacement kit for this phone, as you do for the Pixel XL
Hi Michael, we do sell a Pixel 2 XL battery replacement kit! Good luck with the repair!
Hello
Completed this last night and after reassembly my screen presents horizontal lines all over the right part from top to bottom.
Do you think the screen get damaged during opening ? Or it could be the connector ?
Looks like Google made sure that we break the screen if battery replacement is attempted.
Tip: Be super patient with the battery. Put ~5-10 drops of alcohol on each side of the battery, then wait 5 minutes. Put the opening picks on the right side of the battery and very gently pry up as shown. If the battery starts bending, wait some more. Once you have the picks underneath the right side of the battery, pour another 10 drops of alcohol where the picks and battery meet, and slightly tilt the phone in all directions to allow alcohol to flow under the battery. Wait another 5 minutes. Gradually work the picks underneath and around the sides of the battery, reapplying alcohol and waiting often.
To avoid applying too much alcohol, gently tilt the phone and check the sides of the battery tray. I was able to change the original battery with no damage to the adhesive or bending the battery this way
It went relatively easily, but with patience.
This repair went a lot easier than I expected. I was very patient when doing it, and honestly felt like I was being slow. My biggest suggestion would be to use lots of heat on the screen. I actually used a hot compress (instead of an iOpener or heat gun) before using the suction to pull up the screen, and it came up very easily. And the plastic picks made separating the screen a cinch. At no point in the process did I feel like the screen would break. But then again, I used a lot of heat and patience because I'd seed that several people had broken their screens.
The funny thing is that I've already replaced the phone with a Pixel 5a, so now, I have a refreshed phone that I don't really have a need for lol. I guess gaining the confidence that I can fix a modern smartphone is plenty
For me the hardest part was to remove the glass. If I can give one piece of advice, it is to use plenty of alcohol and heat, while the plastic pick must enter little so as not to damage the display. Following the instructions and with a lot of patience I was able to replace the battery.
The phone is really easy to repair (as long you manage to open it without breaking the screen). Turns out the screen is really, really fragile. Be careful with the top, that's where i cracked it. Otherwise the repair was easy but the screen is TOTALLED! The top part's touchscreen doesn't work anymore and there are strips all over the screen. I damaged the screen because of iFixIt's INACCURATE instructions. They say put the sucker as close to the sim slot as possible but on the picture they pry it open on the other side with the power buttons. Also you should put the heated iOpener on the edges so that it loosenes the adheisive. Now i have to spend extra money on unnesecary parts. Also after I installed the new battery, it was draining in seconds. I put it on the charger and I hope that the battery calibration actually does the job because otherwise I would have spent money on new battery and new screen for nothing...
It's often said it's so hard to replace the battery on the Pixel series that's because they have thin vesels and super duper fragile.
To prevent this problem, we have to heat the display properly and using picks applied little amount of IPA and pry it over with them not to touch the LC part. After that you can put older display and replace it. It does take so much effort.
That solution is all my personal opinion.
Anyway I hope your battery is good
MU-TON -
everything went smoothly for me! Putting on the adhesive stripes included in the kit took very long, would be nice if the precut adhesive was still available but I'm already surprised that there are still parts for such an old phone.
One thing that would have been good to know beforehand was that the phone will not turn on when the middle plate from step 14 is missing. The screen works and shows the battery charging if you plug the phone in so obviously the only two parts I touched are working but it's like the power button is disabled when that plate is not installed. Would be great if this could be added to the guide (or other guides as well if this is a common thing)