跳转到主内容

期待已久的MacBook Air更新到来,带来了全新的英特尔酷睿i5处理器、升级了的视网膜显示屏以及众多其他更新。发布于2018年11月7日。

150 个问题 查看全部

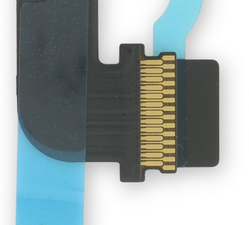
Where can I buy the keyboard ZIF connector?

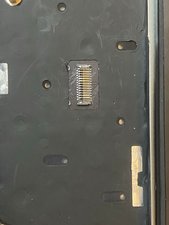
MacBook Air 13 英寸 Retina 显示屏 2018 年末电池更换 Found in step 28 of this guide, I need the surface mount ZIF connector someone ripped off the board of a MacBook I’m repairing. Appears to be 27 pins, 13 on one side, 14 on the other, with 4 grounding/mounting tabs.

Update (03/10/2022)

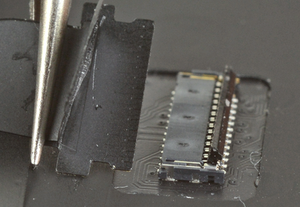
@danj Here are some photos on the connector and its ribbon. https://www.dropbox.com/sh/8sa04i9ki0q1x...

Block Image

Block Image

As measured by my calipers, the pads seem to be approximately 0.5mm spaced, with the two rows of pins spaced at 3.5mm.

已回答! 显示答案 我也有这个问题

这是一个好问题吗?

得分 1
3条评论

Ouch! This might not be repairable. Can you post some good tight focused pics of the keyboard’s connector area so we can see if the pads are still present 在已经存在的问题里加入图片.

完成的

@danj Pads are all intact, I'm not near the machine right now though. If pads were damaged I'd do a trace repair. I just unfortunately can't source a connector alone, and cleaning up all those rivets is annoyingly time consuming compared to a quick connector swap.

完成的

@synthax - While not cheap replacing the upper case would be the other option.

In any case I would need to see a nice set of tight photos to try to find the connector. Need to know the exact pin count and profile for starters and then the dimensions.

完成的

添加一条评论

2个答案

已选择的解决方案

Didn't replace the upper case. Popped the old keyboard out fairly easily. I did that by disassembling everything to get the chassis on its own, grabbing the edge of the chassis with both hands, and forcefully shoving the corner of the keyboard toward the inside with my thumbs until the first few rivets popped. After the corner was pulled up enough, it was as simple as holding the chassis down and yanking the keyboard out the backside. Sitting the new keyboard in place, you can then reapply the backlight and the screws in the center of the keyboard, and reassemble the system. Most of the keys are rock solid, with only the slightest extra deck flex on the bottom corners if you're actively looking for it. This saved me a TON of buying a replacement chassis, as the laptop was sold to me in MINT condition externally. If the slight extra flex on the corners is undesirable, you could carefully remove the old rivets with something like a PCB drill bit the size of whatever screw you're using and only plunge like 1mm (just make sure you don't drill THROUGH) and you'll be able to make the screw self-thread. Amazon has MacBook keyboard screws meant for replacing these rivets. The ones on this MacBook unfortunately don't pull out of the chassis as easily as they do on some other systems, like the older MacBooks or the Surface Book, hence the possible need to drill them out. You should only need to do a few near the bottom corners to get OEM-like keyboard feel.

这个答案有帮助吗?

得分 1
添加一条评论

@synthax - Ouch! The connector body was ripped off! What you are seeing is the bare contacts which are part of the connector housing. At least the pads are still present as best as I can tell. But, you'll need to carefully desolder the contacts from the circuit board below and then you'll need to find the connector thats needed.

This is what it should look like:

Block Image

Sadly I can't find a source for this connector as is a special double row design

Block Image

I had thought you had lost the compression latch or something simple, not so here ;-{ Time for a new uppercase (maybe you can find a used one).

这个答案有帮助吗?

得分 0
添加一条评论

添加你的答案

Synthax 将永远感激不已
浏览统计数据:

过去 24 小时: 0

过去 7 天: 6

过去 30 天: 14

总计 143