

How to install Lenovo YOGA 730-15IKB keyboard
Where can I find instructions for the removal and replacement for the Lenovo YOGA 730-15IKB 81CU keyboard

声誉积分: 98.6千
![]() 419
419
![]() 298
298
![]() 158
158
This model uses a plastic welded keyboard, which requires you to replace the entire palmrest as a unit. In addition, a few of these have a “paired (calibrated)” trackpad, so the whole thing has to be replaced.
The problem with these laptops is the part tends to be as much or very close to another used example of the same laptop in many cases so it’s rarely cost effective unless you have a higher end machine with specs that justify the cost.
That said, the part number will either be 5CB0Q96465 or 5CB0Q96436. If you can, I’d take the laptop apart first to see which one yours needed just in case the 465 part isn’t compatible with 436 laptops. Usually taking the battery out should be enough to check as you just need to confirm it. They both come with the BL keyboard and look functionally identical, so I have no idea why the Part# is different on two identical parts - possibly different revisions?
这个答案有帮助吗?

声誉积分: 25
![]() 1
1
The Lenovos are a full tear down unfortunately to get to the internal keyboard and backplate. But if you go slow and careful removing the logic board and other parts is relatively methodical and doable.
Keep magnets available if you don’t have a mag screw mat, to hold screws I use the little round ones you can get packs of on amazon. Take pics with your phone at stages beginning to end so you can reverse the process if you’re uncomfortable this will help you remember where different screws, wire attachments, and components go.
The ‘plastic riveted keyboards and keyboard backplate repairs simply require a high-quality super glue like the original super glue gel version. Once finished just put a dollop of superglue gel where the old rivets were and let them dry. Placing it near a fan or waving a hairdryer at it on low moving back and forth and far enough away so it doesn’t melt things. It should only take a few minutes to cure.
Don’t use ordinary tape as it degrades and breaks down over time. If you don’t ‘plastic rivet’ the keyboard in again it will also not feel ridged and have bows or flex points making the keyboard mushy in spots. Not a good feeling when typing.
You can use hot glue but it’s messy and frankly not needed.
这个答案有帮助吗?

声誉积分: 13
![]() 2
2
This keyboard is ABS plastic welded rivet..
You need a razor knife to gently cut the plastic welds/rivet.
They will look like a mini mushroom. It is basically welded plastic rivet.
You are going to need a hot glue gun to put the new one in place and fill the old plastic rivet/pimple holes.
这个答案有帮助吗?
声誉积分: 25
![]() 1
1
Update to my previous posted method:
I've revised my method using UV epoxy resin it's the perfect application.
It doesn't set till you hit it with UV light and it dries harder and is not brittle like super glue can and in beads for a much more rigid keyboard repair.
You can get it cheap on amazon in pens or in bottles. I picked up a wide-mouth UV light so I can just set a whole cluster at a time, setting the light down and pushing on the keyboard and backing. Dries in about 5sec.
这个答案有帮助吗?
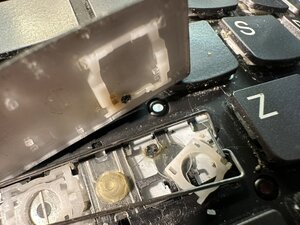
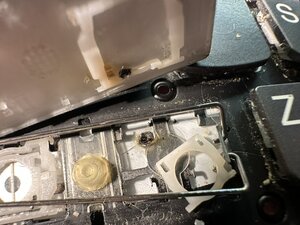
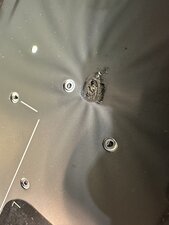
For people in a hurry: I've just installed a new keyboard, and didn't bother to glue the rivets. Yes, the keyboard doesn't feel as springy as it used to. Does it work? Also yes. This shouldn't have been designed this way, but it also shouldn't stop you from repairing it anyway. A scalpel works fine to sever the rivets. Make sure to wiggle the knife and steady your hands so you don't cut any cables accidentally.
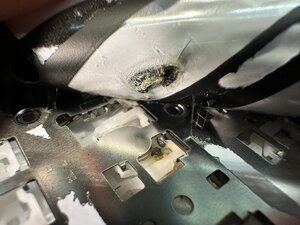
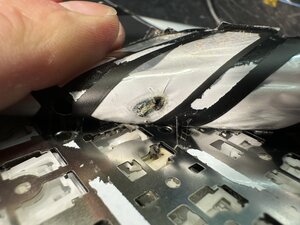
Interestingly, there seemed to be some kind of short in the original keyboard: part of the plastic was molten. The "n", "b" and spacebar keys weren't functioning on this unit. I left out the keyboard backlight in the repair, because I suspect that was the cause (keyboards themselves don't carry enough current to create molten plastic like this).
Could've been a fire, Lenovo....
这个答案有帮助吗?
过去 24 小时: 2
过去 7 天: 18
过去 30 天: 102
总计 7,321
5条评论
Hi, I know it’s been a couple of months, but are you still looking for an answer? I have made this repair before.
由 Craig Sampson 完成的
hi guys ! I am actually interested! I have to replace it soon. Do you have any advice ? I have seen that it can be tricky
由 Simone Mingozzi 完成的
@Simone Mingozzi I started by taking the whole computer apart so that I could work on the keyboard with no fragile components near me just to be safe. So, behind the keyboard is a plastic cover like object that is held in place by sort of plastic buttons that you must pop off in order to get to the keyboard. After you get this piece off you can easily remove and replace the keyboard from the chassis. Unfortunately it isn't possible to put the plastic cover back on the same way it is intended to be. When I replaced mine I used scotch tape to keep it in place (I am a student I didn't have anything else and couldn't wait for some type of adhesive to come in the mail lol). But I would recommend using some type of skinny double sided adhesive tape. Then re-assemble the components and you're good to go. Also, this should go without saying but make sure the keyboard works before you put the plastic cover back on and re-assemble everything. Hope this helps! If you have any other questions let me know!
由 Craig Sampson 完成的
I just replaced my Lenovo 730 15IKB. Here are the steps:
1) Remove the 10 screws on the bottom cover and carefully remove the cover using a credit card by wedging it in the edge
2) Remove the battery, 4 screws and unplug
3) Disconnect the cables plugged into the system board. The WiFi has 2 wires (back and white) that can be left connected if you are careful.
4) Remove the 4 screws on system board, 2 at each end. Carefully lift out. It may be stuck by a sticky adhesive at one end, lift slightly at loose side and slide back and forth sideways until it releases.
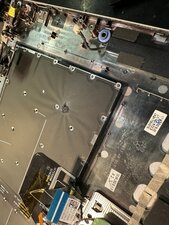
5) Now the cover for the keyboard is fully exposed. Mine is made of thin metal held down by about 20 melted plastic dots. Take a small drill bit and drill at the center of each melted dot until the melted plastic head comes off. NO DEEPER! When all plastic heads are gone, the metal cover can be removed.
由 Gene Waring 完成的
6) The keyboard is also held down by plastic heads. Drill those out and remove the keyboard.
7) Notice how the keyboard ribbon cable is folded. Do similarly on your new keyboard, but I do not recommend folding as hard as the original since this seems to be the reason the keyboards go bad.
8) Place a dab of glue on each place where you drilled out the plastic heads. Superglue can work, but rubber cement adhesive may be best if you apply a dab on each tiny hole and corresponding location on computer, let dry a few minutes, then stick keyboard on.
9) Do likewise with glue for the metal cover.
10) Replace the system board and the 4 screws, making sure it sets in perfectly flat.
11) Connect all cables, install the battery and test the computer before putting the bottom cover back on.
由 Gene Waring 完成的