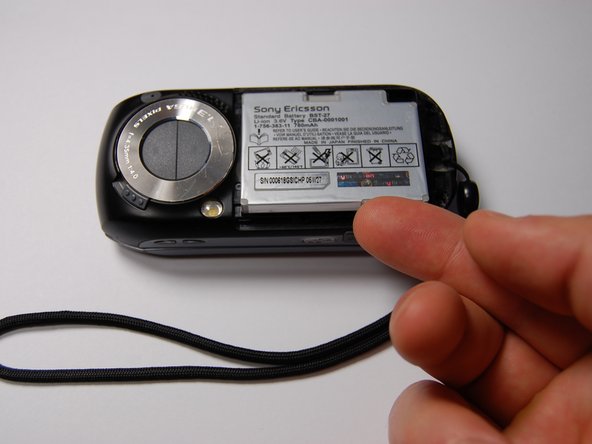
跳转到主内容

你所需要的

这个拆解是不是维修指南。 要维修你的的Sony Ericsson s710a,请使用我们的维修手册

  1. Sony Ericsson s710a Teardown, Battery: 步骤 1 中的图像 1,1
    • Remove the back cover by sliding it off.

  2. Sony Ericsson s710a Teardown: 步骤 2 中的图像 1,1
    • Pull the battery out using your finger.

  3. Sony Ericsson s710a Teardown: 步骤 3 中的图像 1,1
    • The battery can now be replaced.

    • The battery is a 780 mAh rechargeable Lithium Ion battery.

  4. Sony Ericsson s710a Teardown, Sony Ericsson s710a Teardown: 步骤 4 中的图像 1,1
    • Remove the four 6mm screws behind the battery.

  5. Sony Ericsson s710a Teardown: 步骤 5 中的图像 1,2 Sony Ericsson s710a Teardown: 步骤 5 中的图像 2,2
    • Remove plastic piece near the base of the keypad.

    • This will require prying it off with a plastic opening tool and breaking the seal with the glue. Unfortunately there is no way around this.

    • Then remove the two 6mm screws beneath the plastic cover with a Phillips head screw driver.

    • Now you are ready to remove the plastic back cover.

  6. Sony Ericsson s710a Teardown: 步骤 6 中的图像 1,2 Sony Ericsson s710a Teardown: 步骤 6 中的图像 2,2
    • Use the plastic opening tool to pry off the back cover of the phone. This will require a bit of careful work.

    • You should start prying the back cover from the SD card slot.

    • Alternate prying the back cover on each side until it pops off.

  7. Sony Ericsson s710a Teardown: 步骤 7 中的图像 1,1
    • Use the plastic opening tool to carefully pry out the circuit board once you have removed the back cover.

  8. Sony Ericsson s710a Teardown: 步骤 8 中的图像 1,1
    • Remove the LCD cable connectors coming from through the hinge hole with a flat head screw driver.

    • IMPORTANT: be sure to record which port each cable was in and the orientation they were plugged into each socket.

    • Now the two parts of the phone are separated.

  9. Sony Ericsson s710a Teardown: 步骤 9 中的图像 1,1
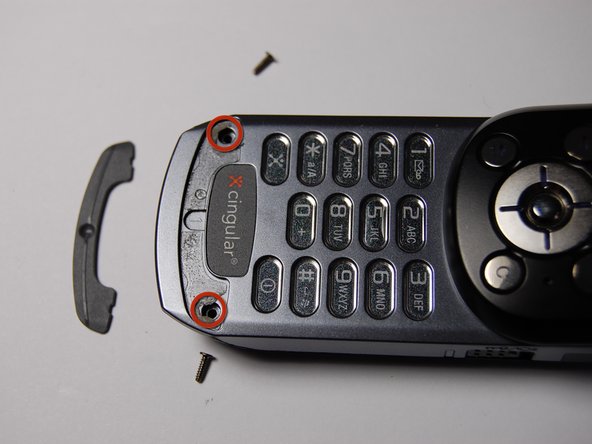
    • On the non-camera side of the phone, remove the four 3mm screws and two 2.3mm screws holding down the twist-structure.

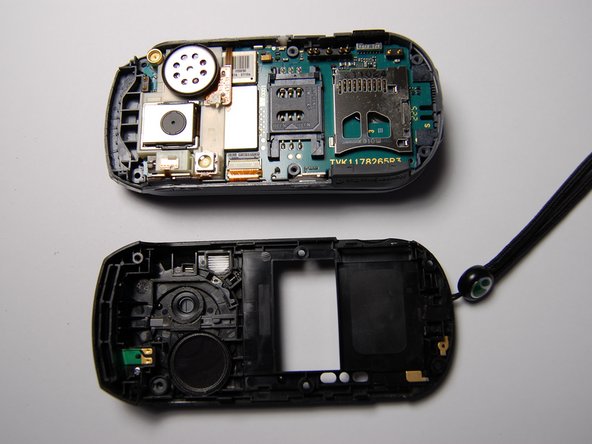
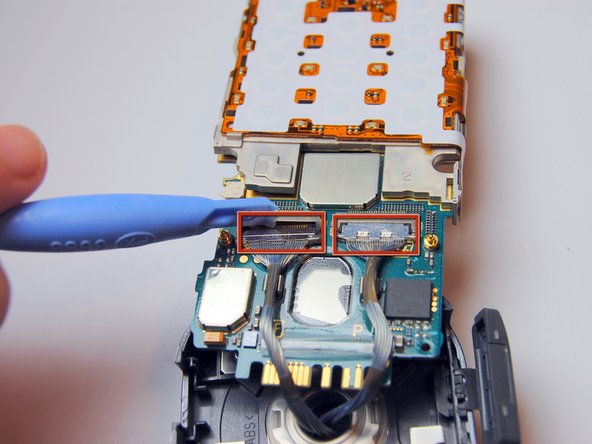
    • When you lift this off, you will need to disconnect the cables from the other side using the same method as in step 5.

    • Again, be sure to record which port each cable was in and the orientation they were plugged into each socket.

  10. Sony Ericsson s710a Teardown: 步骤 10 中的图像 1,2 Sony Ericsson s710a Teardown: 步骤 10 中的图像 2,2
    • Remove the plastic piece near the bottom of this side of the phone with the plastic opening tool. This will give you access to two additional screws.

    • Remember you will have to break the glue seal, but that is alright.

    • Remove the four visible 6mm screws and then remove the back cover.

  11. Sony Ericsson s710a Teardown: 步骤 11 中的图像 1,2 Sony Ericsson s710a Teardown: 步骤 11 中的图像 2,2
    • In order to remove the LCD screen, use the plastic opening tool to pry the plastic piece from the LCD.

    • Perform this step carefully to avoid scratching the glass screen.

  12. Sony Ericsson s710a Teardown: 步骤 12 中的图像 1,1
    • In this picture, you can see all of the parts in the non-camera side of the phone.

    • Interestingly, the four control buttons are all one piece

  13. Sony Ericsson s710a Teardown: 步骤 13 中的图像 1,1
    • This phone has an array of capabilities:

    • Bluetooth

    • Megapixel Camera

    • MP3 capable

    • Messaging options

    • This photograph shows the final result of a complete teardown.

Alexander

于10/29/11注册

75 声望

创作了4篇指南

0条评论

添加评论

浏览统计数据:

过去 24 小时: 0

过去 7 天: 1

过去 30 天: 2

总计 4,057