简介
When Apple goes to the extreme, we do too. What exactly does it take to be extreme? Whatever it may be, challenge accepted. Join us to find out just what awaits in the new high-rise AirPort Extreme.
Want even more extreme? Follow us in the tubular Twitter-sphere or find us on our fly Facebook page.
If you're curious about the Apple Time Capsule instead of the Extreme, check out the Time Capsule teardown instead.
你所需要的
-
-
We snapped up this 2013 rendition of the AirPort Extreme, which was announced at WWDC just one day prior to its release. Spoiler alert: it's TALL. The winner of this year's "tallest wireless router that is white, roughly rectangular, and has an Apple logo on top" award also boasts:
-
IEEE 802.11a/b/g/n/ac
-
Beamforming antenna array
-
Simultaneous dual-band 2.4 GHz and 5 GHz
-
Gigabit Ethernet WAN port
-
Three Gigabit Ethernet LAN ports
-
USB 2.0
-
-
-
Alright! Enough lollygagging! Let's get inside this white brick of wonder.
-
Our method of entry involves using a metal spudger to release the retaining clips holding the black base of the device.
-
Base aside, our first glimpse is what appears to be a heat sink… But it's not. <Suspense>
-
Before we cast the base to the darkest depths, it has one final message for us: a new model number.
-
This year's AirPort Extreme sports the model number A1521. Neat.
-
-
-
Just like an earlier advancement in Mac Mini technology, this new device's power supply moves inside, contributing to its extreme stature.
-
We begin to free the internals with a flick of the spudger and a twist of the Torx screwdriver. The non-proprietary T8 Torx screws come out with ease.
-
-
-
We free the top cover, only to find…3.5" of empty space.
-
While the AirPort Extreme doesn't come equipped with storage, we dug up a standard 3.5" SATA hard drive, just to test it out. Perfecto!
-
This could potentially be good news to DIYers who want to turn their AirPort Extreme into a Time Capsule—except we can't find any connectors where we'd plug in the hard drive, only empty spaces on the logic board. But we'll keep our fingers crossed until we've had the chance to crack open a Time Capsule.
-
-
-
-
We hate to see our tools collect dust, so we're happy to find that opening the AirPort Extreme requires busting out the flexible shaft extension from our 54 bit driver kit.
-
Two spring-loaded, captive Torx T10 screws are the last fasteners clinging to the outer case, but not for long.
-
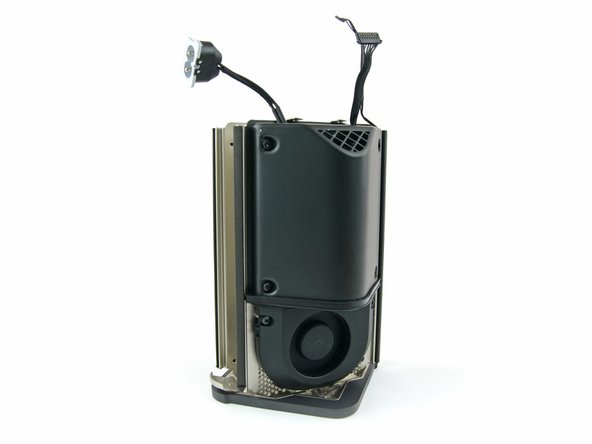
Like a shucked corn cob, the innards of the AirPort Extreme escape their white plastic prison and are borne from captivity.
-
-
-
Using the latest in turn-table technology, we bring you the full 360º of the Extreme's internals.
-
Looking for your own turn-table technology solutions? Look no further.
-
For those of you who just can't wait to get the latest Apple product made up of vertical circuit boards surrounding a big empty space, the AIrPort Extreme is the best available for now.
-
-
-
Next on our path of deconstruction, we work on the shiny plate that caps the innards of the Extreme, and just happens to be the new-and-improved antenna array.
-
The six antenna cables run under the apparent hard drive slot, up the center of the device, and into a big plate at the top, which functions as the antenna.
-
The updated 802.11ac Wi-Fi is designed to have multi-station WLAN throughput of at least 1 gigabit per second and a single link throughput of at least 500 megabits per second (500 Mbit/s).
-
-
-
We finally get a closer look at the logic board. We find:
-
Broadcom BCM53019 router SOC with gigabit switch
-
Broadcom BCM4360KLMG, the same IC we found in yesterday's MacBook Air Teardown
-
Hynix H5TC4G63AFR 4 Gb (512 MB) synchronous DDR3 SDRAM
-
Micron 25Q256A 32 MB serial flash
-
Skyworks 5003L1 5GHz WLAN power amplifier
-
Skyworks 2623L 2.4GHz WLAN power amplifier
-
TDK TLA-7T201HF (which appears to be a pulse transformer)
-
-
-
We've got the power…supply.
-
From the looks of it, it is a fairly standard 12 V, 5 A power supply with your standard large capacitors and coils.
-
Whatever you do, don't lick your fingers and then touch the large black cylinder. You may be shocked to discover what 400 V can do.
-
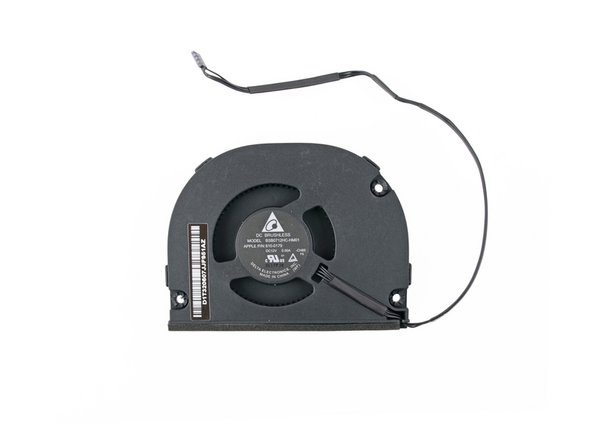
Like the fan, this unit is made by Delta Electronics. They have named it ADP-60DFS, so as not to be confused with other, less-powerful power supplies.
-
- No proprietary fastener funny business over here. The Extreme uses Torx screws throughout the structure to keep its act together.
- Disassembly is pretty straightforward, and modular components are used throughout.
- No glue (except for a small dab used for the status LED) is found inside.
- The opening procedure requires a bit of prying that may slightly damage the case if the user isn't careful.
- You'll have to disassemble a good portion of the device in order to clean the fan.
- Some of the connectors are super-small and can be prone to breaking.


最后的想法
可修复性评分


(10是最容易修复)

40条评论
Ok so im taking it from the teardown, that on the non time capsule version they havent soldered the sata port and power onto the logic board ? so there is no DIY upgrading to a time capsule ? well at least its repairability index is way higher than most of apples other products, im taking from the photos and layout that the device vents in and out of the same thin bottom grey stand, and as usual with apple no foam filtering so the fan will clog up with dust, or sitting on medium pile carpets as that will smother the vents, is it noisy ? what diameter is the fan ? looks titchy and prone to low flow an noise ? 60mm ?
Correct, correct, correct, correct, not sure (we just took it apart), ~2" diameter, not sure what "titchy" means, probably silent, seems about right since 60 mm = 2.36".
On the first images we can see 4 connectors used. Later I can only see the 2 cables. Being one of the cables the power supply and the other one the fan. What are the other two cables used for? I guess one of them is for a led in the case. is that right? No clue about the fourth one.
The third is for the tiny status LED, and the fourth is for the reset switch that resides next to the power plug. Both cables disappear early on in the teardown since both components are attached to the white plastic case.
a 2TB 15mm 2.5" WD hard drive costs $160 to $180. Apple is only charging $100 more. Kudos!
a 3TB mobile drive doesn't even exist as far as I know. (please correct me if I'm wrong, since I'm looking for one of these.) So I can't wait for you guys to tear down a 3TB AP Time Capsule. Could it be TWO 1.5TB drives in there? Regardless $200 more for this is very reasonable.
Apple used to charge $200 more for the $70 1TB drive, which was a major rip off, since I could just get any external USB 2TB drive for $100 and get the same functionality of time capsule.