跳转到主内容

iPhone 4S 屏幕更换

注:你正在编辑的一份前提条件指南。你所做的任何更改将影响包括此步骤的4指南

英语
中文

正翻译步骤 11

步骤 11
iPhone 4S Screen Replacement, Display Assembly Installation (Cont'd): 步骤 0 中的图像 1,3 iPhone 4S Screen Replacement, Display Assembly Installation (Cont'd): 步骤 0 中的图像 2,3 iPhone 4S Screen Replacement, Display Assembly Installation (Cont'd): 步骤 0 中的图像 3,3
Display Assembly Installation (Cont'd)
  • Whether installing a replacement display assembly or re-using the existing display assembly, note the following:

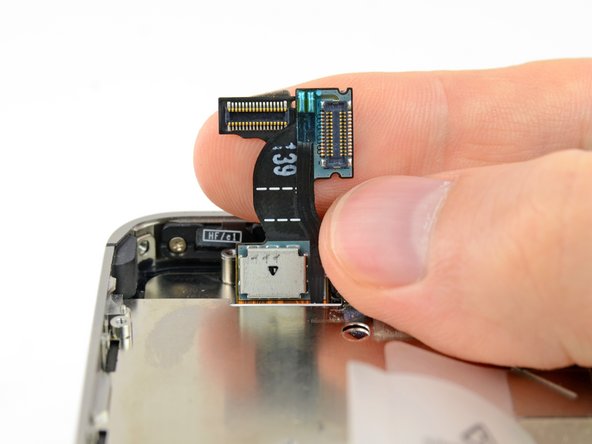
  • Carefully straighten the digitizer and LCD data cables, and feed them through the slot cut in the outer case.

  • The middle photo shows the digitizer cable being correctly fed through to its full length.

  • This photo shows the display assembly being installed incorrectly, with too much slack in the digitizer cable, which then forms a bend/loop that gets caught in the slot. The third photo also shows this loop.

  • If the digitizer cable has been installed incorrectly, it will not reach its socket on the logic board. Do not attempt to pull it through by force, or it will be cut by the sharp edge of its slot in the enclosure. Remove the display assembly, straighten the cable, and re-feed the cable through completely and correctly.

不管是安装新的屏幕还是安装已经用过的屏幕,注意以下几点:

小心拉直屏幕排线和数字转换排线然后从中板打孔处穿过去。图片中图的做法是错误的,使橡皮圈和数字转换排线一起穿过开孔。中图展示的橡皮圈。

图片右图中展示方法能使数字转换排线完全穿过中板打孔处。

这个照片展示了屏幕组件被错误的安装的样子,在数字排线之间留有太多空隙,最终会导致排线弯曲/缠绕最终被卡在凹槽上。第三张照片展示了这个凹槽。

如果数字转换排线没能正确的安装,排线就不能扣在主板的座子上。不要用蛮力拉扯排线否则会被切断或者撕拉到薄薄的橡胶排线的前段。取下屏幕拉直排线然后重新安装塑料圈。

您的所有投稿皆享有基于开源创作共享许可协议(CC BY-NC-SA)著作权利