跳转到主内容

当前版本的文档还未经巡查,您可以查看最新的已查核版本

你所需要的

  1. , 粘贴显示屏玻璃: 步骤 1 中的图像 1,3 , 粘贴显示屏玻璃: 步骤 1 中的图像 2,3 , 粘贴显示屏玻璃: 步骤 1 中的图像 3,3
    • 如果屏幕的盖板碎裂并且有玻璃的碎屑,为了保护自己请用胶带把玻璃碎屑贴住。

    • 用胶布贴住整块屏幕以固定住玻璃碎屑。

    • 这样当你撬起和取下屏幕时保护玻璃面板和屏幕支架。

    • 当你进行维修时请戴好防护眼镜保护眼睛,以避免玻璃碎屑飞溅。

  2. , 移除底部螺丝: 步骤 2 中的图像 1,1
    • 在开始之前,将手机电池电量放电至25%及以下。如果不小心捅破的话,过多电量的锂电池会起火或者爆炸。

    • 在拆解之前将手机关机。

    • 拧掉 2 颗在 Lightning 接口两侧的 3.8mm P2防撬螺丝

  3. , 使用iSclack 起屏器打开屏幕: 步骤 3 中的图像 1,3 , 使用iSclack 起屏器打开屏幕: 步骤 3 中的图像 2,3 , 使用iSclack 起屏器打开屏幕: 步骤 3 中的图像 3,3
    • 接下来两步是展示如何使用iSclack起屏器打开iPhone 5c的屏幕,也可以用于其他任何手机。如果你没使用iSclack起屏器,请跳到步骤5。

    • 合拢iSclack的手柄,打开吸盘口。

    • 把手机底部放入吸盘口,并抵在塑料深度计上。

    • 上方的吸盘口不要覆盖在Home键上。

    • 打开iSclack的手柄合拢吸盘口。按压手柄使得吸盘口贴合在手机表面和底部中线上。

  4. , 完成iSclack开屏步骤: 步骤 4 中的图像 1,2 , 完成iSclack开屏步骤: 步骤 4 中的图像 2,2
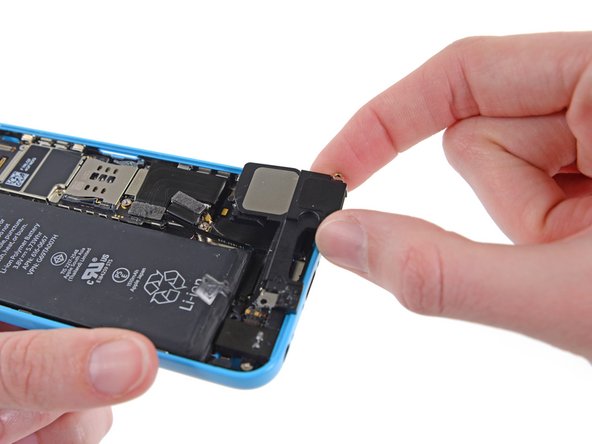
    • 握好机器合拢iSclack手柄分离吸盘口,把屏幕从后盖上拉开。

    • iSclack致力于安全的打开iPhone,仅仅是完全分离部件而不会损坏排线。

    • 取下iPhone上的两个吸盘。

    • 可以跳过接下来的3步从第8步开始。

  5. , 手工开屏方法: 步骤 5 中的图像 1,1
    • 把吸盘贴合在屏幕上,Home键的正前方。

    • 确保吸盘口紧密的贴合在屏幕上。

  6. , 抬起显示屏: 步骤 6 中的图像 1,2 , 抬起显示屏: 步骤 6 中的图像 2,2
    • 确定吸盘牢固的贴合在前置面板上。

    • 一只手用撬棒下压机器,另一只手轻轻的拉起吸盘使前置面板从后盖上分离出来。

    • 慢慢的使匀力稳当的拉起吸盘。比起大多数部件来说屏幕是装配得最紧的。

    • 当你拉起吸盘时,使用塑料撬棒轻轻的下压后盖使屏幕与机身分离。

    • 有好几个卡扣在前置面板和后盖之间,所以需要组合使用吸盘和塑料撬棒使屏幕与机身分离。

  7. : 步骤 7 中的图像 1,1
    • 拉起小点释放吸盘的真空密闭空间。

    • 从屏幕上取下吸盘。

  8. , 抬起显示屏: 步骤 8 中的图像 1,2 , 抬起显示屏: 步骤 8 中的图像 2,2
    • 打开屏幕竖起大约90°角,把屏幕竖起依靠在某些物品上。

    • 需要的话,可以使用未打开的罐装饮料支持住屏幕。

    • 用橡皮筋固定住屏幕,这样可以避免过度紧绷屏幕排线。

  9. : 步骤 9 中的图像 1,1
    • 拧掉主板上用于固定电池排线的金属屏蔽罩上的2颗1.6mm PH000号螺丝。

  10. : 步骤 10 中的图像 1,1
    • 取下电池排线的金属屏蔽罩。

  11. , 断开电池排线: 步骤 11 中的图像 1,1
    • 用撬棒或干净的手指甲挑开主板上的电池排线。

    • 请小心!仅将排线插头挑起即可,不要挑起插座。如果您挑起了主板上的插座,可能会导致插座和周围元件的损坏

  12. : 步骤 12 中的图像 1,1
    • 拧掉主板上固定前置面板排线金属屏蔽罩上十字PH000螺丝:

    • 2颗1.3mm的螺丝

    • 1颗1.7mm的螺丝

    • 1颗3.25mm的螺丝

    • 记住这些螺丝的位置是很重要的。在恢复的时候 错误的把3.25mm螺丝或者1.7mm螺丝拧在右下角会对主板造成不可修复的损伤或使得iPhone无法开机。

    • 螺丝不要拧太紧。如果拧紧螺丝时很困难可能是使用了错误规格的螺丝刀,请不要使用蛮力。

  13. : 步骤 13 中的图像 1,1
    • 从主板上取下固定前置面板排线的金属屏蔽罩。

  14. , 断开显示屏排线: 步骤 14 中的图像 1,2 , 断开显示屏排线: 步骤 14 中的图像 2,2
    • 用撬棒或干净的手指甲挑开前置摄像头排线和感应器排线。

    • 请小心!仅将排线插头挑起即可,不要挑起插座。如果您挑起了主板上的插座,可能会导致插座和周围元件的损坏

  15. : 步骤 15 中的图像 1,3 : 步骤 15 中的图像 2,3 : 步骤 15 中的图像 3,3
    • 在您进行本步骤操作需要连接或者断开线缆时请确保电池保持在断开的状态。

    • 用撬棒或干净的手指甲来断开LCD线缆链接头。

    • 显示排线和触摸排线是联在一起的,所以必须同时挑开2根排线。在取下屏幕前请再次检查2根排线是否都已经挑开。

    • 当重装机器时,显示排线可能会跑偏扣在座子上。白屏或者有条纹就是因为排线没扣好。如果出现这样的情况,重新扣排线和重启iPhone即可。最好的办法是,重置电池:挑开电池排线然后再扣上即可。

  16. , 将显示屏和后盖分离: 步骤 16 中的图像 1,1
    • 从后盖上取下显示屏。

  17. 这个步骤还没有翻译 帮忙翻译一下

    : 步骤 17 中的图像 1,2 : 步骤 17 中的图像 2,2
    • Use a plastic opening tool to peel the home button spring contact cable up from the speaker enclosure.

  18. 这个步骤还没有翻译 帮忙翻译一下

    : 步骤 18 中的图像 1,1
    • Remove the following screws securing the speaker enclosure to the rear case:

    • Two 2.7 mm Phillips #000 screws

    • One 2.2 mm Phillips #000 screw

  19. 这个步骤还没有翻译 帮忙翻译一下

    : 步骤 19 中的图像 1,2 : 步骤 19 中的图像 2,2
    • Use the flat end of a spudger to gently pry the speaker enclosure up from the rear case.

  20. 这个步骤还没有翻译 帮忙翻译一下

    : 步骤 20 中的图像 1,3 : 步骤 20 中的图像 2,3 : 步骤 20 中的图像 3,3
    • Remove the speaker enclosure. Be careful not to snag it on the antenna cable.

  21. 这个步骤还没有翻译 帮忙翻译一下

    : 步骤 21 中的图像 1,2 : 步骤 21 中的图像 2,2
    • The far right screw hole on the speaker has a contact bracket wrapped around it. Remove it and note the orientation for reassembly.

    • The flat portion of the contact clip should rest against the speaker, as shown.

    • The alignment bracket on the far end of the speaker assembly is adhered, but may fall off if handled aggressively.

    • The angled end should face up and line up with the outside edge of the speaker.

  22. 这个步骤还没有翻译 帮忙翻译一下

    : 步骤 22 中的图像 1,2 : 步骤 22 中的图像 2,2
    • Your replacement speaker may be missing the contact-bearing sticker shown here; be sure to transfer it to the new part.

    • Use a plastic opening tool to lift the sticker from the speaker.

    • Peel up and remove the sticker.

终点

35等其他人完成本指南。

Sam Goldheart

于10/18/12注册

465,933 声望

创作了538篇指南

团队

iFixit iFixit 的会员

Staff

135 名成员

创作了17,271篇指南

5条评论

Speaker doesn't work even after replacing using this guide, any idea what can be wrong? many thanks

Amir - 回复

Same here. Speaker went out. Replaced it with a new one from an Amazon seller, and still nothing. It's like I didn't do anything.

Rest of the phone works perfectly.

wlnorris - 回复

I just did this replacement today and had the same problem as the other posts. However what I figured out was that the speaker is powered through contact on the back side. I applied some pressure to that area (this is mostly likely bad for the screen, so try at your own risk) to the speaker area and surprise it worked. A hacky fix was to put a piece of folded up paper on top of the speaker to create the contact. I do not recommend this fix, but it help solidify the actual cause.

Hope this helps

ayechonk - 回复

ayechonk merci pour le tips, c'est bien un faux contact, en appuyant un peu j'ai le son, je vais testé le coup de la cale.

Hadou - 回复

Does anyone know what's the actual voltage needed by the loudspeaker to work? I've tested it out the continuity of the loudspeakers (both the original on the replacing part) and they seem to work just fine, otherwise the output voltage from the motherboard on the contact while playing some music, swings quickly from 0 to 1mV.

Rocco Lorusso - 回复

添加评论

浏览统计数据:

过去 24 小时: 0

过去 7 天: 6

过去 30 天: 37

总计 34,797