简介
用这个指南来拆出iPhone后置摄像头
注意:拆掉电池可以更好的接近后置摄像头的连接器盖板,然而电池并不是非拆不可,如果你的电池真的很难取出,不管它,在周围下功夫
你所需要的
-
-
这个步骤还没有翻译 帮忙翻译一下
-
Remove the following five screws securing the connector cover to the iPhone:
-
One 2.3 mm Phillips
-
Two 1.6 mm Phillips
-
One 1.4 mm Phillips
-
One 4.8 mm Phillips
-
Remark: in order to remember their proper positions, it might be helpful to draw 5 circles on a sheet of paper, placing each screw in the corresponding circle.
-
-
这个步骤还没有翻译 帮忙翻译一下
-
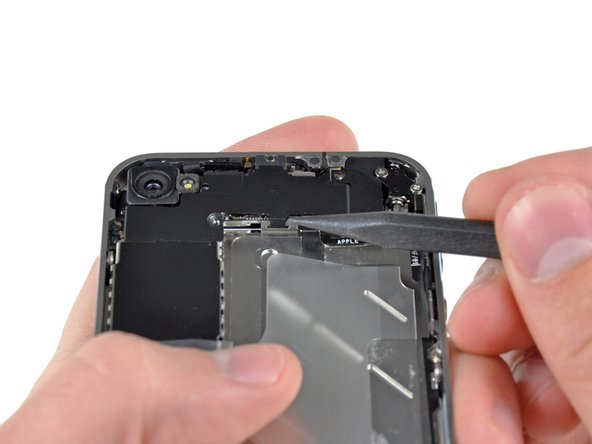
Use an iPod opening tool to slightly lift the top edge of the connector cover away from the logic board.
-
Use the tip of a spudger to pull the connector cover retaining clips away from the inner frame.
-
Remove the connector cover from the iPhone.
-
Before reassembly, be sure to clean all metal-to-metal contact points on the connector cover with a de-greaser such as windex. The oils on your fingers have the potential to cause wireless interference issues.
-
-
这个步骤还没有翻译 帮忙翻译一下
-
Remove the rear camera from the iPhone avoiding to move some of the connectors to the right.
-
After reinserting the new camera, verify these connectors if the IPhone does not power on.
-
Remark: The battery (not shown on the photos) should be disconnected but doesn't need to be removed entirely.
-
按照相反顺序的步骤来重新组装设备
按照相反顺序的步骤来重新组装设备
193等其他人完成本指南。
由衷感谢以下译者:
50%
Jiajun Lu正在帮助我们修复这个世界! 您也想加入吗?
开始翻译 ›
附加文件
11条评论
This was super simple. My camera was not focusing after a previous company replaced it due to a faulty flash. I decided to take things into my own hands...no pun intended.
The instructions are super simple and easy to follow. Be aware of the loose clip under the connector - mine flew out - and I was worried I wouldn't figure out how to get it back in.
I also had to use a #0 screwdriver...#00 was too large.
I couldn't get the battery out...so, I was just super careful that the phone was off, and remained off during the repair.
Out with the defective camera...in with the functioning camera...replaced a couple of screws and the battery connector. Tested the camera prior to replacing everything.
Thank you ifixit!
You ROCK!!!
great comment!. You Rock!
Luca -
Hi guys. I just did it ! I would not describe it as super easy, but thanks to the screw template provided file, even the now famous pressure contact can not be lost ;-)
I just wanted to comment, not only to praise iFixit (and myself), but also to mention two side effects I had to overcome:
-First, when finished, the power button did not work (I had to plug the Dock Connector to start the phone). As I the power button is not so far from the rear camera, I figured out something went wrong in the reassembly. Since I had just done it once, I thought I could do it a second time, so I removed the newly assembled camera and reassembled it with extra caution. At the end, the power button worked as expected.
-Second: each time I restarted the phone after reassembly (twice, then), the SIM card would not unlock after the PIN code was entered. I had to remove and reinsert the SIM card for the PIN code to finally unlock it.
Otherwise, everything went smoothly, thanks again to the iFixit guys !
Fantastic!!! my problem was the rear camera, when i switch on the camera app the screen were completely black and the torch was not working at all! I buyed the tools and the rear camera everything arrived here in Italy in perfect time as scheduled and in one hour I did the job !!! now my iphone camera is perfectly up and running !!! thanks to IFIXIT.COM and their guides!
hello guys ! I have done the replacement correctly because my camera wasn't able to focus anymore ! But now the flash light isn't working anymore :(( what can i do ?
Sincerly,
Antoine


