跳转到主内容

当前版本的文档还未经巡查,您可以查看最新的已查核版本

你所需要的

  1. , SIM卡: 步骤 1 中的图像 1,1
    • 在耳机孔旁的孔中插入SIM卡工具或扳直的回形针。

    • 向下压SIM卡工具或扳直的回形针,直到SIM卡托盘弹出。

  2. : 步骤 2 中的图像 1,1
    • 抓住SIM卡托盘并将其拉出iPhone。

  3. , 天线盖: 步骤 3 中的图像 1,1
    • 此图显示了位于天线盖底侧的两个卡舌和两个卡扣。必须将图像顶部的两个选项卡推向黑色盖板以将其打开。

  4. : 步骤 4 中的图像 1,1
    • 确保将金属撬棒插入扩展坞连接器和天线盖之间,不要插入扩展坞连接器里面。

    • 将金属撬棒插入扩展坞连接器和天线盖之间的插槽中。在两个卡舌附近轻轻撬起,以在天线盖和银色前挡板之间形成一个小间隙。

  5. : 步骤 5 中的图像 1,1
    • 将塑料撬棒插入天线盖和前挡板之间的间隙。撬棒的楔子应指向天线盖。沿拐角处向上并向上滑动工具,直至到达金属底衬。

    • 在另一侧重复相同的步骤。

  6. : 步骤 6 中的图像 1,1
    • 抓住任一侧的天线盖,将其向上滑动并与iPhone分开。这需要一些力量。如果无法松开,请确保将天线盖提起至足以松开卡扣。

  7. , 耳机孔: 步骤 7 中的图像 1,1
    • 移除用以保护iPhone背板的 #00 十字螺丝

  8. 这个步骤还没有翻译 帮忙翻译一下

    : 步骤 8 中的图像 1,1
    • Getting the iPhone open is a challenging feat, so don't get discouraged. Take a deep breath and make sure you have plenty of time to get the job done.

    • The small square hole is the location to insert the dental pick in the next step.

    • Insert the pointed end of a heavy-duty spudger into the space between the gray metal bar and the rear panel. Pry the panel up enough until you can get the tip of the iPod opening tool into the seam between the front bezel and rear panel.

  9. 这个步骤还没有翻译 帮忙翻译一下

    : 步骤 9 中的图像 1,1
    • Start removing the rear panel on the side with the buttons.

    • Slide the dental pick completely into the square hole. You may need to wiggle the tool and apply a good amount of force to get it to go all the way.

  10. 这个步骤还没有翻译 帮忙翻译一下

    : 步骤 10 中的图像 1,1
    • Pry up the rear panel by pulling the dental pick counterclockwise in a quick motion. Apply force perpendicular to the plane of the display assembly. You may be afraid to go fast, but going slowly is more likely to bend the case.

  11. 这个步骤还没有翻译 帮忙翻译一下

    : 步骤 11 中的图像 1,1
    • Use a spudger to free the rear panel from the iPhone along the corner and top.

    • The rear panel is still attached to the iPhone by the headphone jack cable, so don't entirely remove the rear panel from the iPhone just yet.

  12. 这个步骤还没有翻译 帮忙翻译一下

    : 步骤 12 中的图像 1,1
    • Repeat the same procedure on the other side of the iPhone. Slide the dental pick completely into the square hole. You may need to wiggle the tool and apply a good amount of force to get it to go all the way.

  13. 这个步骤还没有翻译 帮忙翻译一下

    : 步骤 13 中的图像 1,1
    • Pry up the rear panel by pulling the dental pick counterclockwise in a quick motion. Apply force perpendicular to the plane of the display assembly. You may be afraid to go fast, but going slowly is more likely to bend the case.

    • The rear panel is still attached to the iPhone by the headphone jack cable, so don't entirely remove the rear panel from the iPhone just yet.

  14. 这个步骤还没有翻译 帮忙翻译一下

    : 步骤 14 中的图像 1,1
    • Make sure the phone is off before disconnecting the headphone jack cable.

    • Use a spudger to disconnect the headphone jack cable from the logic board.

  15. 这个步骤还没有翻译 帮忙翻译一下

    : 步骤 15 中的图像 1,1
    • Remove the two Phillips #00 screws securing the on/off switch to the rear panel.

  16. 这个步骤还没有翻译 帮忙翻译一下

    : 步骤 16 中的图像 1,1
    • Remove the following 3 screws:

    • Two Phillips #00 screws securing the vibrator to the rear panel.

    • One larger head and longer Phillips #00 screw securing the headphone jack to the rear panel.

  17. 这个步骤还没有翻译 帮忙翻译一下

    : 步骤 17 中的图像 1,1
    • Grasp the metal screw plate attached to the on/off switch and lift slightly up and away from the rear panel. The button should come with the cable.

    • Gently peel up the on/off switch ribbon cable. Be sure to pull near where the ribbon cable is glued to the rear panel.

  18. 这个步骤还没有翻译 帮忙翻译一下

    : 步骤 18 中的图像 1,1
    • The headphone jack is slightly recessed into the rear panel. First slide the headphone jack away from its housing and then lift it up slightly (only 1/4 inch or 1/2 centimeter) so that it is no longer in the rear panel.

  19. 这个步骤还没有翻译 帮忙翻译一下

    : 步骤 19 中的图像 1,1
    • Grasp the headphone jack at the tip and gently lift up, pulling the vibrator out of the rear panel.

  20. 这个步骤还没有翻译 帮忙翻译一下

    : 步骤 20 中的图像 1,1
    • Remove the two Phillips #00 screws securing the silent/ring switch to the rear panel.

    • Pry off the metal backing with the screw holes and save for securing the replacement switch.

  21. 这个步骤还没有翻译 帮忙翻译一下

    : 步骤 21 中的图像 1,1
    • Grasp the silent/ring switch and lift it up to reveal the screw beneath.

  22. 这个步骤还没有翻译 帮忙翻译一下

    : 步骤 22 中的图像 1,1
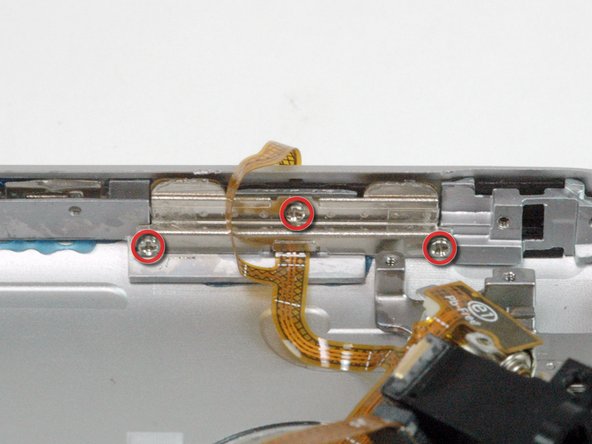
    • Remove the three Phillips #00 screws securing the volume switch to the rear panel.

  23. 这个步骤还没有翻译 帮忙翻译一下

    : 步骤 23 中的图像 1,1
    • Lift the headphone jack assembly out of the rear panel.

  24. 这个步骤还没有翻译 帮忙翻译一下

    : 步骤 24 中的图像 1,1
    • Rear panel remains.

终点

53等其他人完成本指南。

iRobot

于09/24/09注册

1 声望

创作了636篇指南

0条评论

添加评论

浏览统计数据:

过去 24 小时: 5

过去 7 天: 17

过去 30 天: 85

总计 113,472