跳转到主内容

此翻译可能不反映源指南的最新更新。 帮助更新翻译查看源指南

iMac Intel 27寸 EMC 2546显示屏替换

你所需要的

视频概述

  1. iMac Intel 27寸 EMC 2546显示屏替换, 显示屏: 步骤 1 中的图像 1,1
    在这个步骤中使用的工具:
    iMac Intel 27" Cardboard Service Wedge
    $4.99
    购买
    • 如果铰链可以自由移动,iMac就会失去平衡,难以开展工作。修理时可以让iMac躺下,但使用iMac维修楔子会更快更容易。

    • 如果你使用的是 iFixit纸板服务楔子,请按照 装配说明将其组装起来。

  2. iMac Intel 27寸 EMC 2546显示屏替换: 步骤 2 中的图像 1,3 iMac Intel 27寸 EMC 2546显示屏替换: 步骤 2 中的图像 2,3 iMac Intel 27寸 EMC 2546显示屏替换: 步骤 2 中的图像 3,3
    • 从显示器的左侧开始,靠近电源按钮,将iMac打开工具插入玻璃面板和后壳之间的缝隙中。

    • iMac打开工具上的轮毂可以防止你把轮子推得太远。如果使用不同的工具,插入显示器的距离不要超过3/8英寸(9.5毫米)。否则有可能切断天线电缆并造成严重损坏。

  3. iMac Intel 27寸 EMC 2546显示屏替换: 步骤 3 中的图像 1,3 iMac Intel 27寸 EMC 2546显示屏替换: 步骤 3 中的图像 2,3 iMac Intel 27寸 EMC 2546显示屏替换: 步骤 3 中的图像 3,3
    • 就像切披萨一样—在缝隙里划过屏幕,这会切除掉粘在中间的泡沫粘合剂。

    • 一定要推着转盘的后面让转盘旋转,如果你是拉的,转盘可能会掉出托盘。

    • 在左方划开显示屏。

  4. iMac Intel 27寸 EMC 2546显示屏替换: 步骤 4 中的图像 1,3 iMac Intel 27寸 EMC 2546显示屏替换: 步骤 4 中的图像 2,3 iMac Intel 27寸 EMC 2546显示屏替换: 步骤 4 中的图像 3,3
    • 继续用工具划过左上角。

  5. iMac Intel 27寸 EMC 2546显示屏替换: 步骤 5 中的图像 1,2 iMac Intel 27寸 EMC 2546显示屏替换: 步骤 5 中的图像 2,2
    • 从左上方开始,沿边切除粘合剂。

  6. iMac Intel 27寸 EMC 2546显示屏替换: 步骤 6 中的图像 1,2 iMac Intel 27寸 EMC 2546显示屏替换: 步骤 6 中的图像 2,2
    • 划过上方的屏幕。

    • 你也许要多划几次,大约3-4次,确保大多数粘合剂已经分离了。

  7. iMac Intel 27寸 EMC 2546显示屏替换: 步骤 7 中的图像 1,3 iMac Intel 27寸 EMC 2546显示屏替换: 步骤 7 中的图像 2,3 iMac Intel 27寸 EMC 2546显示屏替换: 步骤 7 中的图像 3,3
    • 沿着缝隙划到显示屏右上角。

  8. iMac Intel 27寸 EMC 2546显示屏替换: 步骤 8 中的图像 1,2 iMac Intel 27寸 EMC 2546显示屏替换: 步骤 8 中的图像 2,2
    • 转一下,让轮子沿着向下方向。

  9. iMac Intel 27寸 EMC 2546显示屏替换: 步骤 9 中的图像 1,2 iMac Intel 27寸 EMC 2546显示屏替换: 步骤 9 中的图像 2,2
    • 把打开显示屏的工具推到显示器右边的底部。

    • 此时,您会希望在整个显示器周围使用该工具,以确保尽可能减少粘结。

  10. iMac Intel 27寸 EMC 2546显示屏替换: 步骤 10 中的图像 1,3 iMac Intel 27寸 EMC 2546显示屏替换: 步骤 10 中的图像 2,3 iMac Intel 27寸 EMC 2546显示屏替换: 步骤 10 中的图像 3,3
    • 当打开显示屏的工具做了大部分工作之后,显示器仍然会轻微地粘附在外壳上。用一张塑料卡就可以把这种胶粘剂移除。

    • 将iMac屏幕朝上放在桌面上。

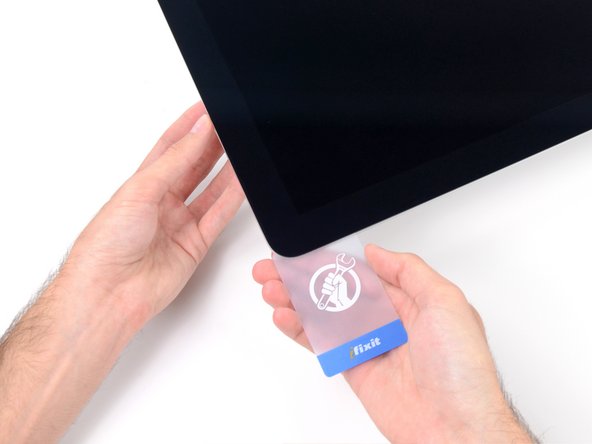
    • 从iMac的右上角开始,在显示屏和外壳之间插入一张塑料卡。

    • 注意不要插入超过3/8英寸(9.5毫米),否则可能损坏内部元件。

  11. iMac Intel 27寸 EMC 2546显示屏替换: 步骤 11 中的图像 1,2 iMac Intel 27寸 EMC 2546显示屏替换: 步骤 11 中的图像 2,2
    • 轻轻扭动塑料卡,打开显示屏和框架之间的空间,并剪掉靠近角落的任何剩余粘合剂。

    • 用力过大会使玻璃破裂。小心工作,不要试图制造一个大于约1/4英寸(6毫米)的间隙。

  12. iMac Intel 27寸 EMC 2546显示屏替换: 步骤 12 中的图像 1,3 iMac Intel 27寸 EMC 2546显示屏替换: 步骤 12 中的图像 2,3 iMac Intel 27寸 EMC 2546显示屏替换: 步骤 12 中的图像 3,3
    • 在碰到iSight摄像头前一定要停止切割,否则你可能会损坏它。

    • 将卡片向显示屏的中心滑动,以减少剩余的黏合剂。

  13. iMac Intel 27寸 EMC 2546显示屏替换: 步骤 13 中的图像 1,2 iMac Intel 27寸 EMC 2546显示屏替换: 步骤 13 中的图像 2,2
    • 把这张卡放在显示屏的边角处,让它留在那里,以防止粘结剂重新粘合。

  14. iMac Intel 27寸 EMC 2546显示屏替换: 步骤 14 中的图像 1,3 iMac Intel 27寸 EMC 2546显示屏替换: 步骤 14 中的图像 2,3 iMac Intel 27寸 EMC 2546显示屏替换: 步骤 14 中的图像 3,3
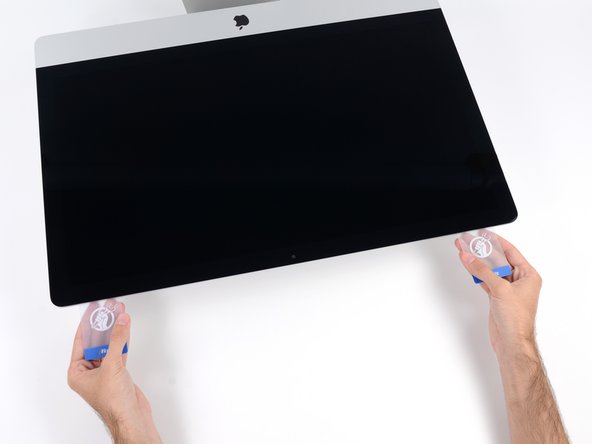
    • 将第二张卡插入显示屏另一个边角处和外壳之间的空隙。

  15. iMac Intel 27寸 EMC 2546显示屏替换: 步骤 15 中的图像 1,2 iMac Intel 27寸 EMC 2546显示屏替换: 步骤 15 中的图像 2,2
    • 轻轻抬起卡片,稍微增加显示屏与外壳之间的间隙。

    • 与另一边一样,慢慢地移动,让胶粘剂破裂,注意不要过度按压玻璃。

  16. iMac Intel 27寸 EMC 2546显示屏替换: 步骤 16 中的图像 1,3 iMac Intel 27寸 EMC 2546显示屏替换: 步骤 16 中的图像 2,3 iMac Intel 27寸 EMC 2546显示屏替换: 步骤 16 中的图像 3,3
    • 把塑料卡滑到中心,再一次停在iSight相机前。

  17. iMac Intel 27寸 EMC 2546显示屏替换: 步骤 17 中的图像 1,2 iMac Intel 27寸 EMC 2546显示屏替换: 步骤 17 中的图像 2,2
    • 将卡片插入显示屏的另一个边角处。

  18. iMac Intel 27寸 EMC 2546显示屏替换: 步骤 18 中的图像 1,3 iMac Intel 27寸 EMC 2546显示屏替换: 步骤 18 中的图像 2,3 iMac Intel 27寸 EMC 2546显示屏替换: 步骤 18 中的图像 3,3
    • 只把显示屏抬起几英寸——它仍然是通过数据和电力电缆连接到iMac上的。

    • 将卡片插入到边角附近,轻轻地扭转卡片,以增加显示屏与外壳之间的距离。

    • 如果有任何部分看起来粘在一起,并且不会分开,那就停止扭转卡片,用其中一张卡片在问题区域中切下胶粘剂。

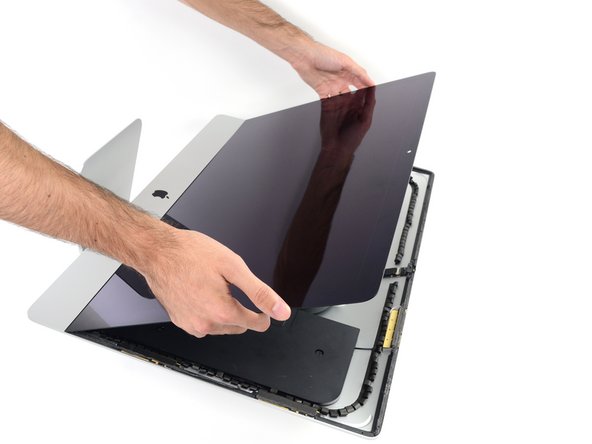
    • 开始从外壳中抬起显示屏的顶部。

  19. iMac Intel 27寸 EMC 2546显示屏替换: 步骤 19 中的图像 1,2 iMac Intel 27寸 EMC 2546显示屏替换: 步骤 19 中的图像 2,2
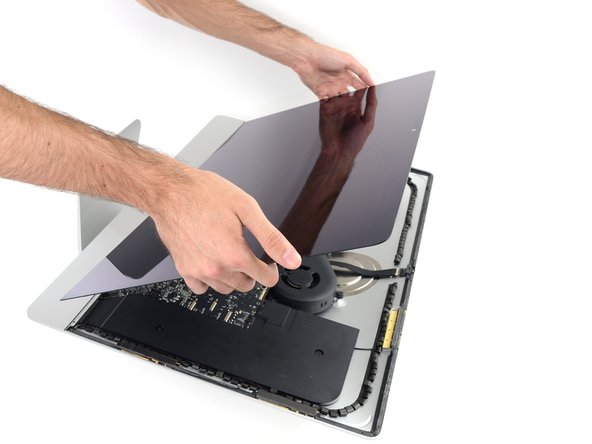
    • 用一只手握住显示器的同时,用另一只手拔下显示电源线

    • 把显示器提升到足够方便的高度,但不要太高,电缆还是连接在逻辑板上的(电缆约长8英寸)

  20. iMac Intel 27寸 EMC 2546显示屏替换: 步骤 20 中的图像 1,3 iMac Intel 27寸 EMC 2546显示屏替换: 步骤 20 中的图像 2,3 iMac Intel 27寸 EMC 2546显示屏替换: 步骤 20 中的图像 3,3
    • 打开覆盖在显示数据电缆上的金属盖片

    • 断开显示数据电缆

    • 这是一种很容易被打破的微妙关系。确保将显示数据电缆连接器直接从其插座中拉出,并拉向iMac的顶部

  21. iMac Intel 27寸 EMC 2546显示屏替换: 步骤 21 中的图像 1,2 iMac Intel 27寸 EMC 2546显示屏替换: 步骤 21 中的图像 2,2
    • 将显示器提升到接近垂直的位置

    • 此时,显示屏底部仍有一块胶粘剂,可以像铰链一样将显示器固定在外壳上。你可以通过几次开合来将这种粘合剂弄松

    • 通过抓住外部边缘多次开合尽可能多地去除粘合剂,然后将其拉到需要的位置

  22. iMac Intel 27寸 EMC 2546显示屏替换: 步骤 22 中的图像 1,3 iMac Intel 27寸 EMC 2546显示屏替换: 步骤 22 中的图像 2,3 iMac Intel 27寸 EMC 2546显示屏替换: 步骤 22 中的图像 3,3
    • 要非常小心,不要触摸电容器引线或电源背面的任何暴露的焊点(红色框内)。

    • 如果有必要,可以用塑料卡来切割底部胶条的任何剩余部分。

  23. iMac Intel 27寸 EMC 2546显示屏替换: 步骤 23 中的图像 1,3 iMac Intel 27寸 EMC 2546显示屏替换: 步骤 23 中的图像 2,3 iMac Intel 27寸 EMC 2546显示屏替换: 步骤 23 中的图像 3,3
    • 抬起显示屏时要非常小心--它又大又重,而且是玻璃做的。显示屏的边缘十分脆弱,请避免从边角来抬起显示屏。

    • 将显示屏从框架上抬起并取下。将显示屏正面朝下放在一个平坦柔软的表面上。

    • 可能有必要从一边慢慢地抬起起,并将剩余的胶粘剂剥离

    • 粘合剂被切断后,不能重复利用。当你维修完成后,请按照 这个指南 更换将显示器固定在后壳上的胶条。

  24. iMac Intel 27寸 EMC 2546显示屏替换: 步骤 24 中的图像 1,1
    • 如果您需要替换显示器面板,您可能需要将额外的组件从旧u面板转移到新面板上。比较新旧面板的背部。注意:所有的线缆,传感器和泡沫缓冲材料不随新面板提供。

    • 如果胶带下方有电线或电缆,务必先将胶带移除。

    • 如果电缆粘在底座上,先使用iOpener或吹风机来软化粘合剂。然后您便可以滑一个开口以松动下方的电缆。切勿直接拉动精密连接器。

    • 在此插入翻译

结论

要重新组装你的设备,请按照这些说明逆向操作,并使用我们的胶条指南来重新安装显示玻璃。

把你的电子垃圾送到R2或e-Stewards认证的回收商那里。

维修没有按计划进行?尝试一些基本的故障排除,或向我们的问答社区寻求帮助。

61等其他人完成本指南。

由衷感谢以下译者:

en zh

96%

这些译者帮助我们修补全世界! 您也想加入吗?
开始翻译 ›

团队

iFixit iFixit 的会员

Staff

135 名成员

创作了16,476篇指南

20条评论

…thanks, but i have a crack on the screen as i was lifting it up. after reconnecting, there where lines on the display. what should i do.?

zeerowbadman - 回复

Something you may want to include for anyone replacing their damaged screen with a new one:

The replacement screens from LG more often DO NOT come with the thermal sensor attached, which means if you replace the screen without transferring the thermal sensor from the old LCD module, the computer will go absolutely insane, rendering it unusable.

This means re-opening the iMac and destroying the brand new adhesive strips. Because I had no idea this sensor existed, much panic ensued before I was forced to rip everything apart again and ultimately securing it closed with packing tape while I waited for the new adhesive strips to arrive in the mail....Not to mention the computer belongs to a client who lives 3 hours outside of the city.

placebomessiah - 回复

Sorry, could you help me? What thermal sensor?! Could you explain?

cristiano -

See the thin twisted black wire on the back of the display in this photo? The one that ends in a small piece of black tape:

https://d3nevzfk7ii3be.cloudfront.net/ig...

that piece of tape covers the tiny thermal sensor at the end of that wire. It is not included as part of the new display, and must be transferred from the old display or your computer will turn into a nightmare.

placebomessiah - 回复

But this is for model emc2546 too? And how you can transfer thermal sensor? Thank You!!!!

cristiano -

添加评论

浏览统计数据:

过去 24 小时: 37

过去 7 天: 179

过去 30 天: 802

总计 155,842