跳转到主内容

Xbox One S All Digital Edition Power Supply Replacement

你所需要的

  1. Xbox One S All Digital Edition Power Supply Replacement, Plastic Enclosure: 步骤 1 中的图像 1,3 Xbox One S All Digital Edition Power Supply Replacement, Plastic Enclosure: 步骤 1 中的图像 2,3 Xbox One S All Digital Edition Power Supply Replacement, Plastic Enclosure: 步骤 1 中的图像 3,3
    • Position the iFixit Opening Tool's riveted edge in between the top and bottom cover of the plastic enclosure.

    • Apply downward pressure on the iFixit Opening Tool until the security clip unlocks.

    • Repeat on different points of the plastic enclosure until the bottom cover is removed.

  2. Xbox One S All Digital Edition Power Supply Replacement: 步骤 2 中的图像 1,2 Xbox One S All Digital Edition Power Supply Replacement: 步骤 2 中的图像 2,2
    • Remove the six 50 mm green screws (labeled F1-F6) from the metal chassis using a Torx 10 screwdriver.

    • These screws hold the top cover of the plastic enclosure to the chassis.

  3. Xbox One S All Digital Edition Power Supply Replacement: 步骤 3 中的图像 1,2 Xbox One S All Digital Edition Power Supply Replacement: 步骤 3 中的图像 2,2
    • Apply pressure to peel off the sides of the casing.

    • Separate the metal chassis from the top cover, lifting the back of the chassis up and away from the top cover.

    • The plastic back panel is meant to stay attached to the metal chassis.

  4. Xbox One S All Digital Edition Power Supply Replacement: 步骤 4 中的图像 1,1
    • Flip the metal enclosure so that the fan cover is on top.

  5. Xbox One S All Digital Edition Power Supply Replacement, Top Metal Shield: 步骤 5 中的图像 1,2 Xbox One S All Digital Edition Power Supply Replacement, Top Metal Shield: 步骤 5 中的图像 2,2
    • Remove the two 15mm screws from the front panel using the Torx T8 screwdriver.

  6. Xbox One S All Digital Edition Power Supply Replacement: 步骤 6 中的图像 1,3 Xbox One S All Digital Edition Power Supply Replacement: 步骤 6 中的图像 2,3 Xbox One S All Digital Edition Power Supply Replacement: 步骤 6 中的图像 3,3
    • Carefully slide the top metal case off the frame.

    • This may require shifting the case side to side as you slide up.

  7. Xbox One S All Digital Edition Power Supply Replacement, Wifi Card: 步骤 7 中的图像 1,2 Xbox One S All Digital Edition Power Supply Replacement, Wifi Card: 步骤 7 中的图像 2,2
    • Remove the three 15 mm screws with the Torx T8 Security Bit Screwdriver.

    • The top of the metal chassis has been removed in the picture, but is not necessary for the replacement.

  8. Xbox One S All Digital Edition Power Supply Replacement: 步骤 8 中的图像 1,1
    • Carefully remove the WiFi Card from the metal chassis.

  9. Xbox One S All Digital Edition Power Supply Replacement, IR Blaster: 步骤 9 中的图像 1,2 Xbox One S All Digital Edition Power Supply Replacement, IR Blaster: 步骤 9 中的图像 2,2
    • Remove the four 15mm screws attaching the IR Blaster to the metal chassis with the Torx T8 Security screwdriver.

  10. Xbox One S All Digital Edition Power Supply Replacement: 步骤 10 中的图像 1,2 Xbox One S All Digital Edition Power Supply Replacement: 步骤 10 中的图像 2,2
    • Carefully remove the IR Blaster from the metal chassis.

    • The connector is very fragile. Make sure you pull the board away from the case and not sideways.

  11. Xbox One S All Digital Edition Power Supply Replacement, Bottom Metal Shield: 步骤 11 中的图像 1,2 Xbox One S All Digital Edition Power Supply Replacement, Bottom Metal Shield: 步骤 11 中的图像 2,2
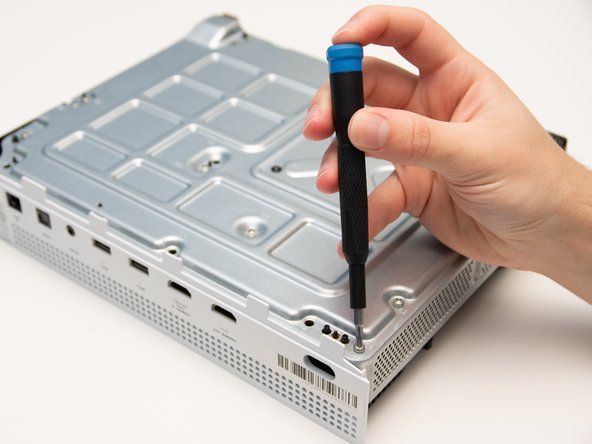
    • Remove the eight 10mm screws from the bottom of the metal casing using the Torx T9 screwdriver.

    • Remove the four 15mm screws from the bottom of the heatsink fastener using the Torx T8 screwdriver.

  12. Xbox One S All Digital Edition Power Supply Replacement: 步骤 12 中的图像 1,3 Xbox One S All Digital Edition Power Supply Replacement: 步骤 12 中的图像 2,3 Xbox One S All Digital Edition Power Supply Replacement: 步骤 12 中的图像 3,3
    • Remove the two plastic pieces from the motherboard.

  13. Xbox One S All Digital Edition Power Supply Replacement: 步骤 13 中的图像 1,3 Xbox One S All Digital Edition Power Supply Replacement: 步骤 13 中的图像 2,3 Xbox One S All Digital Edition Power Supply Replacement: 步骤 13 中的图像 3,3
    • Lift the motherboard up from the metal chassis.

    • The motherboard should easily separate from the metal chassis.

  14. Xbox One S All Digital Edition Power Supply Replacement, Power Supply: 步骤 14 中的图像 1,3 Xbox One S All Digital Edition Power Supply Replacement, Power Supply: 步骤 14 中的图像 2,3 Xbox One S All Digital Edition Power Supply Replacement, Power Supply: 步骤 14 中的图像 3,3
    • Gently lift the hard drive to free up some space around the power supply.

  15. Xbox One S All Digital Edition Power Supply Replacement: 步骤 15 中的图像 1,2 Xbox One S All Digital Edition Power Supply Replacement: 步骤 15 中的图像 2,2
    • Lift the power supply up and away from the motherboard.

  16. Xbox One S All Digital Edition Power Supply Replacement: 步骤 16 中的图像 1,2 Xbox One S All Digital Edition Power Supply Replacement: 步骤 16 中的图像 2,2
    • Disconnect the six pin connector from the motherboard.

结论

To reassemble your device, follow these instructions in reverse order.

4等其他人完成本指南。

Jules Hajjar

于10/10/19注册

1,531 声望

创作了8篇指南

团队

Cal Poly, Team S12-G6, Regan Fall 2019 Cal Poly, Team S12-G6, Regan Fall 2019 的会员

CPSU-REGAN-F19S12G6

4 名成员

创作了25篇指南

3条评论

I replaced the power supply and my Xbox still isn't turning on. I used a power supply I got from this website. Please help

William Oliver - 回复

Another issue could be the power button on the front power board. If possible, you could try to replace that as well.

Jules Hajjar -

replace the PSU and still boots up and shuts off

imafuxer - 回复

添加评论

浏览统计数据:

过去 24 小时: 4

过去 7 天: 30

过去 30 天: 131

总计 6,738