跳转到主内容

Weinmann VENTImotion and VENTIlogic Display Board Replacement

医疗设备
ifixit 或本维修指南均未获得医疗设备制造商的认可或与任何制造商存在附属关系。

你所需要的

  1. Weinmann VENTImotion and VENTIlogic Display Board Replacement, Display Board: 步骤 1 中的图像 1,2 Weinmann VENTImotion and VENTIlogic Display Board Replacement, Display Board: 步骤 1 中的图像 2,2
    • Open the device by following these steps:

    • Place the device on a non-slip surface with the top facing downwards

    • Remove the filter cassette from the top part of the housing.

    • Undo and remove the 6 screws (34).

    • Open the bottom of the housing (35) away to the side.

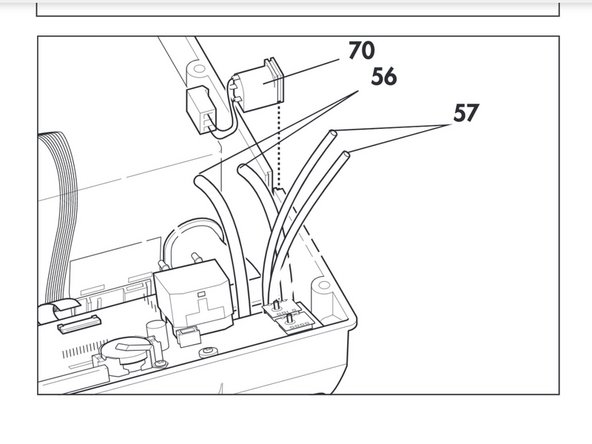
    • Undo the connecting cables for the humidifier (42) and the alarm (43).

    • Make sure the power supply plug is disconnected.

  2. Weinmann VENTImotion and VENTIlogic Display Board Replacement: 步骤 3 中的图像 1,1
    • Disconnect the following:

    • encoder connector (82).

    • connectors of interfaces (84) and (85) off the control board.

  3. Weinmann VENTImotion and VENTIlogic Display Board Replacement: 步骤 4 中的图像 1,1
    • Disconnect the ribbon cable of the display and the fascia film.

    • Pull the latch out until you feel resistance. You can then pull out the ribbon cable.

    • If the latch has not been opened correctly, the ribbon cable may be damaged when it is pulled out.

  4. Weinmann VENTImotion and VENTIlogic Display Board Replacement: 步骤 5 中的图像 1,1
    • Pull flow measurement hoses (56) off the flow sensor.

    • Pull pressure measurement hoses (57) off the pressure sensors.

  5. Weinmann VENTImotion and VENTIlogic Display Board Replacement: 步骤 6 中的图像 1,1
    • Undo the four screws (51) and remove control board (50).

  6. Weinmann VENTImotion and VENTIlogic Display Board Replacement: 步骤 7 中的图像 1,1
    • Remove spring (54) from the control board and remove battery (52) (see "7.9 Replace battery on control board" on page 42).

    • Remove display

  7. Weinmann VENTImotion and VENTIlogic Display Board Replacement: 步骤 9 中的图像 1,1
    • Insert a new display (49).

    • The display may not tilt and must be straight in the guides.

结论

To reassemble your device, follow these instructions in reverse order.

Cameron Young

于04/22/19注册

174 声望

撰写一个指南

团队

Cal Poly, Team S7-G19, Paton Spring 2020 Cal Poly, Team S7-G19, Paton Spring 2020 的会员

CPSU-PATON-S20S7G19

3 名成员

创作了4篇指南

0条评论

添加评论

浏览统计数据:

过去 24 小时: 0

过去 7 天: 0

过去 30 天: 1

总计 88