跳转到主内容

Samsung Galaxy Tab S3 Motherboard Replacement

你所需要的

  1. Samsung Galaxy Tab S3 Motherboard Replacement, Display: 步骤 1 中的图像 1,1
    • To soften the adhesive holding the tablet together, heat up the edges of the glass panel using a heated iOpener on the edge of the device. Alternatively you can use a heat gun to loosen the adhesive.

    • Leave the iOpener on edge for two minutes.

    • Be careful not to burn yourself while handling the hot iOpener. For more information on the iOpener, use the iOpener Instructions Guide.

  2. Samsung Galaxy Tab S3 Motherboard Replacement: 步骤 2 中的图像 1,1
    • Place a suction cup near edge that you heated up with the iOpener.

    • Press down on the suction cup to create a seal, and pull up with force to create a separation between the display and the midframe.

    • Use an opening tool to split apart the glass panel from the midframe.

    • Be careful to not break the glass when prying from the frame.

  3. Samsung Galaxy Tab S3 Motherboard Replacement: 步骤 3 中的图像 1,1
    在这个步骤中使用的工具:
    Plastic Cards
    $2.99
    购买
    • As you continue along the edge using the opening tool, use a plastic card to keep the glass separate from the midframe.

    • You can also use multiple opening picks instead of a plastic card.

  4. Samsung Galaxy Tab S3 Motherboard Replacement: 步骤 4 中的图像 1,3 Samsung Galaxy Tab S3 Motherboard Replacement: 步骤 4 中的图像 2,3 Samsung Galaxy Tab S3 Motherboard Replacement: 步骤 4 中的图像 3,3
    • Pull off the glass panel using the suction cup.

    • As you remove the glass panel, be careful not to tear the ribbon connecting the motherboard to the display.

    • Carefully disconnect the ribbon cable connecting the display assembly to the motherboard. You can disconnect this ribbon from either end.

  5. Samsung Galaxy Tab S3 Motherboard Replacement, Rear glass panel: 步骤 5 中的图像 1,2 Samsung Galaxy Tab S3 Motherboard Replacement, Rear glass panel: 步骤 5 中的图像 2,2
    • Repeat steps 3 through 7 to remove the rear glass panel on the opposite side of the device.

  6. Samsung Galaxy Tab S3 Motherboard Replacement, Battery: 步骤 6 中的图像 1,2 Samsung Galaxy Tab S3 Motherboard Replacement, Battery: 步骤 6 中的图像 2,2
    • Use a Phillips #000 screwdriver to unscrew the five screws securing the battery, and the twenty-two screws surrounding the midframe.

  7. Samsung Galaxy Tab S3 Motherboard Replacement: 步骤 7 中的图像 1,1
    • The midframe should snap off from the device’s motherboard.

  8. Samsung Galaxy Tab S3 Motherboard Replacement: 步骤 8 中的图像 1,3 Samsung Galaxy Tab S3 Motherboard Replacement: 步骤 8 中的图像 2,3 Samsung Galaxy Tab S3 Motherboard Replacement: 步骤 8 中的图像 3,3
    • Locate the ribbon running from the midframe and disconnect it from the motherboard with the flat end of a spudger.

  9. Samsung Galaxy Tab S3 Motherboard Replacement: 步骤 9 中的图像 1,2 Samsung Galaxy Tab S3 Motherboard Replacement: 步骤 9 中的图像 2,2
    • Use the flat end of the spudger to pop off the connector between the battery and the motherboard.

  10. Samsung Galaxy Tab S3 Motherboard Replacement: 步骤 10 中的图像 1,2 Samsung Galaxy Tab S3 Motherboard Replacement: 步骤 10 中的图像 2,2
    • Flip the midframe over and pop the battery out, making sure to slide it out from underneath the ribbon cables.

  11. Samsung Galaxy Tab S3 Motherboard Replacement: 步骤 11 中的图像 1,1
    • The battery should now be removed and detached from the device.

  12. Samsung Galaxy Tab S3 Motherboard Replacement, Motherboard: 步骤 12 中的图像 1,3 Samsung Galaxy Tab S3 Motherboard Replacement, Motherboard: 步骤 12 中的图像 2,3 Samsung Galaxy Tab S3 Motherboard Replacement, Motherboard: 步骤 12 中的图像 3,3
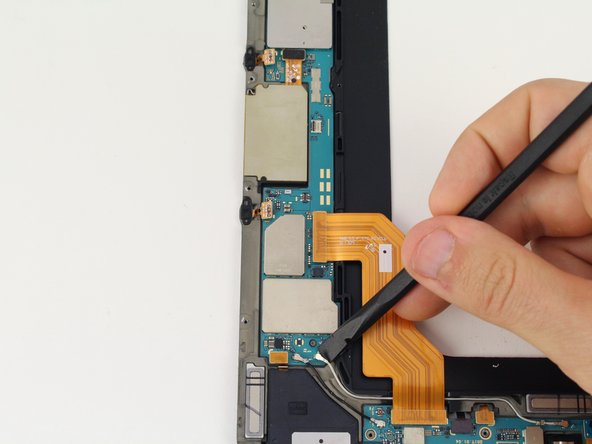
    • Use the black nylon spudger to lift the gray ZIF connector up and pull out the orange ribbon cable below the camera.

  13. Samsung Galaxy Tab S3 Motherboard Replacement: 步骤 13 中的图像 1,3 Samsung Galaxy Tab S3 Motherboard Replacement: 步骤 13 中的图像 2,3 Samsung Galaxy Tab S3 Motherboard Replacement: 步骤 13 中的图像 3,3
    • Remove the ribbon cable for the front facing camera after popping the red ZIF connector bar up with a spudger.

  14. Samsung Galaxy Tab S3 Motherboard Replacement: 步骤 14 中的图像 1,3 Samsung Galaxy Tab S3 Motherboard Replacement: 步骤 14 中的图像 2,3 Samsung Galaxy Tab S3 Motherboard Replacement: 步骤 14 中的图像 3,3
    • Disconnect the three press fit connectors in the top section of the midframe by prying upwards with the spudger.

  15. Samsung Galaxy Tab S3 Motherboard Replacement: 步骤 15 中的图像 1,3 Samsung Galaxy Tab S3 Motherboard Replacement: 步骤 15 中的图像 2,3 Samsung Galaxy Tab S3 Motherboard Replacement: 步骤 15 中的图像 3,3
    • Pull back the green tape on the upper section of the motherboard with your tweezers to reveal the ZIF connector below.

  16. Samsung Galaxy Tab S3 Motherboard Replacement: 步骤 16 中的图像 1,3 Samsung Galaxy Tab S3 Motherboard Replacement: 步骤 16 中的图像 2,3 Samsung Galaxy Tab S3 Motherboard Replacement: 步骤 16 中的图像 3,3
    • Push the red bar up from the ZIF connector with the spudger and pull the orange, touchpad ribbon cable out.

  17. Samsung Galaxy Tab S3 Motherboard Replacement: 步骤 17 中的图像 1,3 Samsung Galaxy Tab S3 Motherboard Replacement: 步骤 17 中的图像 2,3 Samsung Galaxy Tab S3 Motherboard Replacement: 步骤 17 中的图像 3,3
    • Use the spudger to disconnect five more press fit connectors on the left side of the motherboard by prying upwards.

  18. Samsung Galaxy Tab S3 Motherboard Replacement: 步骤 18 中的图像 1,3 Samsung Galaxy Tab S3 Motherboard Replacement: 步骤 18 中的图像 2,3 Samsung Galaxy Tab S3 Motherboard Replacement: 步骤 18 中的图像 3,3
    • Pop the coaxial antenna cables off from the motherboard with the spudger.

  19. Samsung Galaxy Tab S3 Motherboard Replacement: 步骤 19 中的图像 1,1
    • Using your fingers, move all the cables aside and wiggle the motherboard free.

结论

To reassemble your device, follow these instructions in reverse order.

3等其他人完成本指南。

Sarah Westberg

于03/11/19注册

23,043 声望

创作了70篇指南

团队

iFixit iFixit 的会员

Staff

135 名成员

创作了16,734篇指南

0条评论

添加评论

浏览统计数据:

过去 24 小时: 0

过去 7 天: 6

过去 30 天: 33

总计 3,574