跳转到主内容

Samsung Galaxy S9 Plus NFC Antenna and Charging Coil Replacement

你所需要的

  1. Samsung Galaxy S9 Plus NFC Antenna and Charging Coil Replacement, Rear Glass Removal: 步骤 1 中的图像 1,1
    • Switch off your phone.

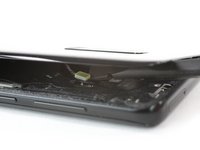
    • Use an iOpener to loosen the adhesive beneath the rear glass. Apply the iOpener for at least two minutes. You might want to repeat this step several times during the back cover removal.

    • The adhesive of the Samsung Galaxy S9 Plus is very strong. A hair dryer, heat gun, or hot plate may also be used if you aren't able to open the device with the iOpener. Be careful not to overheat the phone—the AMOLED display and internal battery are both susceptible to heat damage.

  2. Samsung Galaxy S9 Plus NFC Antenna and Charging Coil Replacement: 步骤 2 中的图像 1,1
    • In the following steps, you'll be cutting through the adhesive securing the back cover.

    • The adhesive in the inside of the back cover is laid out as seen in the image.

    • You'll be slicing through the adhesive in the areas shown:

    • Thick portions of adhesive

    • Thin areas of adhesive

    • Avoid prying or slicing in this area, to protect the fingerprint sensor flex cable.

  3. Samsung Galaxy S9 Plus NFC Antenna and Charging Coil Replacement: 步骤 3 中的图像 1,2 Samsung Galaxy S9 Plus NFC Antenna and Charging Coil Replacement: 步骤 3 中的图像 2,2
    • If the phone's rear glass is cracked, the suction cup may not stick. Try lifting it with strong tape, or superglue the suction cup in place and allow it to cure so you can proceed.

    • Press a suction cup onto the back cover.

    • Lift the back cover's bottom edge with your suction cup, opening a slight gap between the back cover and the frame.

    • This may require a significant amount of force, but you only need to open a very slight gap with the suction cup to insert your tool. If you have trouble, apply more heat to further soften the adhesive, and try again. The adhesive cools very fast, so you may need to heat it repeatedly.

    • Insert an opening pick in the gap and slide it to the bottom right corner.

  4. Samsung Galaxy S9 Plus NFC Antenna and Charging Coil Replacement: 步骤 4 中的图像 1,2 Samsung Galaxy S9 Plus NFC Antenna and Charging Coil Replacement: 步骤 4 中的图像 2,2
    • Insert a second opening pick and slide it to the bottom left corner.

    • Insert a third opening pick at the bottom end of the phone. This opening pick stays there during the rear glass removal procedure to prevent the adhesive from resealing.

  5. Samsung Galaxy S9 Plus NFC Antenna and Charging Coil Replacement: 步骤 5 中的图像 1,2 Samsung Galaxy S9 Plus NFC Antenna and Charging Coil Replacement: 步骤 5 中的图像 2,2
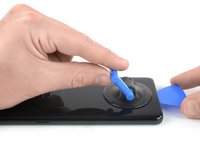
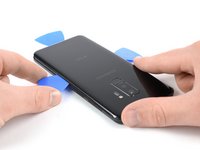
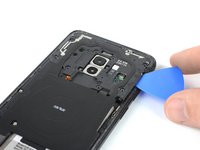
    • Start to slide the tip of the opening pick from the bottom left corner along the side of the S9 Plus.

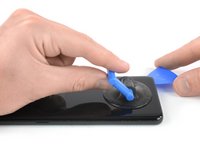
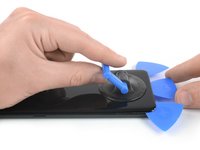
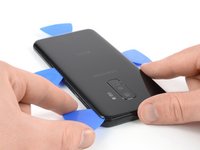
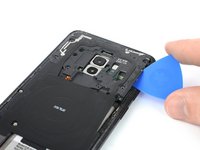
    • Leave the opening pick in its place after you cut the adhesive half way up the left side of the phone.

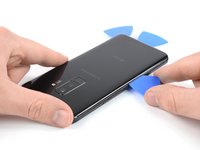
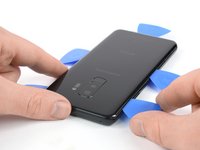
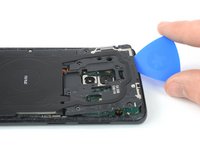
    • Slide the opening pick from the bottom right corner half way up the frame and leave it there.

  6. Samsung Galaxy S9 Plus NFC Antenna and Charging Coil Replacement: 步骤 6 中的图像 1,2 Samsung Galaxy S9 Plus NFC Antenna and Charging Coil Replacement: 步骤 6 中的图像 2,2
    • Insert a fourth opening pick at the right side of the frame and slide it to the top right corner.

    • Slide a fifth opening pick along the left side of the phone to the top left corner.

    • Use the opening pick to cut the remaining adhesive under the upper part of the rear glass.

    • Don't open the phone all the way yet. The flex cable for the fingerprint reader is still connected to the motherboard.

  7. Samsung Galaxy S9 Plus NFC Antenna and Charging Coil Replacement: 步骤 7 中的图像 1,2 Samsung Galaxy S9 Plus NFC Antenna and Charging Coil Replacement: 步骤 7 中的图像 2,2
    • Carefully lift the side of the rear glass where the volume button is located.

    • Use the edge of a spudger to pry up and disconnect the fingerprint sensor flex cable.

  8. Samsung Galaxy S9 Plus NFC Antenna and Charging Coil Replacement: 步骤 8 中的图像 1,1
    • Remove the rear glass.

    • When reassembling follow this guide to replace the adhesive and reinstall the rear glass.

    • In case you want to replace your rear glass follow this guide to transfer the rear camera bezel including the fingerprint.

  9. Samsung Galaxy S9 Plus NFC Antenna and Charging Coil Replacement, NFC Antenna and Charging Coil: 步骤 9 中的图像 1,1
    • Remove the nine 4 mm Phillips #00 screws.

  10. Samsung Galaxy S9 Plus NFC Antenna and Charging Coil Replacement: 步骤 10 中的图像 1,3 Samsung Galaxy S9 Plus NFC Antenna and Charging Coil Replacement: 步骤 10 中的图像 2,3 Samsung Galaxy S9 Plus NFC Antenna and Charging Coil Replacement: 步骤 10 中的图像 3,3
    • Insert an opening pick under the right side of the plastic cover containing the NFC antenna and charging coil.

    • Flip the opening pick sideways to lift the cover out of its plastic clips.

    • Work your way around the plastic cover, prying up to release the remaining clips.

  11. Samsung Galaxy S9 Plus NFC Antenna and Charging Coil Replacement: 步骤 11 中的图像 1,1
    • Remove the plastic cover containing the NFC antenna and the charging coil.

结论

If possible, turn on your phone and test your repair before installing new adhesive and resealing the phone.

To reassemble your device, follow these instructions in reverse order.

After you've completed the repair, follow this guide to test your repair.

5等其他人完成本指南。

Dominik Schnabelrauch

于11/23/16注册

201,129 声望

创作了682篇指南

团队

iFixit iFixit 的会员

Staff

136 名成员

创作了16,579篇指南

2条评论

Be very careful when removing ... I broke my GPS antenna at the upper left at the index finger in the prior photo. Can't find a replacement anywhere.

Chris Schinell - 回复

How do you actually remove and replace the NFC charger..??

Farmer Detroit - 回复

添加评论

浏览统计数据:

过去 24 小时: 3

过去 7 天: 24

过去 30 天: 101

总计 14,279