简介
Use this guide to remove the fingerprint sensor and the camera lens cover in the Samsung Galaxy S9+.
Opening the Samsung Galaxy S9+ will damage the waterproof sealing on the device. If you do not replace the adhesive seals, your phone will function normally, but will loose its water-protection.
You’ll need replacement adhesive to reattach components when reassembling the device.
你所需要的
-
-
Switch off your phone.
-
Use an iOpener to loosen the adhesive beneath the rear glass. Apply the iOpener for at least two minutes. You might want to repeat this step several times during the back cover removal.
-
-
-
In the following steps, you'll be cutting through the adhesive securing the back cover.
-
You'll be slicing through the adhesive in the areas shown:
-
Thick portions of adhesive
-
Thin areas of adhesive
-
Avoid prying or slicing in this area, to protect the fingerprint sensor flex cable.
The yellow portion labeled "Avoid prying in this area" is also pretty heavily glued. I had luck using heat to soften it, but I messed up my fingerprint sensor because the image above is mirrored - I sliced through the right side because the image says it's on the left. The fingerprint sensor cable is actually on the right (when viewing the back side of the phone) on the same side as the phone's volume control.
-
-
-
Press a suction cup onto the back cover.
-
Lift the back cover's bottom edge with your suction cup, opening a slight gap between the back cover and the frame.
-
Insert an opening pick in the gap and slide it to the bottom right corner.
This is the most challenging part. The suction cup can barely hold for the amount of force required...but here's a tip, especially for the first-timers like me. It's not obvious in this image, but the back, curved as it is as it attaches to the frame, is curved because the surface under the back is also curved. Therefore, using an angle for the pick that's a bit tilted up will help to get under the back, and get the cutting of the adhesive started.
Don't let that give you too much confidence, though. Sufficient heating of the back, to make the adhesive soft enough to yield to the several picks, is essential. Go slow, if you go too fast, or don't have enough heat, you WILL break the glass...as I did. Replacements, fortunately, are easy to find and not too expensive.
-
-
-
-
Start to slide the tip of the opening pick from the bottom left corner along the side of the S9 Plus.
-
Leave the opening pick in its place after you cut the adhesive half way up the left side of the phone.
-
Slide the opening pick from the bottom right corner half way up the frame and leave it there.
-
-
-
Carefully lift the side of the rear glass where the volume button is located.
-
Use the edge of a spudger to pry up and disconnect the fingerprint sensor flex cable.
I also have a G965U model S9+, and its fingerprint read also remained in the back glass.
It's easier to pop the button up than it is to reattach it when reassembling the phone. Well, I sure hope it goes better for you than it did me. (:
-
-
-
Remove the rear glass.
Is it necessary to replace the rear glass adhesive? I have given up on water resistance, just want it to hold in one piece.
Hi Zachary,
in order to assure that the rear glass sticks to the rest of the phone assembly you have to replace the rear glass adhesive once you removed the rear glass. However you can use a narrow and strong double sided tape, tesa tape or our precut adhesive card. All of these will do their job however as you just mentioned you will lose the water protection of your phone. Before installing all of these it is very important to remove the old adhesive backings (for example with high isopropyl alcohol 90% or higher).
Sadly it's not possible to replace the rear glass without new adhesive.
-
-
-
Apply a heated iOpener to the rear camera lens cover. Apply the iOpener for at least two minutes.
-
-
-
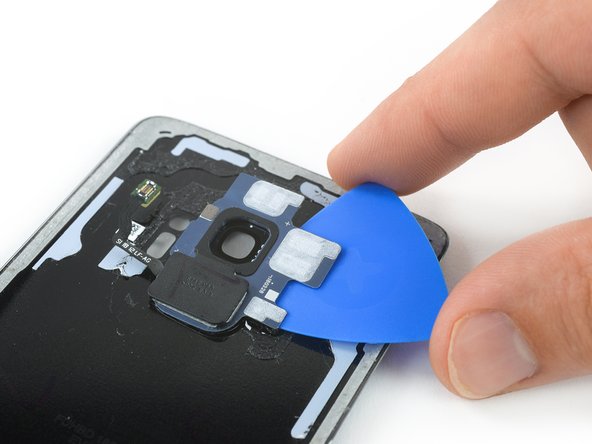
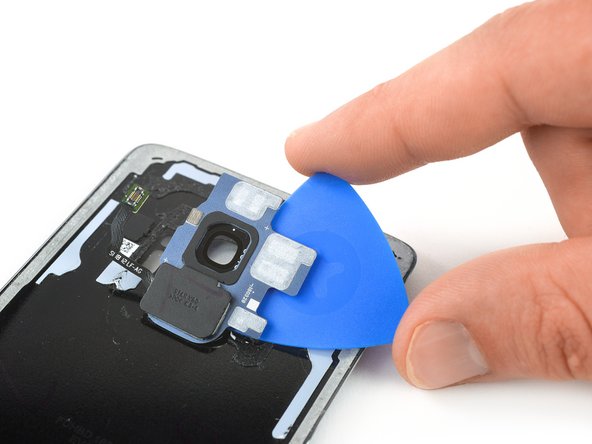
Use a pair of tweezers to remove the rear camera bezel including the fingerprint sensor.
-


Secure the new back cover with pre-cut adhesive or double-sided adhesive tape.
To reassemble your device, follow these instructions in reverse order.
After installing the rear cover, apply strong, steady pressure to your phone for several minutes to help the adhesive form a good bond, such as by placing it under a stack of heavy books.
After you've completed the repair, follow this guide to test your repair.
15等其他人完成本指南。


I don't know how much longer should I use for the min heat gun.
Hui Chen - 回复
Only heat it up so you can still handle the phone. That depends on your heat gun. Wearing (ESD-)gloves might give you some extra degrees.
Tobias Isakeit -
It is very very hard to remove the back glass due to the adesive… I don't know if it is possibile (at least for everyone) to remove it wothout broking the glass
Luigi - 回复
This is nearly impossible without breaking the glass or risking overheating. I would say apply heat repetitively for 6-8 minutes. The very most adhesive is across the bottom so push the pry stick way in. I generally start on the rear side.
Thomas Hayes - 回复
Whoah NO. It will damage the camera and other sensitive electronics.
D Harlo -
Heating the back is essential, challenging, frustrating and, for first-timers such as myself, seemingly impossble, but I will say don't give up...I'll have another comment later.
cbclistener - 回复
I tried with the iopener but I gave in after three attempts. I then used a hairdryer and a pizza oven infrared thermometer, heating in increments. 60C did the trick and I was able to get the first pick in. Further heating was necessary to ease the rest of the back off, all to 60C.
Chris Harrison - 回复