跳转到主内容

当前版本的文档还未经巡查,您可以查看最新的已查核版本

已存档的指南
本指南只作为历史记录保留。请使用指南的最新版本来进行维修。

你所需要的

  1. , 后壳: 步骤 1 中的图像 1,2 , 后壳: 步骤 1 中的图像 2,2
    • 使用撬棒或指甲来从后置摄像头靠近电源键位置撬起后壳。

  2. : 步骤 2 中的图像 1,3 : 步骤 2 中的图像 2,3 : 步骤 2 中的图像 3,3
    • 将后壳与手机上的卡扣分离,移除手机后壳。

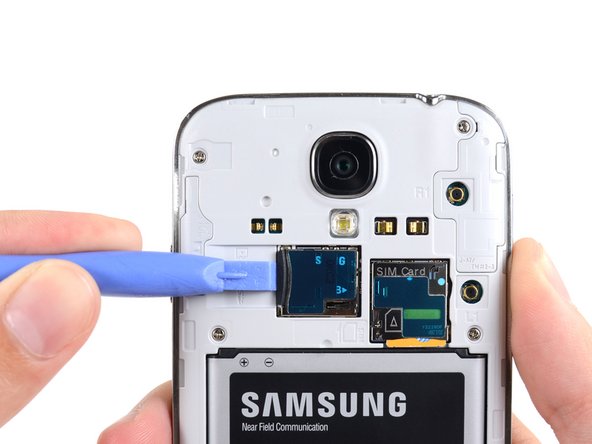
  3. , MicroSD 卡: 步骤 3 中的图像 1,3 , MicroSD 卡: 步骤 3 中的图像 2,3 , MicroSD 卡: 步骤 3 中的图像 3,3
    • 使用撬棒扁平的一端或者您的指甲,来轻轻按动microSD卡压入进卡槽中,直到听到卡塔一声。

    • 在听到咔塔一声后松开卡,卡将会从卡槽中弹出。

    • 移除卡片。

    • 要重新装入卡,将其插入卡槽,直至卡入到位。

  4. , 电池: 步骤 4 中的图像 1,3 , 电池: 步骤 4 中的图像 2,3 , 电池: 步骤 4 中的图像 3,3
    • 使用塑料撬棒或者手指甲来从电池仓槽口处向上提起电池。

    • 将电池从您的手机中移出。

  5. , SIM卡: 步骤 5 中的图像 1,3 , SIM卡: 步骤 5 中的图像 2,3 , SIM卡: 步骤 5 中的图像 3,3
    • 使用塑料开启工具(或者你的手指)来把SIM卡向卡槽反向轻微挤压,直到你听到了声响。

    • 听到声响后,停止挤压SIM卡,它会自动弹出卡槽。

    • 移除SIM卡。

    • 在重新安装的过程中,将卡推入卡槽直到你听到声响。

  6. , 中框: 步骤 6 中的图像 1,1
    • 拆下九个用来固定中框和屏幕的4 mm 菲利普斯# 00螺钉。

  7. : 步骤 7 中的图像 1,2 : 步骤 7 中的图像 2,2
    • 中框是由几个塑料卡子后面的中框镀铬挡板固定在显示组件上的。接下来的步骤将指导你分离中框与屏幕组件的连接。

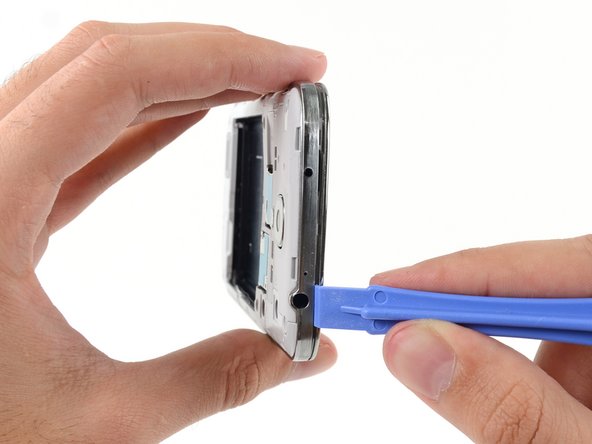
    • 从手机的音量按钮开始,在显示玻璃的铬边框和较大的镀铬边框之间插入塑料开口工具。寻找两者之间的缝隙。

    • 沿着切口滑动开孔工具,将塑料卡子分开。

    • 轻轻地撬开,只够将塑料卡子在中框挡板就可以打开。

  8. : 步骤 8 中的图像 1,2 : 步骤 8 中的图像 2,2
    • 继续撬开手机边缘。

    • 滑动你的开启工具沿着设备的底部中框和显示器之间的缝。

  9. : 步骤 9 中的图像 1,2 : 步骤 9 中的图像 2,2
    • 再次,撬到电源按钮的一边。

    • 沿缝滑动开启工具。

  10. : 步骤 10 中的图像 1,2 : 步骤 10 中的图像 2,2
    • 继续滑动开启工具在手机的顶部,最后市中框离开显示组件。

    • 检查一遍周围,确定所有边缘都已被撬棒打开。

  11. : 步骤 11 中的图像 1,3 : 步骤 11 中的图像 2,3 : 步骤 11 中的图像 3,3
    • 从剩余零件中去处中框。

  12. , 主板组件: 步骤 12 中的图像 1,3 , 主板组件: 步骤 12 中的图像 2,3 , 主板组件: 步骤 12 中的图像 3,3
    • 使用一个撬棒的平端断开USB板连接器。

    • 断开前面对面摄像机排线接头。

    • 断开耳机扬声器排线连接器。

  13. : 步骤 13 中的图像 1,3 : 步骤 13 中的图像 2,3 : 步骤 13 中的图像 3,3
    • 断开耳机插孔总成的排线接头。

    • 断开显示器/数字化器排线连接器。

    • 断开天线排线接头。

  14. : 步骤 14 中的图像 1,1
    • 从主板组装拆卸单2.4 mm菲利普斯# 00螺杆。

  15. : 步骤 15 中的图像 1,2 : 步骤 15 中的图像 2,2
    • 轻轻地拆下主板。

    • 保持主板的边缘以防止静电放电损坏。小心不要在任何电缆上把它从显示器装配中取出。

  16. 这个步骤还没有翻译 帮忙翻译一下

    : 步骤 16 中的图像 1,2 : 步骤 16 中的图像 2,2
    • Use an opening tool to unclip the speaker assembly on the bottom of the phone.

    • Remove the speaker assembly.

  17. 这个步骤还没有翻译 帮忙翻译一下

    : 步骤 17 中的图像 1,2 : 步骤 17 中的图像 2,2
    • Use tweezers to lift and de-route the antenna cable from the edge of the case.

  18. 这个步骤还没有翻译 帮忙翻译一下

    : 步骤 18 中的图像 1,2 : 步骤 18 中的图像 2,2
    • Lift directly up on the antenna connection to remove it from the speaker daughter board.

    • Completely remove the antenna cable.

  19. 这个步骤还没有翻译 帮忙翻译一下

    : 步骤 19 中的图像 1,1
    • Prepare an iOpener (or use a hair dryer or heat gun) and heat the screen side of the phone to loosen the display adhesive.

    • Leave the iOpener on the phone for at least two minutes to fully heat the screen and soften the adhesive holding it to the case.

    • You may need to reheat the iOpener and repeat this procedure several times until the display adhesive gets loose enough.

  20. 这个步骤还没有翻译 帮忙翻译一下

    : 步骤 20 中的图像 1,2 : 步骤 20 中的图像 2,2
    在这个步骤中使用的工具:
    Jimmy
    $7.95
    购买
    • Because the gap between the screen and phone frame is so thin, a Jimmy is needed to separate the two. Read the following warnings carefully before proceeding.

    • Even though the metal blade is mostly dull, be careful not to apply too much pressure, as this might cause the Jimmy to slip and cut you or damage the phone.

    • Wear eye protection. The glass may break, sending pieces flying.

  21. 这个步骤还没有翻译 帮忙翻译一下

    : 步骤 21 中的图像 1,3 : 步骤 21 中的图像 2,3 : 步骤 21 中的图像 3,3
    • With the adhesive lose, insert the blade into the small gap between the frame and the screen, near the volume rocker.

    • Slowly slide the blade down the length of the phone towards the charge port to release the screen glass from the LCD.

    • The glass will most likely develop hairline fractures as you bend it during this step. Make sure you have proper eye protection.

  22. 这个步骤还没有翻译 帮忙翻译一下

    : 步骤 22 中的图像 1,2 : 步骤 22 中的图像 2,2
    • The next three steps involve removing extremely fragile components. Consider working on a surface that will be easy to clean up afterwards.

    • With the screen glass completely loosened around the edges, remove it from the phone.

    • The fragile LCD display underneath the glass has a tendency to shatter into small pieces. If in doubt, protect your hands with gloves.

    • Cover the LCD with tape to prevent the broken glass from spreading or falling out during removal.

  23. 这个步骤还没有翻译 帮忙翻译一下

    : 步骤 23 中的图像 1,2 : 步骤 23 中的图像 2,2
    • Carefully peel the cracked LCD away from the frame.

    • If necessary, push the Jimmy between the LCD and the frame to loosen it from the adhesive.

    • Remove the LCD.

  24. 这个步骤还没有翻译 帮忙翻译一下

    : 步骤 24 中的图像 1,2 : 步骤 24 中的图像 2,2
    • Grab the foil liner underneath the LCD and peel it away from the case.

    • You may need to reheat and reapply the iOpener to help loosen the adhesive.

  25. 这个步骤还没有翻译 帮忙翻译一下

    : 步骤 25 中的图像 1,3 : 步骤 25 中的图像 2,3 : 步骤 25 中的图像 3,3
    • Use tweezers to remove all old adhesive from the phone case before installing the new display.

    • When you install the replacement display, feed the display cable through the hole on the rear of the case.

终点

Carsten Frauenheim

于03/10/20注册

113,874 声望

创作了338篇指南

团队

iFixit iFixit 的会员

Staff

135 名成员

创作了17,147篇指南

0条评论

添加评论

浏览统计数据:

过去 24 小时: 1

过去 7 天: 1

过去 30 天: 1

总计 40