跳转到主内容

Samsung Galaxy Note Antenna Replacement

已存档的指南
本指南只作为历史记录保留。请使用指南的最新版本来进行维修。

你所需要的

  1. Samsung Galaxy Note Antenna Replacement, Battery: 步骤 1 中的图像 1,3 Samsung Galaxy Note Antenna Replacement, Battery: 步骤 1 中的图像 2,3 Samsung Galaxy Note Antenna Replacement, Battery: 步骤 1 中的图像 3,3
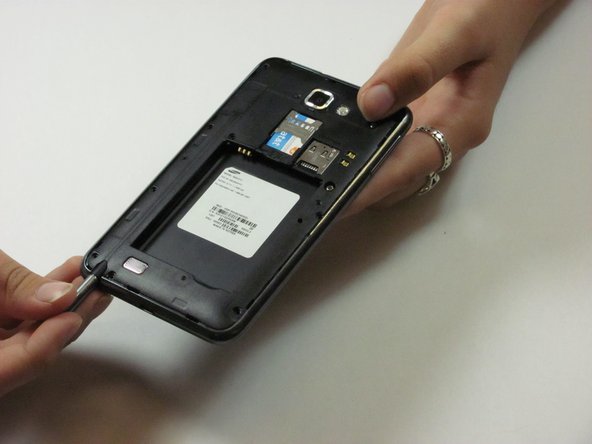
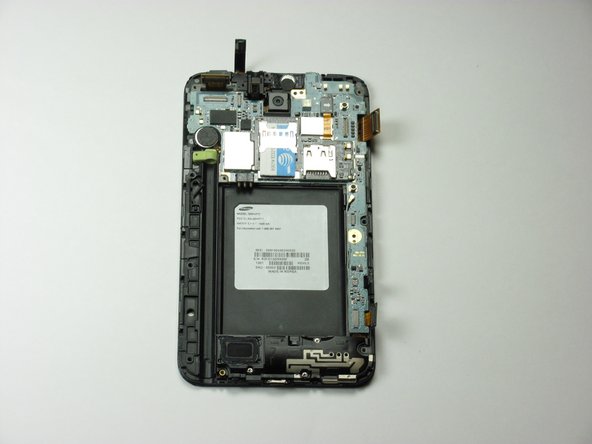
    • Make sure the screen is face-down and the camera is opposite you.

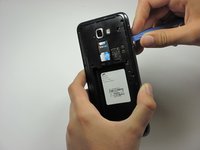
    • Insert the flat end of a spudger into the phone's top right rectangular slot.

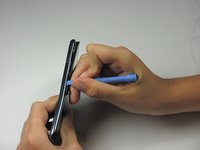
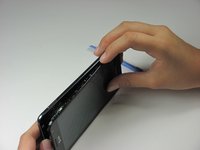
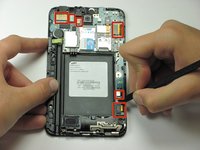
    • Use the spudger as a lever to pry open the back of the phone.

  2. Samsung Galaxy Note Antenna Replacement: 步骤 2 中的图像 1,1
    • With the spudger still inserted, carefully slide the spudger down the side of the phone.

    • Gently peel off the back cover with your hand.

  3. Samsung Galaxy Note Antenna Replacement: 步骤 3 中的图像 1,1
    • Place the spudger in the battery's bottom right slot.

    • Gently pry to remove the battery.

  4. Samsung Galaxy Note Antenna Replacement, Midframe: 步骤 4 中的图像 1,1
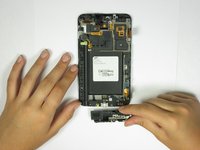
    • Remove the nine 3mm screws on the perimeter of the phone with a Phillips #00 screwdriver.

  5. Samsung Galaxy Note Antenna Replacement: 步骤 5 中的图像 1,1
    • Remove the stylus from the bottom of the phone.

  6. Samsung Galaxy Note Antenna Replacement: 步骤 6 中的图像 1,3 Samsung Galaxy Note Antenna Replacement: 步骤 6 中的图像 2,3 Samsung Galaxy Note Antenna Replacement: 步骤 6 中的图像 3,3
    • Pry all the way around the sides with a plastic pry tool and gently pop off the midframe.

    • If the cover does not come off easily, continue to pry along the phone's perimeter.

    • This step can take some patience. Prying too hard or forcing the screen off can crack or scratch the screen and break the thin plastic around the stylus case.

    • Separate the midframe from the phone. The midframe should now pull off easily.

  7. Samsung Galaxy Note Antenna Replacement, Antenna: 步骤 7 中的图像 1,1
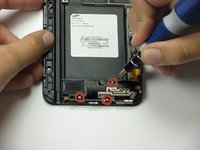
    • Remove the two 3mm screws surrounded by a gold border with a Phillips #00 screwdriver.

  8. Samsung Galaxy Note Antenna Replacement: 步骤 8 中的图像 1,2 Samsung Galaxy Note Antenna Replacement: 步骤 8 中的图像 2,2
    • Use the spudger to pry up all six flex ribbons that hold the motherboard in place. They should pop off easily.

  9. Samsung Galaxy Note Antenna Replacement: 步骤 9 中的图像 1,1
    • Use the spudger to pull off the white wire with the gold connector.

  10. Samsung Galaxy Note Antenna Replacement: 步骤 10 中的图像 1,1
    • Lift the motherboard (PCB) directly up with your hands.

    • If the screws are all removed, the motherboard should come off easily.

  11. Samsung Galaxy Note Antenna Replacement: 步骤 11 中的图像 1,2 Samsung Galaxy Note Antenna Replacement: 步骤 11 中的图像 2,2
    • Use a Phillips #00 screwdriver to remove the three 3mm screws on the black rectangular bracket located towards the bottom of the phone.

  12. Samsung Galaxy Note Antenna Replacement: 步骤 12 中的图像 1,1
    • Use the spudger's flat end to disconnect the other end of the antenna.

结论

To reassemble your device, follow these instructions in reverse order.

13等其他人完成本指南。

David Ritter

于04/14/13注册

758 声望

创作了6篇指南

团队

Cal Poly, Team 3-45, Amido Spring 2013 Cal Poly, Team 3-45, Amido Spring 2013 的会员

CPSU-AMIDO-S13S3G45

4 名成员

创作了7篇指南

0条评论

添加评论

浏览统计数据:

过去 24 小时: 0

过去 7 天: 0

过去 30 天: 0

总计 4,638