跳转到主内容

Ridgid R82005 Motor Replacement

你所需要的

  1. Ridgid R82005  Motor Replacement, Housing Assembly: 步骤 1 中的图像 1,1
    • Eject the battery from the drill.

    • Unscrew the seven M3x15.3mm screws, with the 2mm hex screwdriver bit, that secures the Housing Assembly.

  2. Ridgid R82005  Motor Replacement: 步骤 2 中的图像 1,1
    • Push the metallic Housing Connecting clip out with flat side of the plastic opening tool.

    • Eject battery before attempting this step.

  3. Ridgid R82005  Motor Replacement: 步骤 3 中的图像 1,2 Ridgid R82005  Motor Replacement: 步骤 3 中的图像 2,2
    • Remove the top half of the Housing Assembly.

  4. Ridgid R82005  Motor Replacement: 步骤 4 中的图像 1,2 Ridgid R82005  Motor Replacement: 步骤 4 中的图像 2,2
    • Grasp carefully the top and bottom of drill components.

    • LED light needs to be manually removed.

    • Lift and transfer, as a whole, the drill components from the old housing assembly to the new housing.

    • Make sure all drill components fit properly in the grooves of new Housing Assembly.

  5. Ridgid R82005  Motor Replacement, Motor: 步骤 5 中的图像 1,3 Ridgid R82005  Motor Replacement, Motor: 步骤 5 中的图像 2,3 Ridgid R82005  Motor Replacement, Motor: 步骤 5 中的图像 3,3
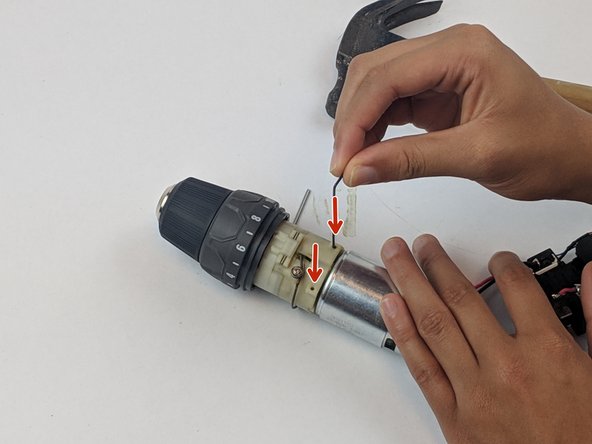
    • Push the two pins through the motor assembly.

    • We used an Alan wrench to push the pins through, but any small tool will do.

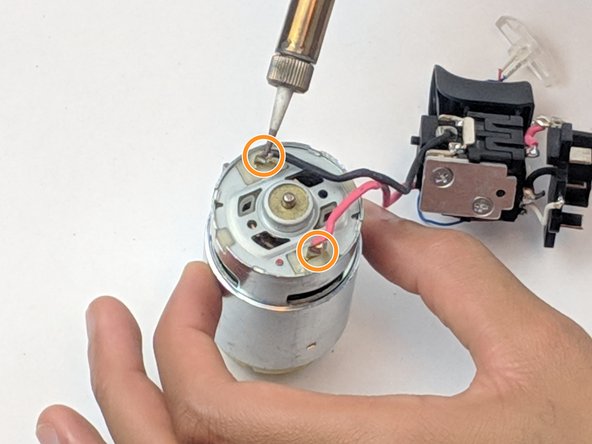
    • Unsolder the wires from the back of the motor to free the motor from the trigger assembly.

    • To learn how to solder, check out the How to Solder and Desolder Connections guide.

    • Make sure all drill components fit properly in the grooves of the Housing Assembly.

结论

To reassemble your device, follow these instructions in reverse order.

3等其他人完成本指南。

团队

USF Tampa, Team S1-G2, Leahy Spring 2019 USF Tampa, Team S1-G2, Leahy Spring 2019 的会员

USFT-LEAHY-S19S1G2

4 名成员

创作了10篇指南

0条评论

添加评论

浏览统计数据:

过去 24 小时: 1

过去 7 天: 3

过去 30 天: 20

总计 807