跳转到主内容

Replacement the WiFi card on Dell XPS 12 9Q23

你所需要的

  1. Replacement the WiFi card on Dell XPS 12 9Q23, Battery: 步骤 1 中的图像 1,1
    • Pop the center cover open on the bottom cover.

    • Remove the center screw with a #00 Phillips screwdriver.

    • Use a T5 Torx screwdriver for the remaining screws around the edge of the bottom cover.

  2. Replacement the WiFi card on Dell XPS 12 9Q23: 步骤 2 中的图像 1,1
    • Carefully remove back panel after all screws have been removed.

  3. Replacement the WiFi card on Dell XPS 12 9Q23: 步骤 3 中的图像 1,1
    • After the back panel has been removed, disconnect the battery to prevent electrical shock

  4. Replacement the WiFi card on Dell XPS 12 9Q23: 步骤 4 中的图像 1,1
    • Use a Phillips #00 screwdriver to remove the 8 screws that secure the battery.

  5. Replacement the WiFi card on Dell XPS 12 9Q23, Remove the battery: 步骤 5 中的图像 1,1
    • Once all the screws have been removed the battery is now safe to extract

  6. Replacement the WiFi card on Dell XPS 12 9Q23, Remove the WiFi card: 步骤 6 中的图像 1,3 Replacement the WiFi card on Dell XPS 12 9Q23, Remove the WiFi card: 步骤 6 中的图像 2,3 Replacement the WiFi card on Dell XPS 12 9Q23, Remove the WiFi card: 步骤 6 中的图像 3,3
    • We removed the battery to avoid electric shocks.

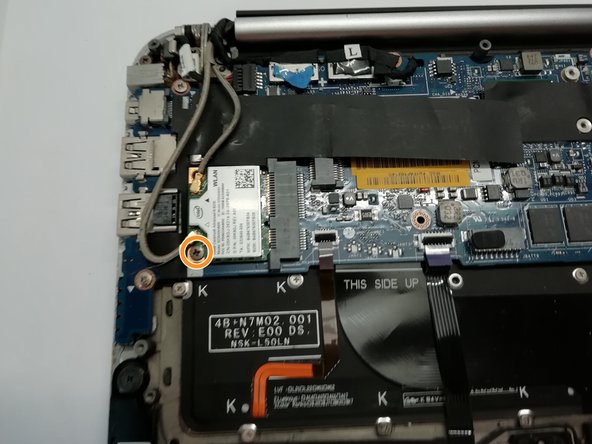
    • Disconnect the two wires from the WiFi card. You can do this with a pair of pliers or your fingernail.

    • Remove the screw with a #00 Phillips screwdriver.

    • Now remove your WiFi card to replace it.

结论

To reassemble your device, follow the instructions in reverse order.

另外一个人完成了本指南。

由衷感谢以下译者:

fr en

100%

Schwarzer正在帮助我们修复这个世界! 您也想加入吗?
开始翻译 ›

Schwarzer

于08/07/19注册

4,844 声望

创作了13篇指南

团队

i.Fixit FR Team i.Fixit FR Team 的会员

Community

3 名成员

创作了40篇指南

0条评论

添加评论

浏览统计数据:

过去 24 小时: 2

过去 7 天: 6

过去 30 天: 7

总计 475