跳转到主内容

Oontz Angle 3 ULTRA Motherboard Replacement

你所需要的

  1. Oontz Angle 3 ULTRA Motherboard Replacement, Back Panel: 步骤 1 中的图像 1,3 Oontz Angle 3 ULTRA Motherboard Replacement, Back Panel: 步骤 1 中的图像 2,3 Oontz Angle 3 ULTRA Motherboard Replacement, Back Panel: 步骤 1 中的图像 3,3
    • Remove the two black rubber sheaths around the edges of the speaker.

    • Under the symbol-marked sheath there is a white rubber covering for the buttons. Peel this away to reveal the panel underneath.

    • On two corners of its triangular face there is a small divot, which allows you to use your fingernails or a pair of tweezers to grip and peel away the covering.

  2. Oontz Angle 3 ULTRA Motherboard Replacement: 步骤 2 中的图像 1,3 Oontz Angle 3 ULTRA Motherboard Replacement: 步骤 2 中的图像 2,3 Oontz Angle 3 ULTRA Motherboard Replacement: 步骤 2 中的图像 3,3
    • Use a JIS #0 screwdriver to remove the six screws to expose the motherboard.

  3. Oontz Angle 3 ULTRA Motherboard Replacement: 步骤 3 中的图像 1,3 Oontz Angle 3 ULTRA Motherboard Replacement: 步骤 3 中的图像 2,3 Oontz Angle 3 ULTRA Motherboard Replacement: 步骤 3 中的图像 3,3
    • Using a pair of tweezers, pinch and pull the rubber fillings obstructing the screws.

  4. Oontz Angle 3 ULTRA Motherboard Replacement: 步骤 4 中的图像 1,3 Oontz Angle 3 ULTRA Motherboard Replacement: 步骤 4 中的图像 2,3 Oontz Angle 3 ULTRA Motherboard Replacement: 步骤 4 中的图像 3,3
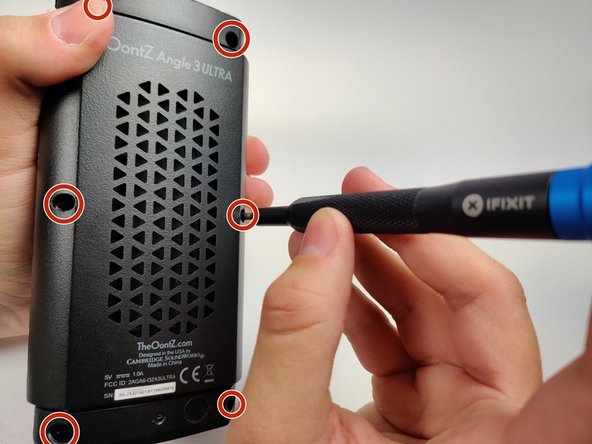
    • Using a JIS #0 screwdriver, remove the 6 screws holding the backplate in.

    • Remove the back panel off of the device.

  5. Oontz Angle 3 ULTRA Motherboard Replacement, Motherboard: 步骤 5 中的图像 1,1
    • Using the spudger, remove the motherboard from the device.

    • Be cautious not to break the USB and 3.5mm auxiliary ports which are poking through the side of the device.

    • The microphone wires that connect to the back of the motherboard are very thin and may pull out. Do not worry, the following step is removing those wires.

  6. Oontz Angle 3 ULTRA Motherboard Replacement: 步骤 6 中的图像 1,1
    • Using a soldering iron, remove microphone wires attached to the motherboard.

    • Melt the solder on the battery terminals on the motherboard and pull the wires through the backside of the board.

    • For more information on soldering, please visit the How to Solder and Desolder Connections guide.

  7. Oontz Angle 3 ULTRA Motherboard Replacement: 步骤 7 中的图像 1,2 Oontz Angle 3 ULTRA Motherboard Replacement: 步骤 7 中的图像 2,2
    • Using a spudger, disconnect the speaker bus female connector from the motherboard's male bus.

    • Remove the grounding wire from the back of the motherboard by gently pulling the metal connection directly away from the board.

  8. Oontz Angle 3 ULTRA Motherboard Replacement: 步骤 8 中的图像 1,1
    • With the new motherboard, re-solder all of the wiring into their appropriate soldering locations and wiring harnesses.

    • Reassemble the speaker in reverse order.

结论

To reassemble your device, follow these instructions in reverse order.

另外一个人完成了本指南。

3条评论

Greetings.

Where can I find boards for my Angle 3 Ultra ??

Chris JOSEPH - 回复

can we have the parts of mother board so we as a beginner in electricians need this

Von Gerald Briones - 回复

添加评论

浏览统计数据:

过去 24 小时: 1

过去 7 天: 2

过去 30 天: 8

总计 748