跳转到主内容

OneLink Safe and Sound Microphone Replacement

你所需要的

  1. OneLink Safe and Sound Microphone Replacement, Cover: 步骤 1 中的图像 1,2 OneLink Safe and Sound Microphone Replacement, Cover: 步骤 1 中的图像 2,2
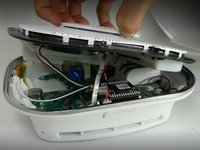
    • Run the metal spudger under the plastic rim and around the perimeter, on the top of the device to loosen the adhesive.

    • Remove plastic rim.

  2. OneLink Safe and Sound Microphone Replacement: 步骤 2 中的图像 1,2 OneLink Safe and Sound Microphone Replacement: 步骤 2 中的图像 2,2
    • Use a Phillips #0 screwdriver to remove nine screws from the top of the device.

  3. OneLink Safe and Sound Microphone Replacement: 步骤 3 中的图像 1,2 OneLink Safe and Sound Microphone Replacement: 步骤 3 中的图像 2,2
    • Don't yank or pull the lid off as there are ribbons and cables connecting the top of the device to the motherboard. They need to be disconnected before the top is removed.

    • Use tweezers or a spudger to disconnect the ribbon from the motherboard.

  4. OneLink Safe and Sound Microphone Replacement: 步骤 4 中的图像 1,1
    • Use tweezers to unplug the speaker cable from the motherboard.

  5. OneLink Safe and Sound Microphone Replacement: 步骤 5 中的图像 1,2 OneLink Safe and Sound Microphone Replacement: 步骤 5 中的图像 2,2
    • Use the plastic opening tool to remove the microphone connection from the motherboard.

    • Remove the top of the device.

  6. OneLink Safe and Sound Microphone Replacement, Microphone: 步骤 6 中的图像 1,2 OneLink Safe and Sound Microphone Replacement, Microphone: 步骤 6 中的图像 2,2
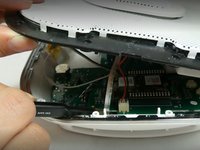
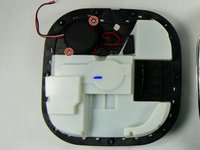
    • Use a Phillips #0 screwdriver to remove the two screws that secure the microphone to the device.

  7. OneLink Safe and Sound Microphone Replacement: 步骤 7 中的图像 1,1
    • Use your hands to remove the microphone.

结论

To reassemble your device, follow these instructions in reverse order.

Arianna Roberts

于11/10/22注册

639 声望

创作了6篇指南

团队

UMass Dartmouth, Team 2-2, Petersen Fall 2022 UMass Dartmouth, Team 2-2, Petersen Fall 2022 的会员

UMASSD-PETERSEN-F22S2G2

3 名成员

创作了6篇指南

0条评论

添加评论

浏览统计数据:

过去 24 小时: 0

过去 7 天: 0

过去 30 天: 5

总计 68